まとめ
ブログのお引越しをした。
(old) https://uzimihsr.github.io/ → (new) https://blog.uzimihsr.com/
- GitHub Pagesでホスティングしていたこのブログのサイズが1GBを超えて更新できなくなってしまった
- Firebase Hostingにブログを移行した
- GitHub Actions上でのHugoビルドとFirebase Hostingへの自動デプロイを設定した
- Cloudflare Registrarで取得したドメインをFirebase Hostingで使えるようにした
- 移行元のGitHub Pagesから移行先のFirebase HostingにJavaScriptでリダイレクトさせた
経緯
薄々気づいてはいたが、Hugo+GitHub Pagesで作ってるこのブログ(https://uzimihsr.github.io/)の合計サイズがかなり大きくなっていて、
GitHub Pagesのビルドにめっちゃ時間がかかったり、たまにコケたりするようになった。
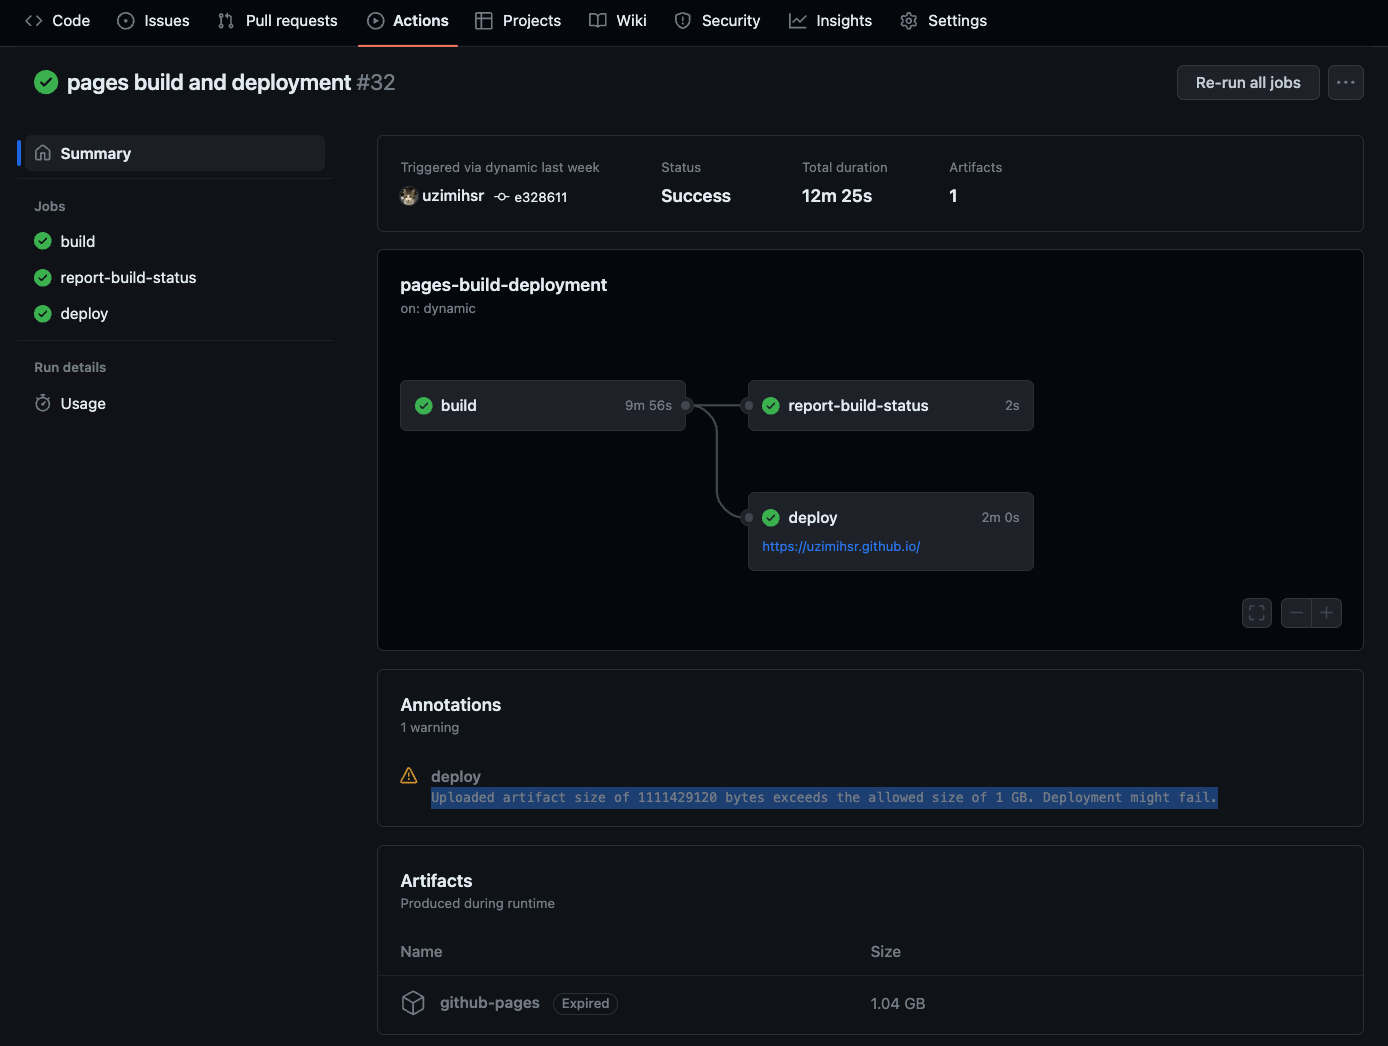
Uploaded artifact size of 1111429120 bytes exceeds the allowed size of 1 GB. Deployment might fail.
GitHub Pagesの利用上の制限のページにもGitHub Pagesサイトのサイズは1GBが上限とちゃんと書いてある。
(読んでなかったか、読んだことを忘れていた。ごめんなさい…)
かといってこれまで書き殴ってきた記事を消したりするのもあまり嬉しくないので、
おとなしく別の場所にお引越しする。
やること
Webサイトのお引越し、あまりやったことがないのでほぼ手探りだが以下のような作業を想定している。
- 移行先の選定
- どこにお引越しするか決める
- 移行先にページを作成
- 実際にお引越し先にページを置いてみる
- (やる気があれば)移行先でのCI/CD設定
- お引越し先でも自動でページがデプロイされるようにする
- (やる気があれば)移行先のドメイン設定
- 自分の好きなドメイン名でアクセスできるようにする
- 移行元(GitHub Pages)から移行先へのリダイレクト設定
- 元のページを辿ってきた人が迷わないようにする
移行先の選定
まずは移行先を決める。
令和の時代、Webサイトのホスティングサービスは星の数ほど存在する。
“Webホスティングサービス 比較"とかで検索すれば候補がいくらでも出てくるが、
自分の要件とコストに合ったものを選ぶべき…
なのだが、今回は脳死でGoogle Cloudに乗っかることにする。
理由は単純で、
- 規模がデカくて当分サ終しなさそうだから
- 個人的な事情(ひみつ)によりGoogle Cloudのクレジットが溜まっているから
という感じ。
こんなテキトーでいいのかな?いいよ(個人の趣味だし)
ただ、Google Cloudでのホスティング方法にも色々ある。
一応クラウドをお仕事にしてきたエンジニアなので、
練習としてCompute EngineやCloud Runでサーバ(コンテナ)を立ててデプロイや運用を頑張るべきなのでは…とも思ったが、
静的サイトなのにそんなことするの無駄に感じちゃったのと、
何より運用を頑張りたくないからFirebase Hostingを採用する。
料金を見た感じ10GBまでなら無料枠で使えそうなのもGood。
移行先にページを作成
Hugo公式でHugo製のページをFirebase Hostingに載せる手順が紹介されているのでそれに従う。
まずはブログ用のFirebaseプロジェクトを新規に作成。
UIから作る方法は世の中にいっぱい転がってそうなので敢えてCLIで作ってみる。
# Firebase CLIの更新
$ npm install -g firebase-tools

# CLIバージョン確認
$ firebase --version
12.9.1

# ログイン
$ firebase login --reauth
プロジェクト作成。
全世界で一意なプロジェクトIDを先に指定しなきゃいけないのが若干面倒。
# 適当なIDでプロジェクトを作成
$ PROJECT_ID=(project ID)
$ firebase projects:create $PROJECT_ID
? What would you like to call your project? (defaults to your project ID) blog
✔ Creating Google Cloud Platform project
✔ Adding Firebase resources to Google Cloud Platform project

🎉🎉🎉 Your Firebase project is ready! 🎉🎉🎉

Project information:
   - Project ID: (project ID)
   - Project Name: blog

Firebase console is available at
https://console.firebase.google.com/project/(project ID)/overview
世の中に同じプロジェクトID(他の人が先に作ったやつ)がある場合はこんな感じで怒られるので、
どうにかして一意なやつを考える必要がある。
$ firebase projects:create $PROJECT_ID
? What would you like to call your project? (defaults to your project ID)
✖ Creating Google Cloud Platform project

Error: Failed to create project because there is already a project with ID (project ID). Please try again with a unique project ID.

Having trouble? Try again or contact support with contents of firebase-debug.log
次にHugoプロジェクトのディレクトリでFirebaseプロジェクトを初期化する。
Firebase featuresはHosting: Configure files for Firebase Hosting and (optionally) set up GitHub Action deploysを選択。
Firebaseプロジェクトは先ほど作成したものを選択。
HugoでビルドしたページのHTMLとかはpublicディレクトリに出力されているのでそれをそのまま使う。
CI/CDの設定は一旦スキップし、
ページを上書きする系の質問はなんとなくNoとした。
$ firebase init

     ######## #### ########  ######## ########     ###     ######  ########
     ##        ##  ##     ## ##       ##     ##  ##   ##  ##       ##
     ######    ##  ########  ######   ########  #########  ######  ######
     ##        ##  ##    ##  ##       ##     ## ##     ##       ## ##
     ##       #### ##     ## ######## ########  ##     ##  ######  ########

You''re about to initialize a Firebase project in this directory:

  /path/to/blog

? Which Firebase features do you want to set up for this directory? Press Space to select features, then Enter to confirm your choices. Hosting: Configure files for Firebase Hosting and (optionally) set up GitHub Action deploys

=== Project Setup

First, let''s associate this project directory with a Firebase project.
You can create multiple project aliases by running firebase use --add,
but for now we''ll just set up a default project.

? Please select an option: Use an existing project
? Select a default Firebase project for this directory: (project ID) (blog)
i  Using project (project ID) (blog)

=== Hosting Setup

Your public directory is the folder (relative to your project directory) that
will contain Hosting assets to be uploaded with firebase deploy. If you
have a build process for your assets, use your build''s output directory.

? What do you want to use as your public directory? public
? Configure as a single-page app (rewrite all urls to /index.html)? No
? Set up automatic builds and deploys with GitHub? No
? File public/404.html already exists. Overwrite? No
i  Skipping write of public/404.html
? File public/index.html already exists. Overwrite? No
i  Skipping write of public/index.html

i  Writing configuration info to firebase.json...
i  Writing project information to .firebaserc...

✔  Firebase initialization complete!
そうするとこんなファイルが生成されている。
.firebaserc
{
  "projects": {
    "default": "(project ID)"
  }
}
firebase.json
{
  "hosting": {
    "public": "public",
    "ignore": [
      "firebase.json",
      "**/.*",
      "**/node_modules/**"
    ]
  }
}
本当は文法とかちゃんと勉強するべきだろうけど、
なんとなく.firebasercでFirebaseプロジェクトのIDを指定していて、firebase.jsonでFirebase featureの種類と公開用ディレクトリの場所、
ホスティングしないファイルのパターンが指定されてそう。
早速Firebaseへのデプロイを試してみる。
$ hugo && firebase deploy
Start building sites …
hugo v0.98.0+extended darwin/arm64 BuildDate=unknown

                   |  EN
-------------------+-------
  Pages            |  236
  Paginator pages  |  123
  Non-page files   |  753
  Static files     |    0
  Processed images | 1982
  Aliases          |   44
  Sitemaps         |    1
  Cleaned          |    0

Total in 5024 ms

=== Deploying to '(project ID)'...

i  deploying hosting
i  hosting[(project ID)]: beginning deploy...
i  hosting[(project ID)]: found 5998 files in public
✔  hosting[(project ID)]: file upload complete
i  hosting[(project ID)]: finalizing version...
✔  hosting[(project ID)]: version finalized
i  hosting[(project ID)]: releasing new version...
✔  hosting[(project ID)]: release complete

✔  Deploy complete!

Project Console: https://console.firebase.google.com/project/(project ID)/overview
Hosting URL: https://(project ID).web.app
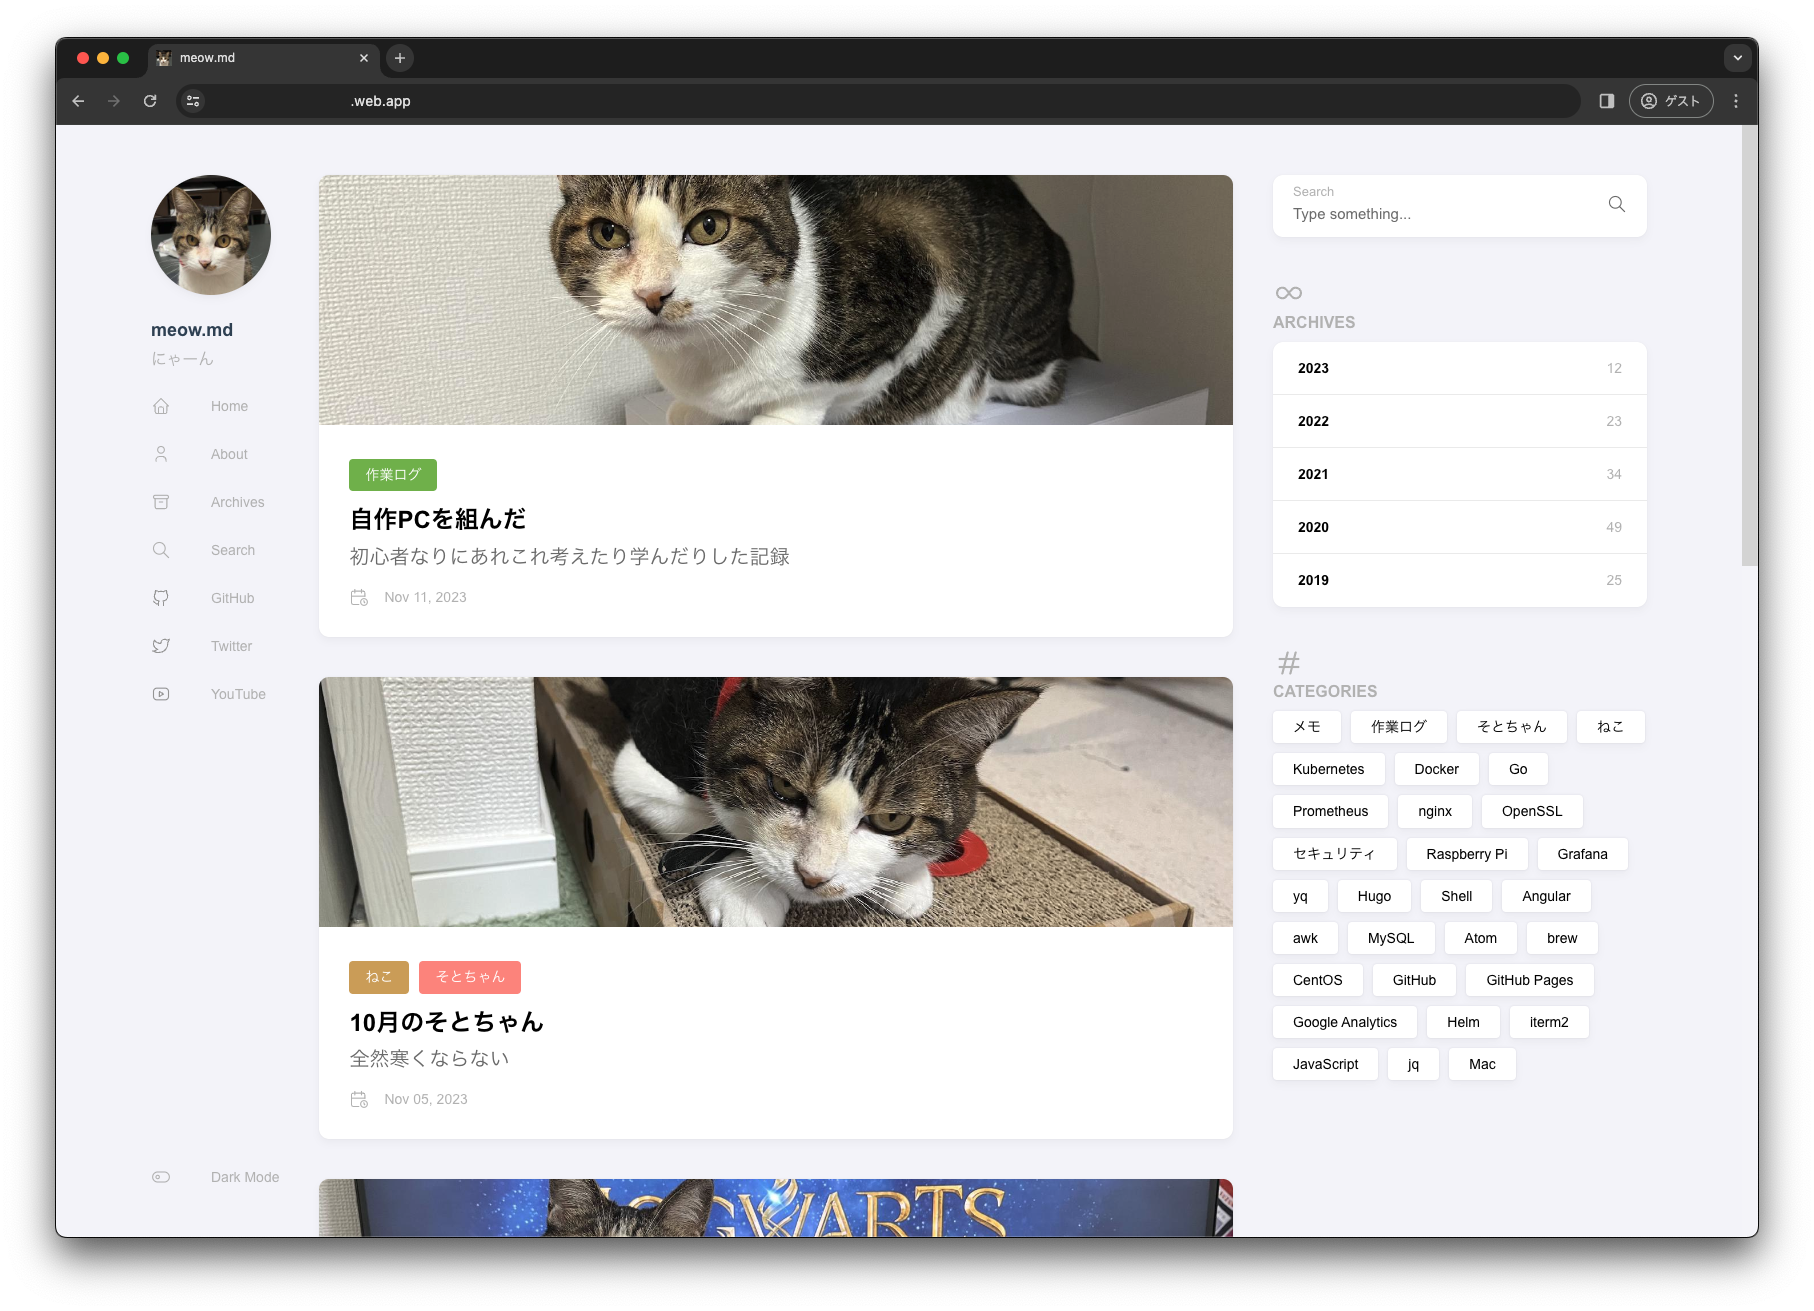
指定されたHosting URLを開くとページが閲覧できるようになっている。
やった〜。
CI/CDの設定
ページの手動デプロイができたので、
さらに自動で簡単にデプロイできるようCI/CDを設定する。firebase initを再度実行し、今度はHosting: Set up GitHub Action deploysを選択する。
途中でGitHubへのログインを求められるが、
これに応えることでFirebaseへのリリース権限を持つTokenがGitHub ActionsのSecrets(FIREBASE_SERVICE_ACCOUNT_(project ID))に自動登録される。
$ firebase init

     ######## #### ########  ######## ########     ###     ######  ########
     ##        ##  ##     ## ##       ##     ##  ##   ##  ##       ##
     ######    ##  ########  ######   ########  #########  ######  ######
     ##        ##  ##    ##  ##       ##     ## ##     ##       ## ##
     ##       #### ##     ## ######## ########  ##     ##  ######  ########

You''re about to initialize a Firebase project in this directory:

  /path/to/uzimihsr/blog

Before we get started, keep in mind:

  * You are initializing within an existing Firebase project directory

? Which Firebase features do you want to set up for this directory? Press Space to select features, then Enter to confirm your choices. Hosting: Set up GitHub Action deploys

=== Project Setup

First, let''s associate this project directory with a Firebase project.
You can create multiple project aliases by running firebase use --add,
but for now we''ll just set up a default project.

i  Using project (project ID) (blog)

=== Hosting:github Setup

i  Detected a .git folder at /path/to/uzimihsr/blog
i  Authorizing with GitHub to upload your service account to a GitHub repository''s secrets store.

Visit this URL on this device to log in:
https://github.com/login/oauth/authorize?client_id=...

Waiting for authentication...

✔  Success! Logged into GitHub as uzimihsr

? For which GitHub repository would you like to set up a GitHub workflow? (format: user/repository) uzimihsr/blog

✔  Created service account github-action-201048321 with Firebase Hosting admin permissions.
✔  Uploaded service account JSON to GitHub as secret FIREBASE_SERVICE_ACCOUNT_(project ID).
i  You can manage your secrets at https://github.com/uzimihsr/blog/settings/secrets.

? Set up the workflow to run a build script before every deploy? No

✔  Created workflow file /path/to/uzimihsr/blog/.github/workflows/firebase-hosting-pull-request.yml
? Set up automatic deployment to your site''s live channel when a PR is merged? Yes
? What is the name of the GitHub branch associated with your site''s live channel? master

✔  Created workflow file /path/to/uzimihsr/blog/.github/workflows/firebase-hosting-merge.yml

i  Action required: Visit this URL to revoke authorization for the Firebase CLI GitHub OAuth App:
https://github.com/settings/connections/applications/...
i  Action required: Push any new workflow file(s) to your repo

i  Writing configuration info to firebase.json...
i  Writing project information to .firebaserc...

✔  Firebase initialization complete!
指示にしたがって最後まで進めると今度は次のようなファイルが生成される。
.github/workflows/firebase-hosting-merge.yml
# This file was auto-generated by the Firebase CLI
# https://github.com/firebase/firebase-tools

name: Deploy to Firebase Hosting on merge
'on':
  push:
    branches:
      - master
jobs:
  build_and_deploy:
    runs-on: ubuntu-latest
    steps:
      - uses: actions/checkout@v3
      - uses: FirebaseExtended/action-hosting-deploy@v0
        with:
          repoToken: '${{ secrets.GITHUB_TOKEN }}'
          firebaseServiceAccount: '${{ secrets.FIREBASE_SERVICE_ACCOUNT_(project ID) }}'
          channelId: live
          projectId: (project ID)
.github/workflows/firebase-hosting-pull-request.yml
# This file was auto-generated by the Firebase CLI
# https://github.com/firebase/firebase-tools

name: Deploy to Firebase Hosting on PR
'on': pull_request
jobs:
  build_and_preview:
    if: '${{ github.event.pull_request.head.repo.full_name == github.repository }}'
    runs-on: ubuntu-latest
    steps:
      - uses: actions/checkout@v3
      - uses: FirebaseExtended/action-hosting-deploy@v0
        with:
          repoToken: '${{ secrets.GITHUB_TOKEN }}'
          firebaseServiceAccount: '${{ secrets.FIREBASE_SERVICE_ACCOUNT_(project ID) }}'
          projectId: (project ID)
これらの変更をcommitしてmasterブランチに取り込む。
$ git add .
$ git commit -m "Firebase"
$ git push origin master
masterブランチにcommitが取り込まれると、早速.github/workflows/firebase-hosting-merge.ymlで定義されたGitHub Actionsが実行される。
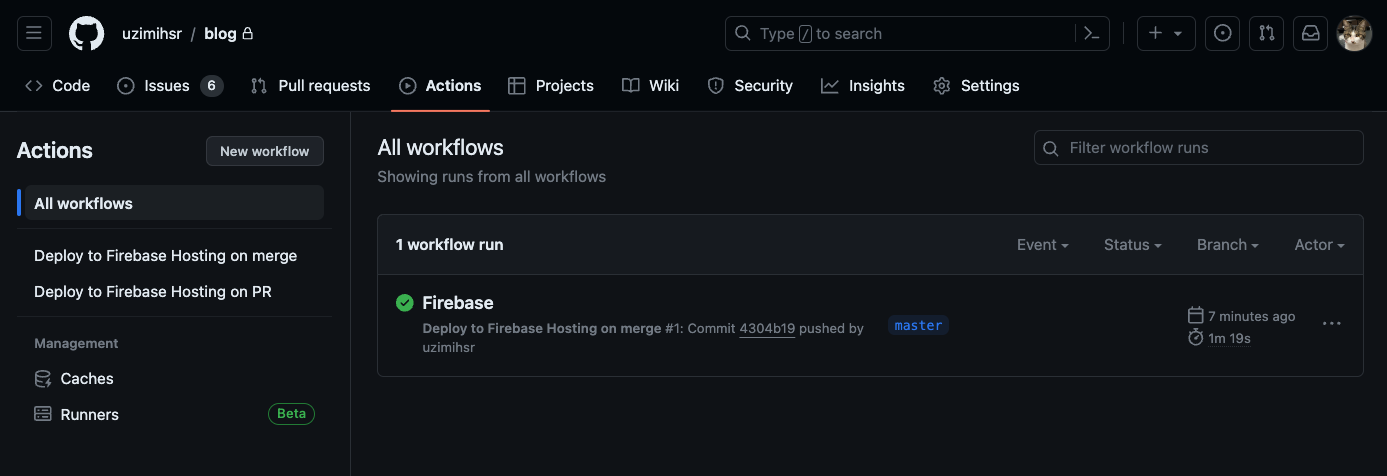
これだけだとちょっとわかりづらいが、
Firebase側で確認すると確かにGitHub Actionsからリリースが走ったことが確認できる。
が、ここで問題が…
さっきまで見えていたFirebaseのページがPage Not Foundになってしまった。
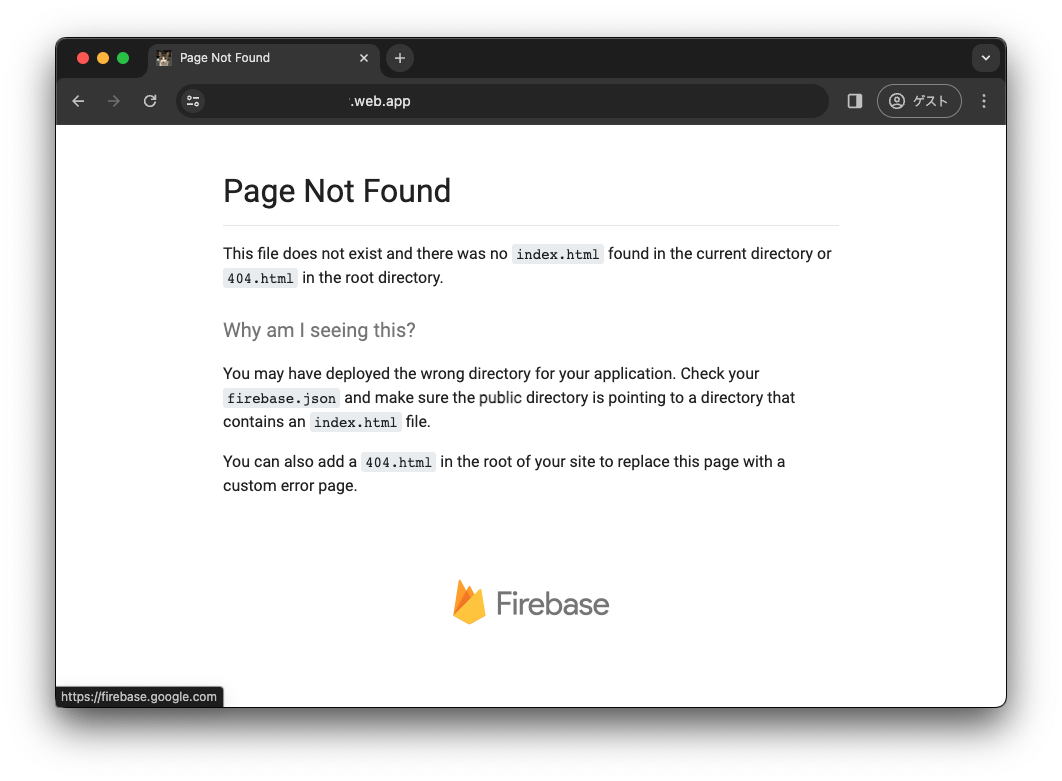
元々このディレクトリではpublicディレクトリの内容をGitHub Pages用のリポジトリ(uzimihsr/uzimihsr.github.io)に反映させるためにsubmodule化しており、
おそらくGitHub Actions上ではこのディレクトリのファイルがファイルとして参照できてない?ような気がする。
(ローカルでfirebase deployしたときはpublic内のファイルが参照できていたのでリリース後にページが見られた)
actions/checkoutのREADMEを確認したところ、submodulesというパラメータを指定することでsubmodule先のリポジトリが参照できるらしい。
.github/workflows/firebase-hosting-merge.ymlを次のように変更、masterにpushして再挑戦。
name: Deploy to Firebase Hosting on merge
"on":
  push:
    branches:
      - master
jobs:
  build_and_deploy:
    runs-on: ubuntu-latest
    steps:
      - uses: actions/checkout@v4 # v3→v4に変更
        with:
          submodules: recursive # submodulesを参照するためのパラメータ
      - uses: FirebaseExtended/action-hosting-deploy@v0
        with:
          repoToken: "${{ secrets.GITHUB_TOKEN }}"
          firebaseServiceAccount: "${{ secrets.FIREBASE_SERVICE_ACCOUNT_(project ID) }}"
          channelId: live
          projectId: (project ID)
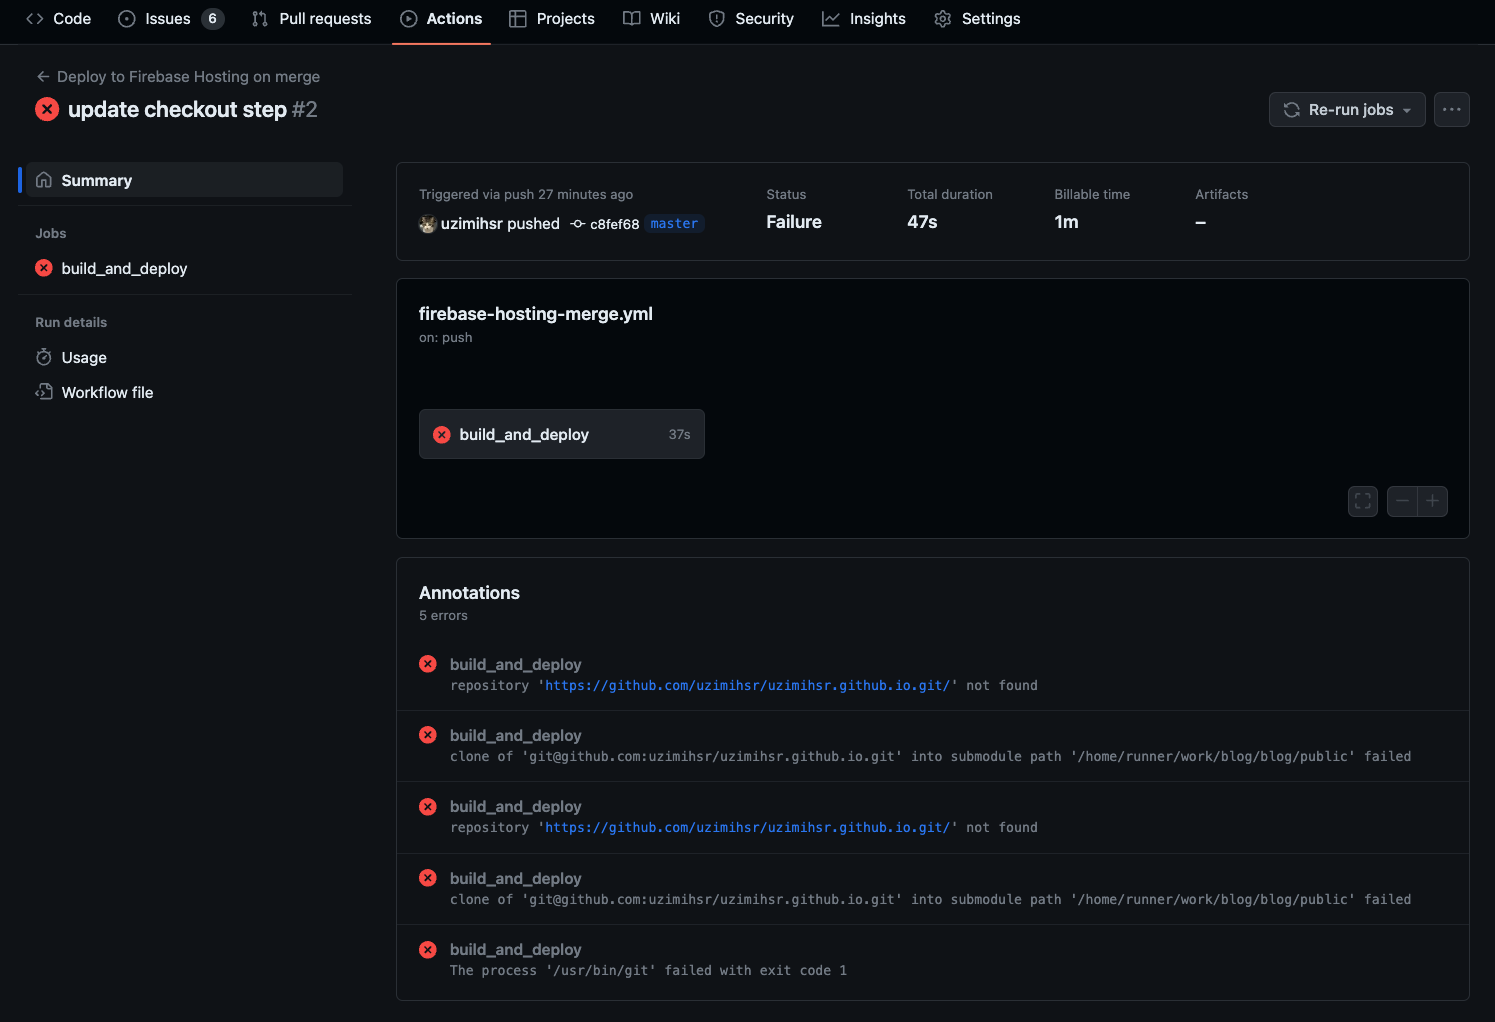
今度はActionsがコケてしまった。
repository ‘https://github.com/uzimihsr/uzimihsr.github.io.git/' not found clone of ‘[email protected]:uzimihsr/uzimihsr.github.io.git’ into submodule path ‘/home/runner/work/blog/blog/public’ failed
エラーメッセージ的に対象のリポジトリが参照できずエラーになっているっぽい。
ここで思い出したのだが、対象のリポジトリ(uzimihsr/uzimihsr.github.io)はPrivateリポジトリだった。
こういうときどうすんだろう…と思い再度actions/checkoutのREADMEを確認するとちゃんと答えがあった。
checkout対象のPrivateリポジトリに関する権限を持つトークンをtokenパラメータで指定すればいいらしい。
本当は真面目にGitHub App作るべきな気もするが、
今回はサクッとFine-grained PATで対象Repoに対するRead権限を持つトークンを作成する。
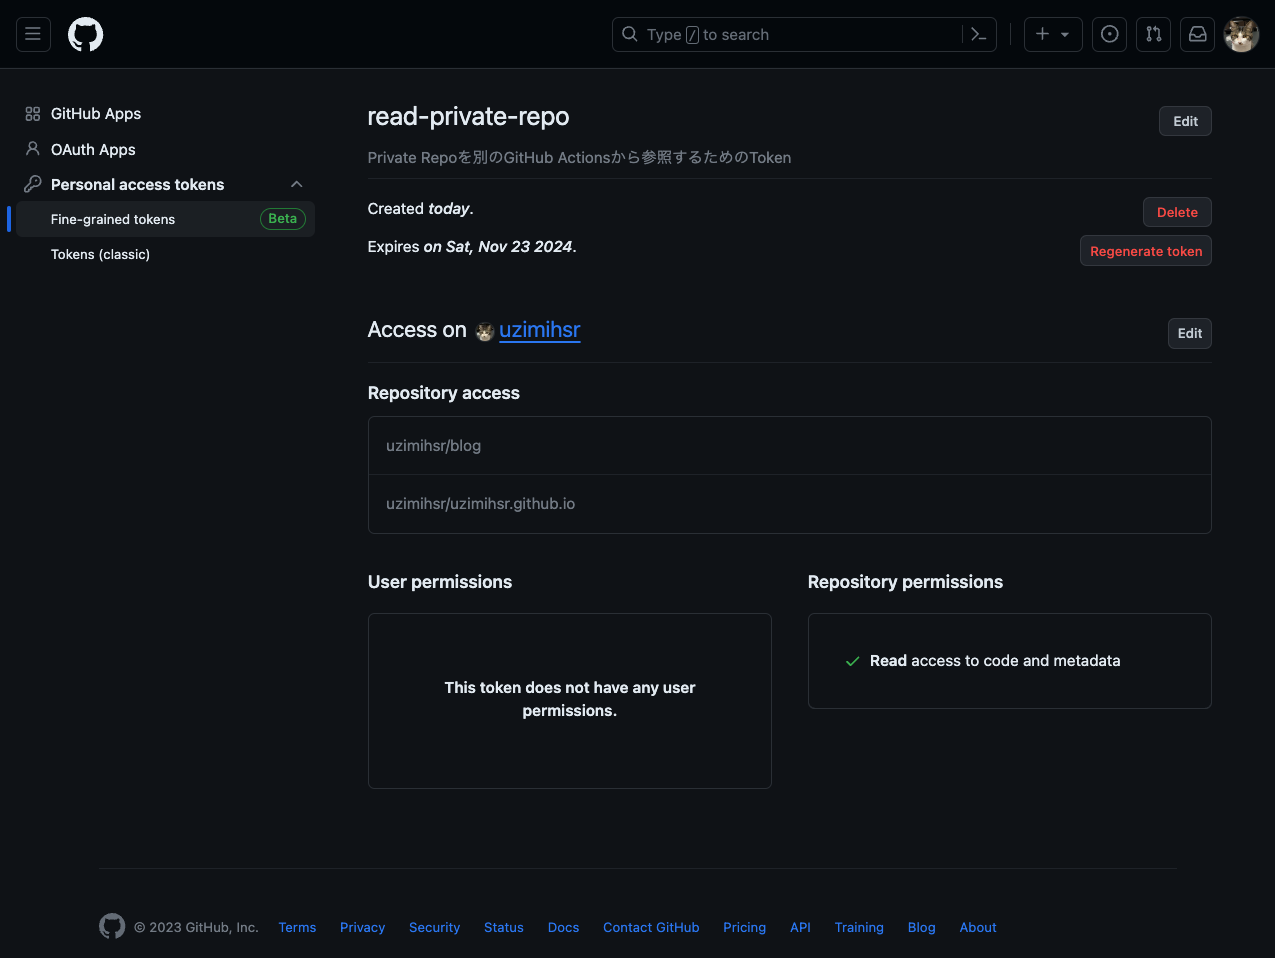
このトークンをGitHub Actionsを実行するリポジトリのSecretsに追加。
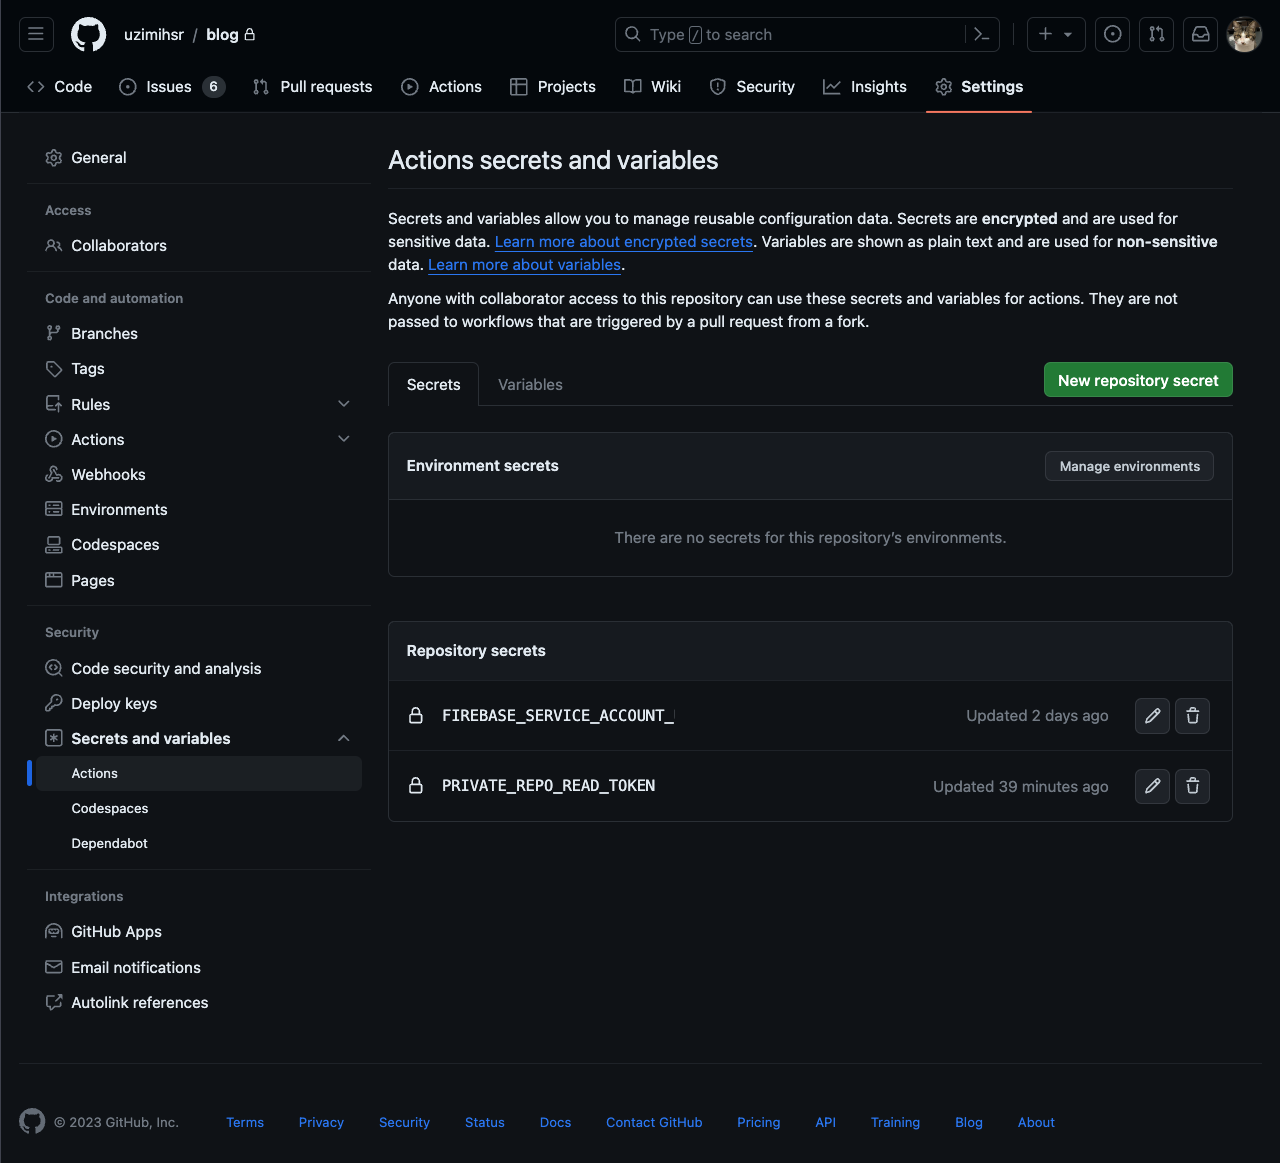
.github/workflows/firebase-hosting-merge.ymlにこのSecretを参照する記述を追加して再挑戦。
name: Deploy to Firebase Hosting on merge
"on":
  push:
    branches:
      - master
jobs:
  build_and_deploy:
    runs-on: ubuntu-latest
    steps:
      - uses: actions/checkout@v4
        with:
          submodules: recursive
          token: "${{ secrets.PRIVATE_REPO_READ_TOKEN }}" # Secretsに追加したFine-grained PAT
      - uses: FirebaseExtended/action-hosting-deploy@v0
        with:
          repoToken: "${{ secrets.GITHUB_TOKEN }}"
          firebaseServiceAccount: "${{ secrets.FIREBASE_SERVICE_ACCOUNT_(project ID) }}"
          channelId: live
          projectId: (project ID)
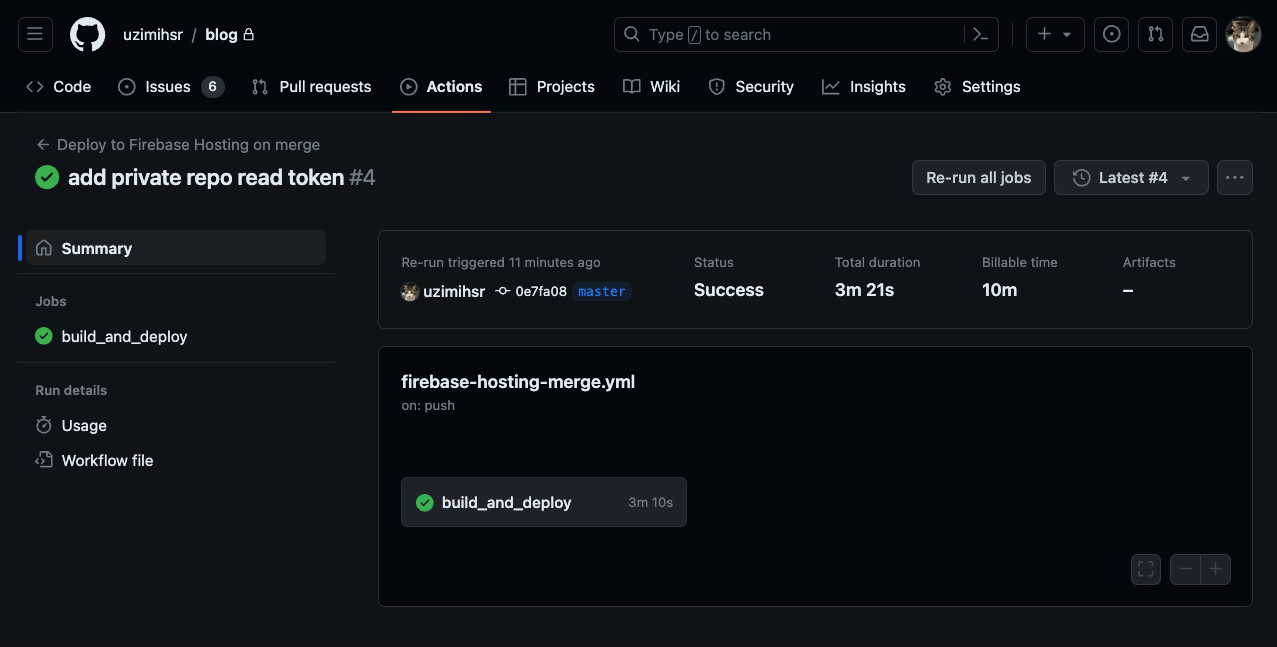
今度はActionsが通った。
Firebase上のページも404が解消されてコンテンツが表示できている。
やった〜。
…と思ったけど、ここで気になったことが1点。
ビルドしたページを格納するpublicディレクトリをgit repoで管理し続ける必要ってあるんだろうか…?
Hugo公式のCI/CD設定手順でも
Don’t forget to update your static pages before push!
と紹介されているように、
この手順だとmarkdownの更新とhugoによるページのビルド(publicディレクトリの更新)は変わらずローカルPCで実施する必要がある。
どうせGitHub Actionsを使うなら、
Actions上でhugoを動かしてpublicディレクトリを更新するようにして、
ローカルでの作業はmarkdownの更新とgit pushだけにできないだろうか…?
(要はローカルPCからhugoを抜いても困らないようにしたい)
GitHub Actions上でHugoを動かす方法についてちょっと調べるとpeaceiris/actions-hugo@v2というものが出てきた。
(Hugo公式のGitHub Pages対応ページでもGitHub Actions上でHugoを動かす例はあるんだけど、今回はこのActionsを利用することにする)
READMEにしたがって.github/workflows/firebase-hosting-merge.ymlに追記してみる。
name: Deploy to Firebase Hosting on merge
"on":
  push:
    branches:
      - master
jobs:
  build_and_deploy:
    runs-on: ubuntu-latest
    steps:
      - uses: actions/checkout@v4
        with:
          submodules: recursive
          token: "${{ secrets.PRIVATE_REPO_READ_TOKEN }}"
      - uses: peaceiris/actions-hugo@v2 # Actions上でのHugoセットアップ
        with:
          hugo-version: "0.119.0"
          extended: true
      - run: hugo --minify # Hugoビルドの実施
      - uses: FirebaseExtended/action-hosting-deploy@v0
        with:
          repoToken: "${{ secrets.GITHUB_TOKEN }}"
          firebaseServiceAccount: "${{ secrets.FIREBASE_SERVICE_ACCOUNT_(project ID) }}"
          channelId: live
          projectId: (project ID)
publicディレクトリ(submodule)が残ってると邪魔そうなのでついでに消す。
$ git submodule
 e328611c605affe6d4672527704f3f5c730f5289 public (heads/master)
 907f881f5d773d9d94a470fa5643fcaade904555 themes/hugo-theme-stack (v1.1.0-282-g907f881)

$ git submodule deinit -f public
Cleared directory 'public'
Submodule 'public' ([email protected]:uzimihsr/uzimihsr.github.io.git) unregistered for path 'public'

$ git submodule
-e328611c605affe6d4672527704f3f5c730f5289 public
 907f881f5d773d9d94a470fa5643fcaade904555 themes/hugo-theme-stack (v1.1.0-282-g907f881)

$ git rm public
rm 'public'

$ rm -rf .git/modules/public

$ git submodule
 907f881f5d773d9d94a470fa5643fcaade904555 themes/hugo-theme-stack (v1.1.0-282-g907f881)
この状態でmaster pushしてみるとどうなるか…?
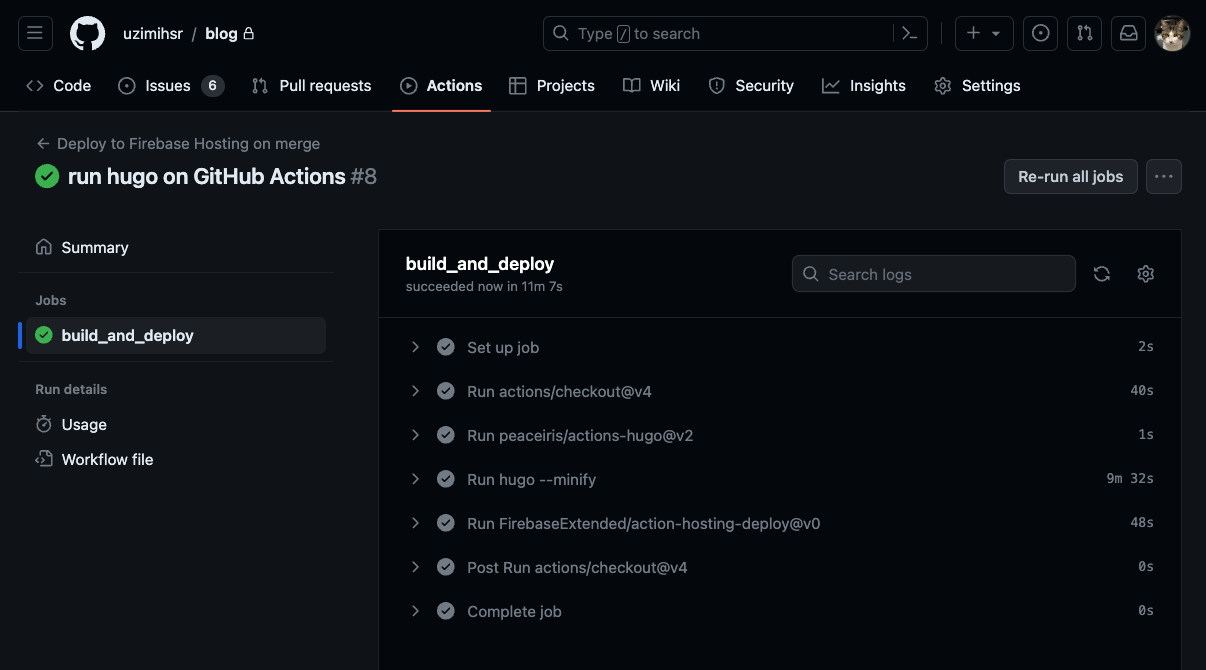
やった〜。
最終的なGitHub Actionsの設定ファイルはこんな感じ。
結局Privateリポジトリへの参照が要らなくなったのでPAT(Secrets)は削除した。
.github/workflows/firebase-hosting-merge.yml
name: Deploy to Firebase Hosting on merge
"on":
  push:
    branches:
      - master
jobs:
  build_and_deploy:
    runs-on: ubuntu-latest
    steps:
      - uses: actions/checkout@v4
        with:
          submodules: recursive
      - uses: peaceiris/actions-hugo@v2
        with:
          hugo-version: "0.119.0"
          extended: true
      - run: hugo --minify
      - uses: FirebaseExtended/action-hosting-deploy@v0
        with:
          repoToken: "${{ secrets.GITHUB_TOKEN }}"
          firebaseServiceAccount: "${{ secrets.FIREBASE_SERVICE_ACCOUNT_(project ID) }}"
          channelId: live
          projectId: (project ID)
.github/workflows/firebase-hosting-pull-request.yml
name: Deploy to Firebase Hosting on PR
"on": pull_request
jobs:
  build_and_preview:
    if: "${{ github.event.pull_request.head.repo.full_name == github.repository }}"
    runs-on: ubuntu-latest
    steps:
      - uses: actions/checkout@v4
        with:
          submodules: recursive
      - uses: peaceiris/actions-hugo@v2
        with:
          hugo-version: "0.119.0"
          extended: true
      - run: hugo -D --minify
      - uses: FirebaseExtended/action-hosting-deploy@v0
        with:
          repoToken: "${{ secrets.GITHUB_TOKEN }}"
          firebaseServiceAccount: "${{ secrets.FIREBASE_SERVICE_ACCOUNT_(project ID) }}"
          projectId: (project ID)
ドメインの設定
Firebaseで公開したページはデフォルトで無料のドメイン(project ID).web.appが付与されている。
これがプロジェクト作成時にidをユニークにしたために結構ダサい名前になってしまったので、
いい感じのドメインに変えてあげたい。
(HTTPS化されてればドメインはあんまり気にしないつもりだったけど、idが想像以上にダサかったので…)
ドメイン取得はGoogle Domainsでやりたかったが、サ終しているので他を探す。
いろいろ探した結果、Cloudflare Registrarが一番安くてUIもしっかりしているので採用。
uzimihsr.comを取得した。
(手順のメモを忘れたけど、クレカの登録ができれば後はとにかく簡単だった。費用は1年で$9.77くらい。)
Firebase公式のカスタム ドメインを接続するを参考に進めてみる。
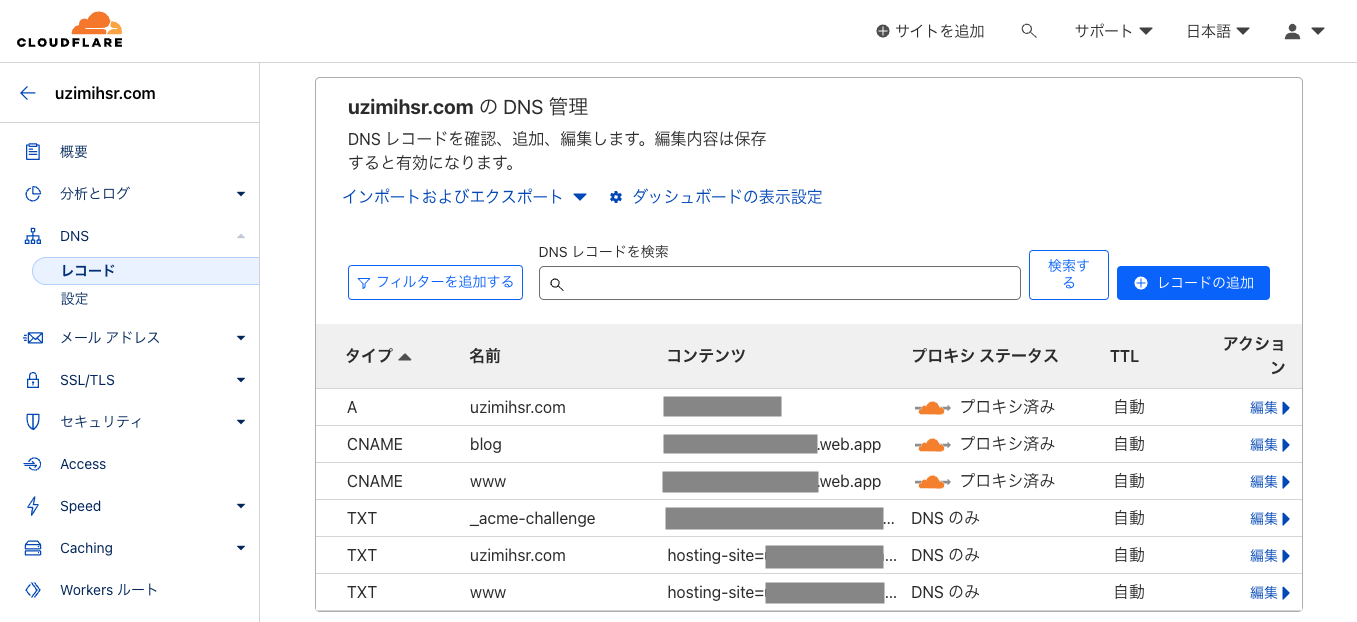
まずはFirebase Hosting側で先ほど取得したドメインを追加する。
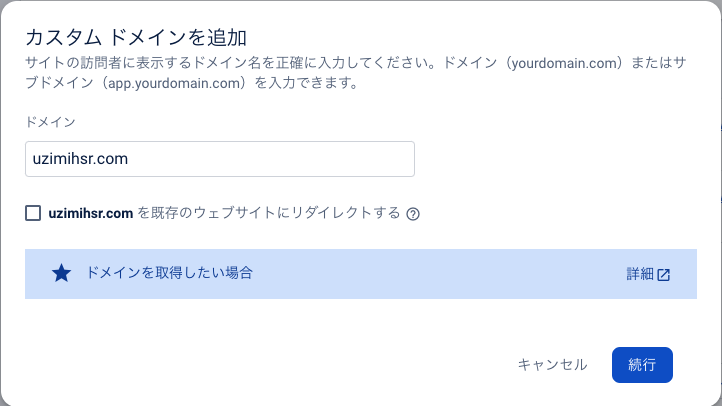
この状態で続行するとDNSに登録すべきレコードが表示される。
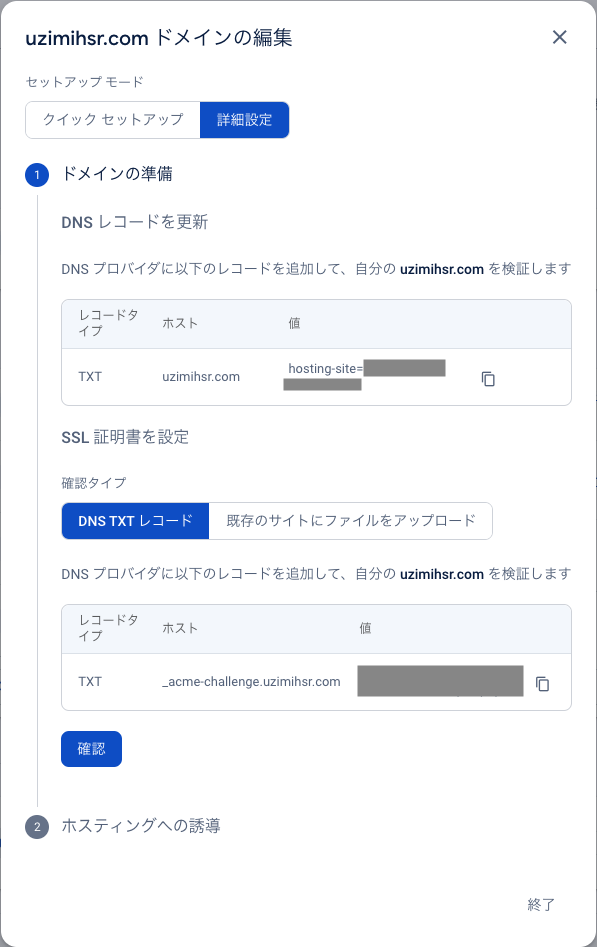
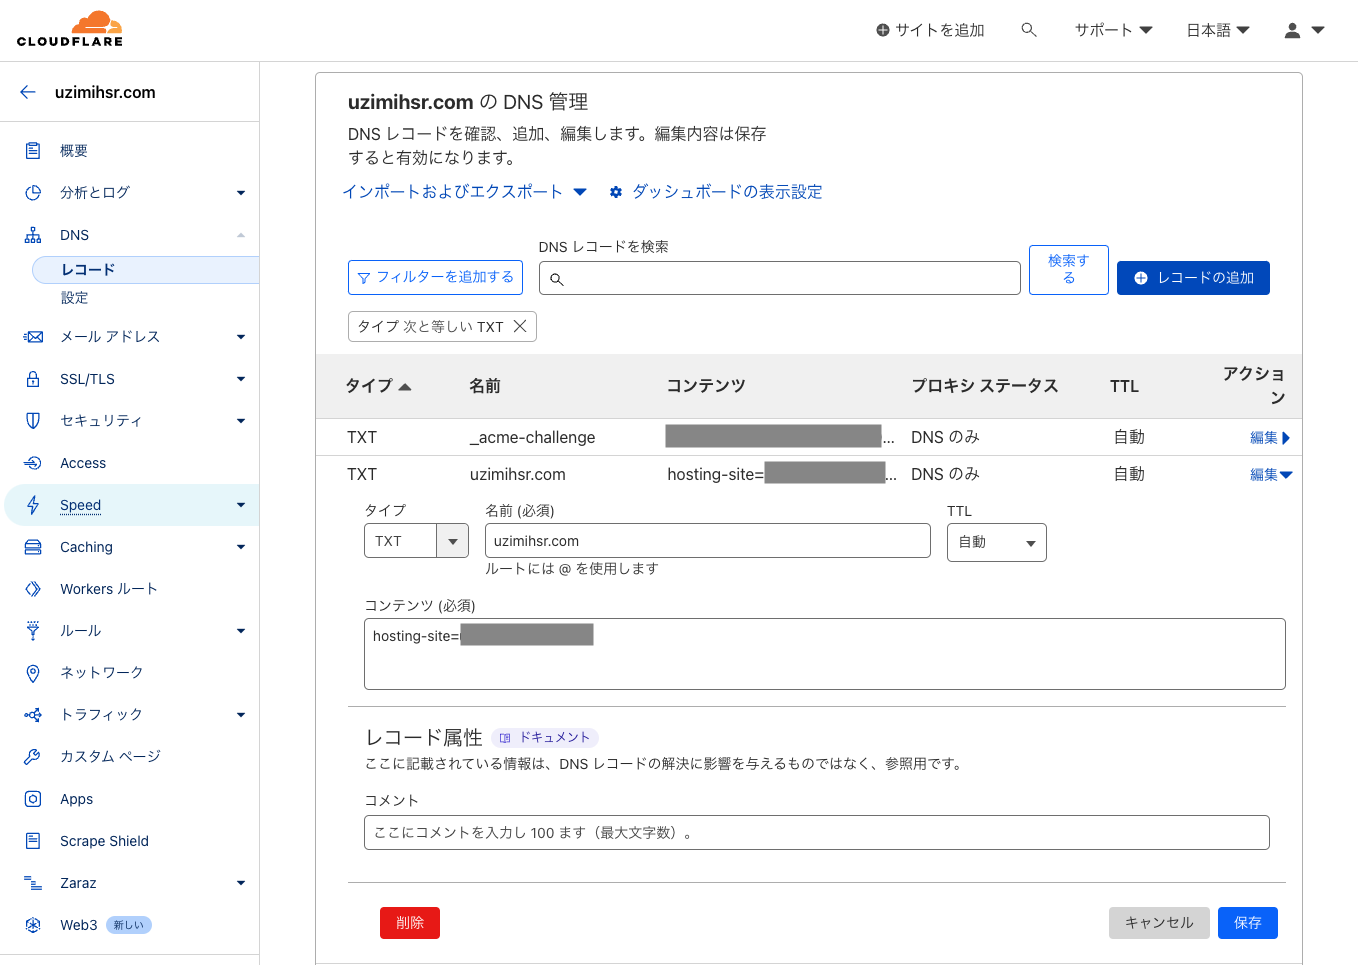
この表示されているレコードをCloudflare側でDNSに追加する。
TXTレコードの設定をしてから反映されるまでにちょっと時間がかかる。
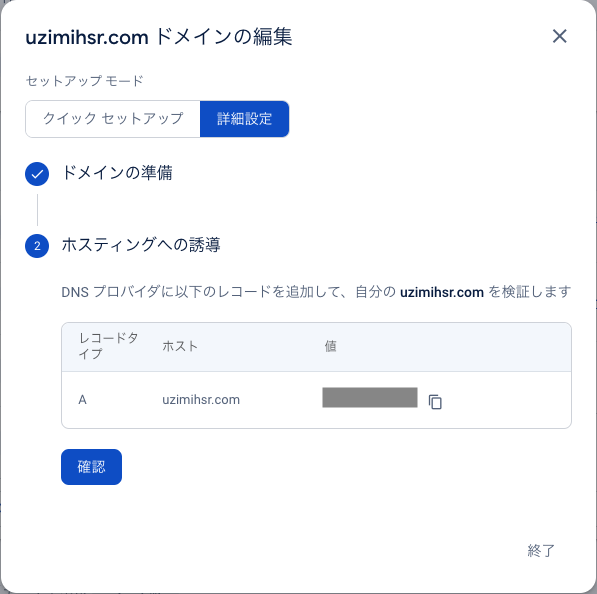
30分くらい経つとドメインの準備が完了し、ホスティングへの誘導で追加のレコードが表示されるのでこれを再度DNS側で追加する。
ここからの待ち時間が結構長い。
最大24時間かかると言われたが、それ以上待っても状況が変化しなかった。
泣きながら色々調べたらこんなのを発見。
https://community.cloudflare.com/t/flexible-ssl-redirect-loop-with-google-firebase/2063/3
https://developers.cloudflare.com/ssl/troubleshooting/too-many-redirects/#flexible-encryption-mode
どうやらオリジン(今回はFirebase Hosting)側でhttp→httpsへのリダイレクト設定がある状態でCloudflare側のSSL/TLS暗号化モードがフレキシブル(デフォルト)だとリダイレクトループが発生するらしい。
解決するにはこの暗号化モードをフルに変更すれば良いとのこと。
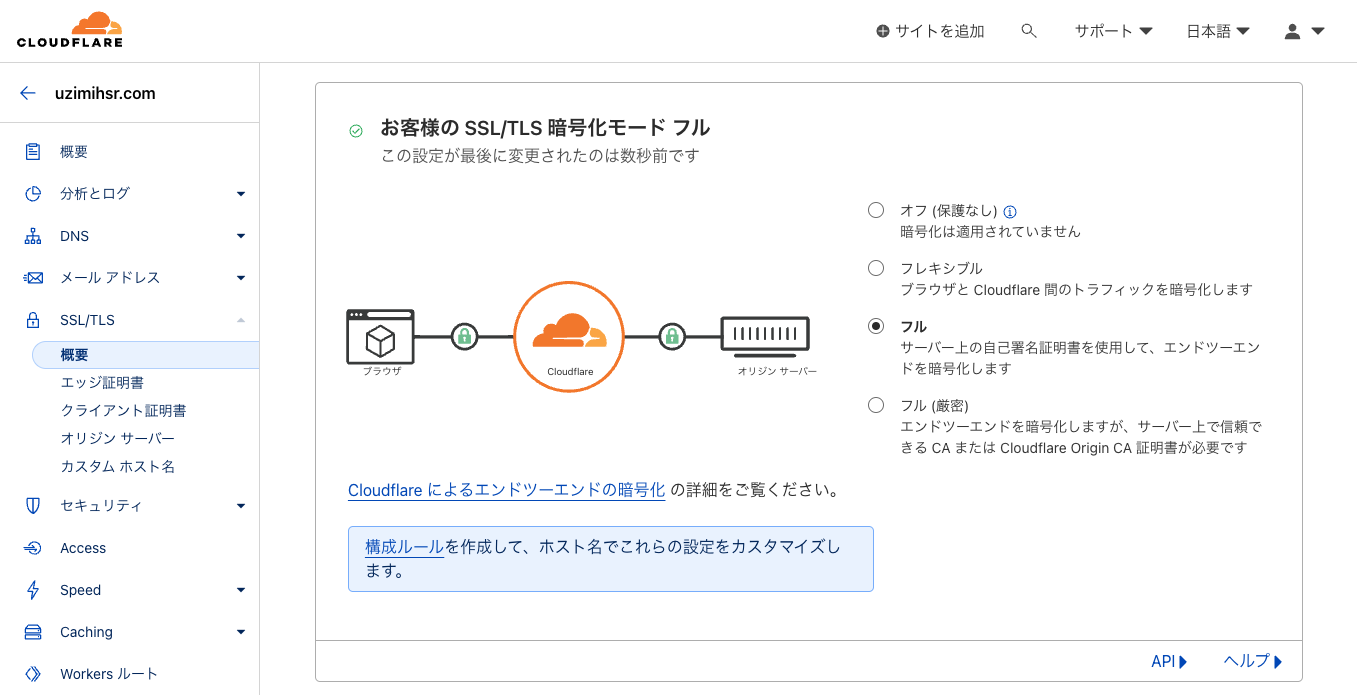
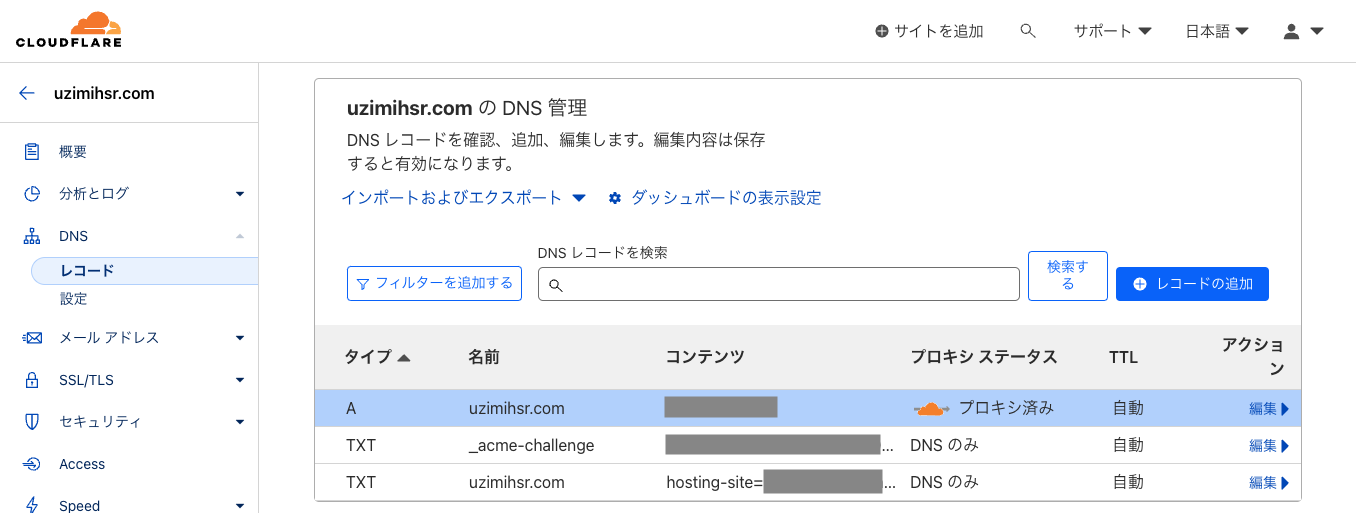
するとあっさりホスティングへの誘導が完了し、対象のドメイン名でページが表示できるようになった。
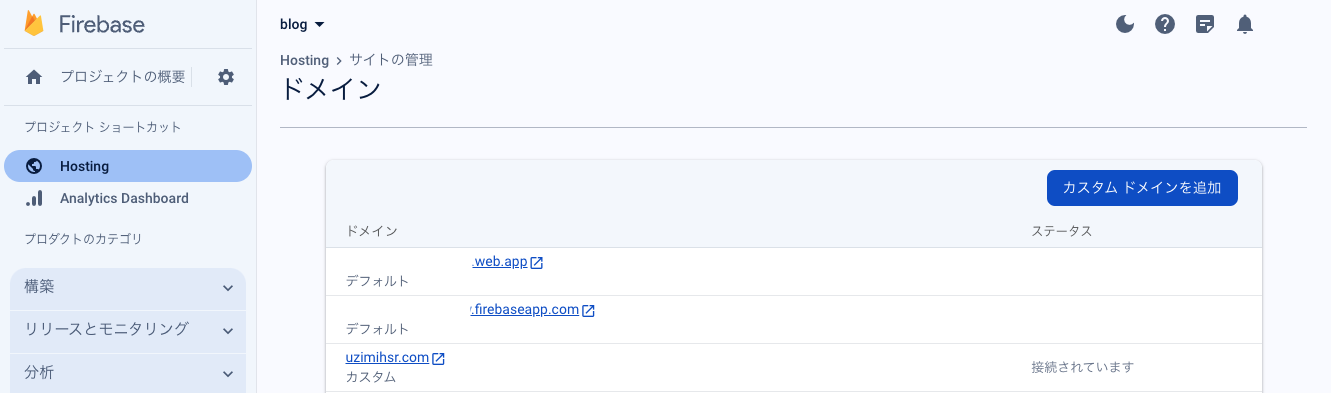
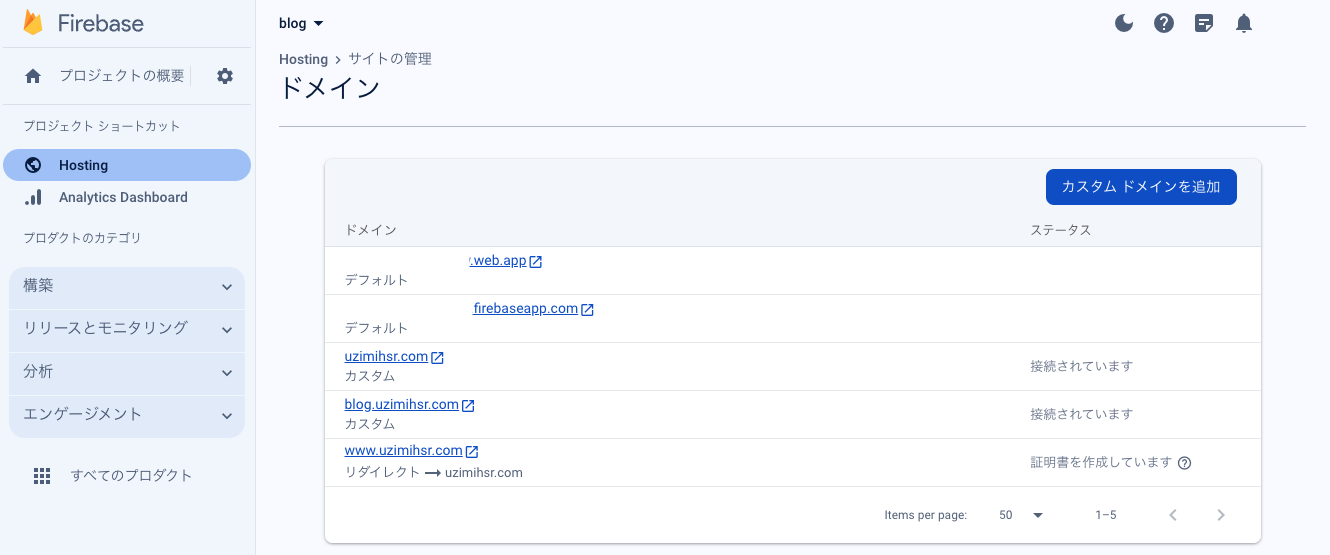
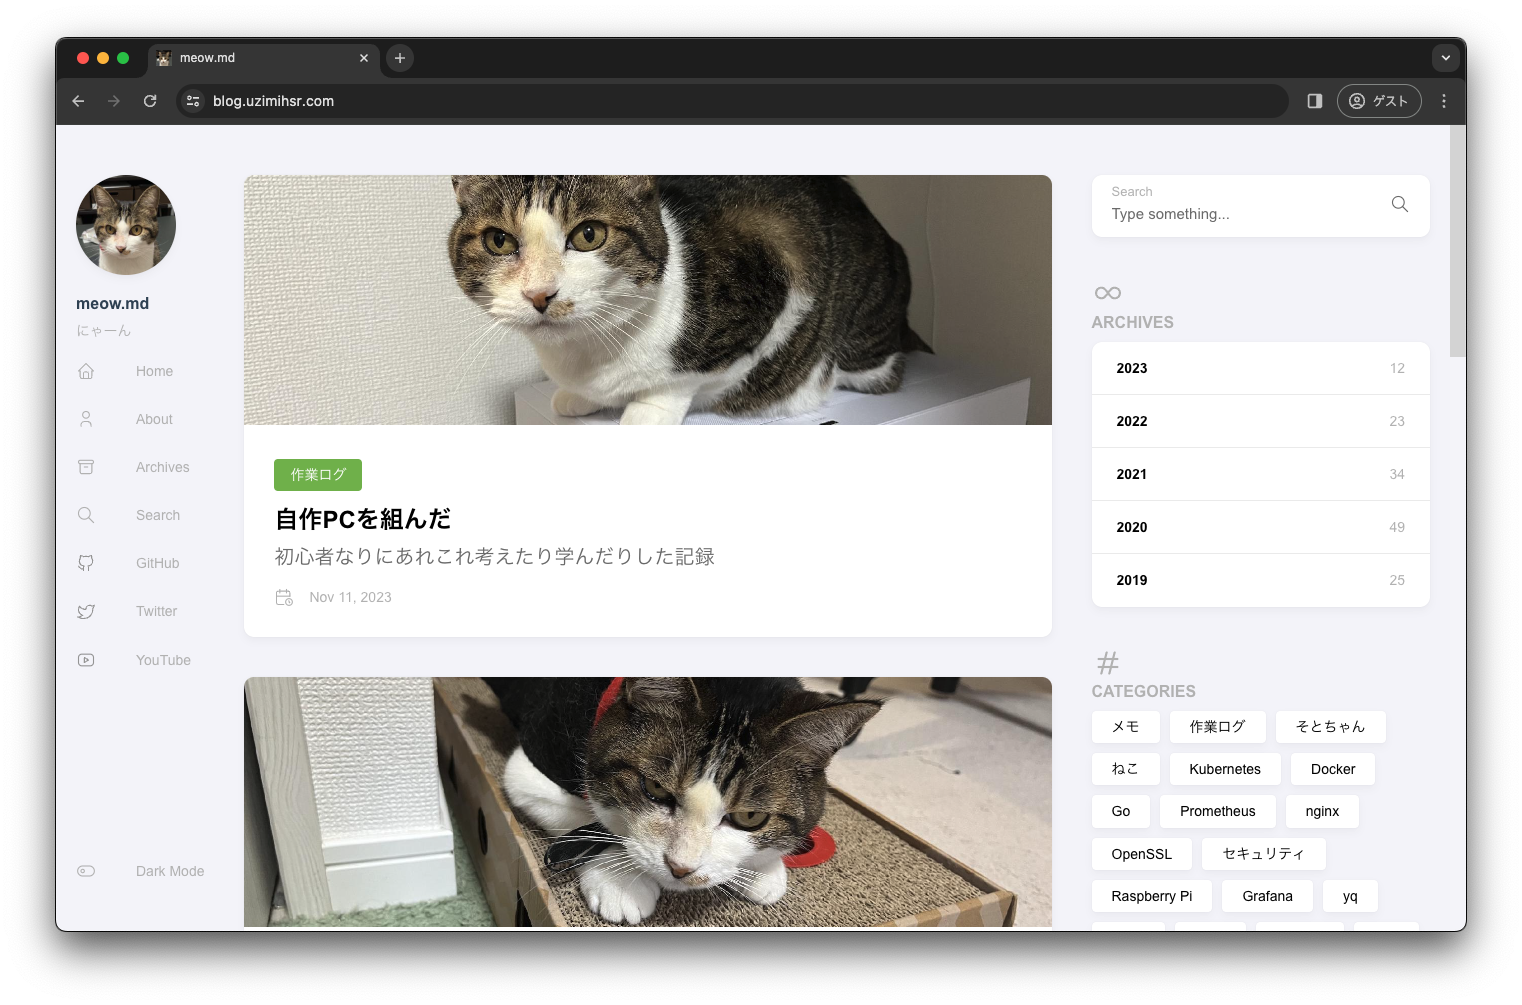
0.00001%くらいの確率で今度ブログ以外にもページを作りたくなるかも…と思ったので、
ブログ専用のサブドメイン(blog.uzimihsr.com)なども同様の手順で追加した。
https://blog.uzimihsr.com/
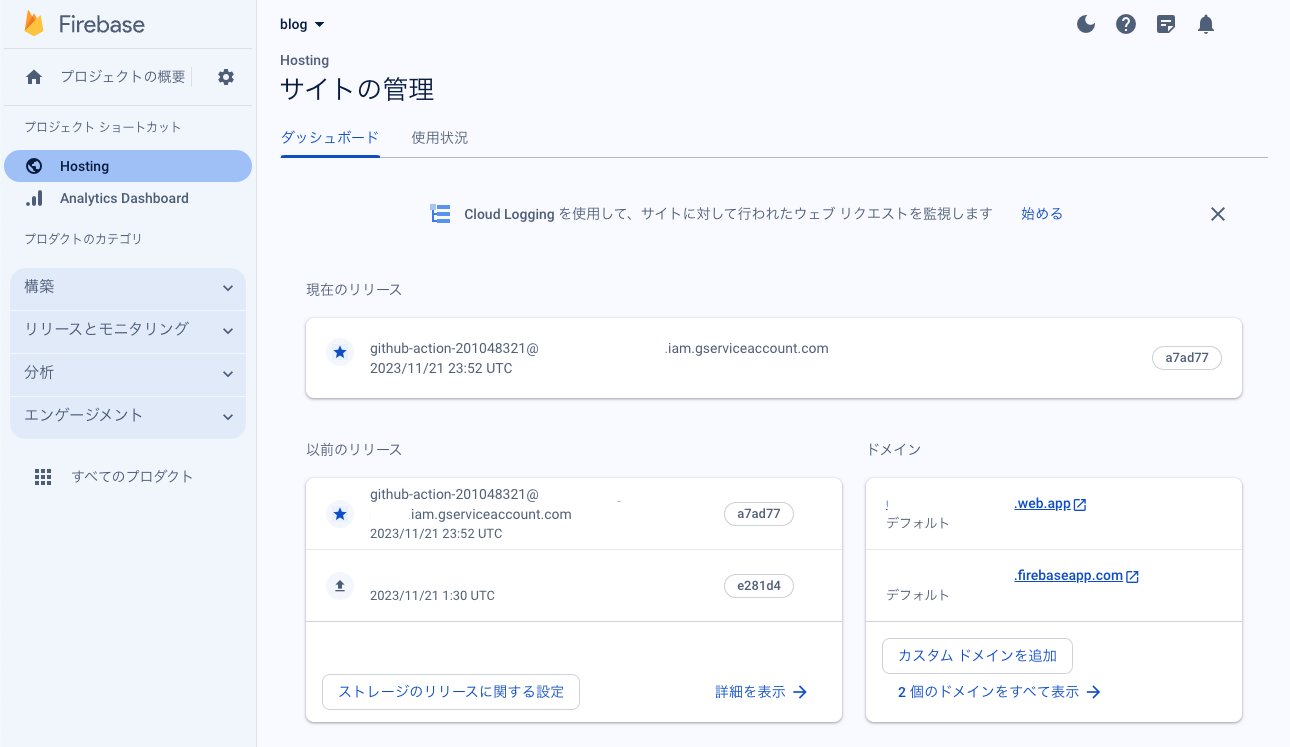
最終的な設定はこんな感じ。
移行元から移行先へのリダイレクト設定
ブログの移行ができたので、いよいよ移行元のGitHub Pagesが不要になった。
本当はいきなり爆破できれば楽なんだけど、
割といろんなところに記事のリンクを貼って(貼られて)しまっているので404になるのは好ましくない。
というわけで移行元のURLでアクセスされたときに移行先の同じページにリダイレクトするようなページを作成して、
既存のGitHub Pagesを差し替えるようにしたい。
(例) https://uzimihsr.github.io/post/2023-11-11-handmade-pc/ → https://blog.uzimihsr.com/post/2023-11-11-handmade-pc/
ちょっとググってみたところGitHub Pagesでは.htaccessが使えず301リダイレクトができないっぽいので、
脳死でJavaScriptを使ったリダイレクトを試してみる。
参考: https://www.w3docs.com/snippets/javascript/how-to-redirect-a-web-page-with-javascript.html
index.html
<!DOCTYPE html>
<html lang="en">

<head>
    <meta charset="UTF-8">
    <title>Moved!</title>
</head>

<body>
    <h1>Moved!</h1>
    <p>You will be redirected in 5 seconds...</p>
    <p>If you are not redirected, <a href="https://blog.uzimihsr.com">click here</a>.</p>
    <script>
        const newHost = "https://blog.uzimihsr.com";
        setTimeout(() => {
            window.location.href = newHost;
        }, 5000);
    </script>
</body>

</html>
404.html
<!DOCTYPE html>
<html lang="en">

<head>
    <meta charset="UTF-8">
    <title>Moved!</title>
</head>

<body>
    <h1>Moved!</h1>
    <p id="newUrl"></p>
    <p>You will be redirected in 5 seconds...</p>
    <p>If you are not redirected, <a href="https://blog.uzimihsr.com">click here</a>.</p>
    <script>
        const newHost = "https://blog.uzimihsr.com";
        const redirectUrl = window.location.href.replace(
            window.location.origin,
            newHost
        );
        document.getElementById("newUrl").innerHTML = "new URL: " + redirectUrl;
        setTimeout(() => {
            window.location.href = redirectUrl;
        }, 5000);
    </script>
</body>

</html>
あとはGitHub Pagesにこの2枚のHTMLだけを残し、それ以外のファイルを全削除。
$ pwd
/path/to/uzimihsr/uzimihsr.github.io

$ ls -a1
.
..
.git
404.html
index.html

$ git add .
$ git commit -m "bye-bye GitHub Pages"
$ git push origin master
元のhttps://uzimihsr.github.io/を開くとindex.htmlが開かれて
こんな感じになる。
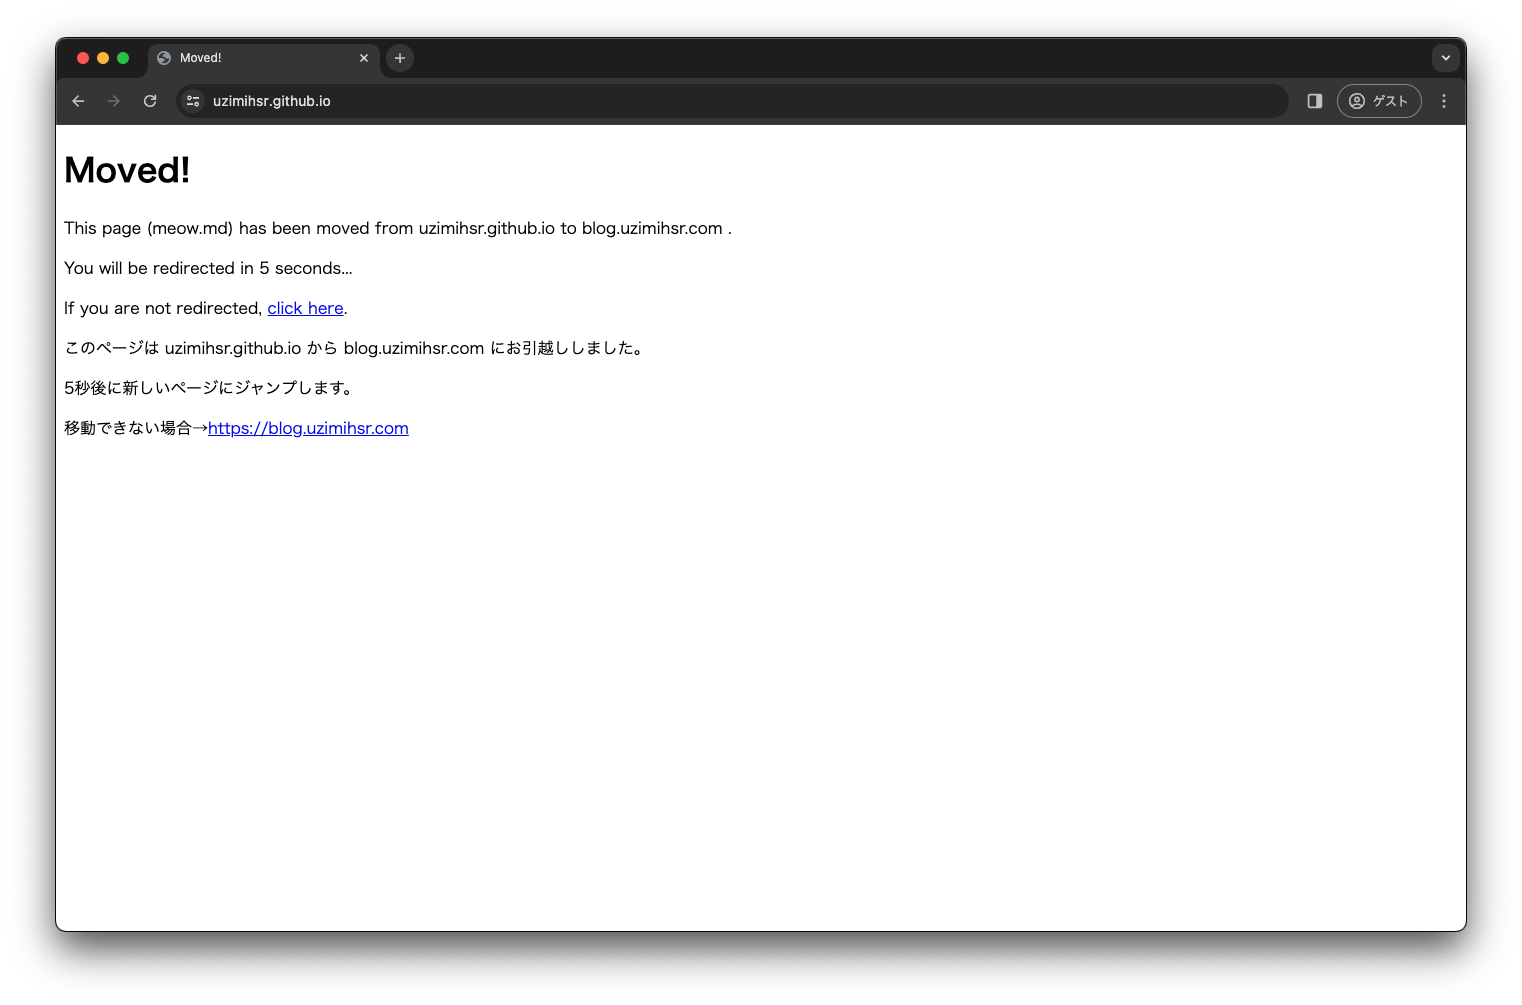
5秒放置するとhttps://blog.uzimihsr.com/にジャンプ(リダイレクト)する。
(JavaScriptが無効だと動かないけど)
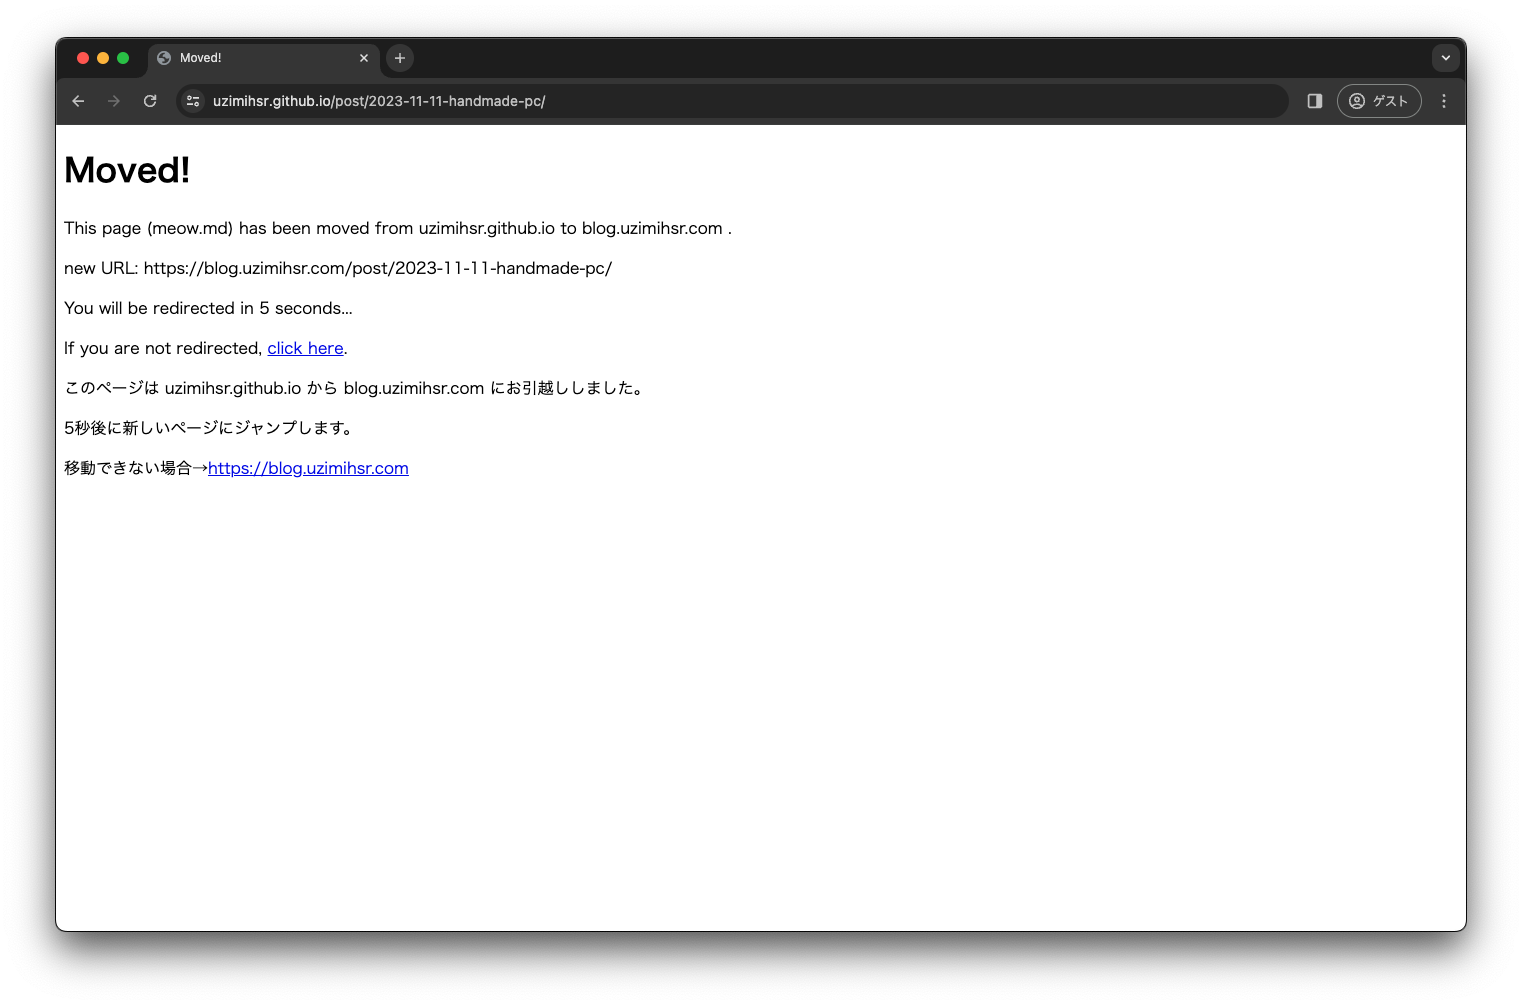
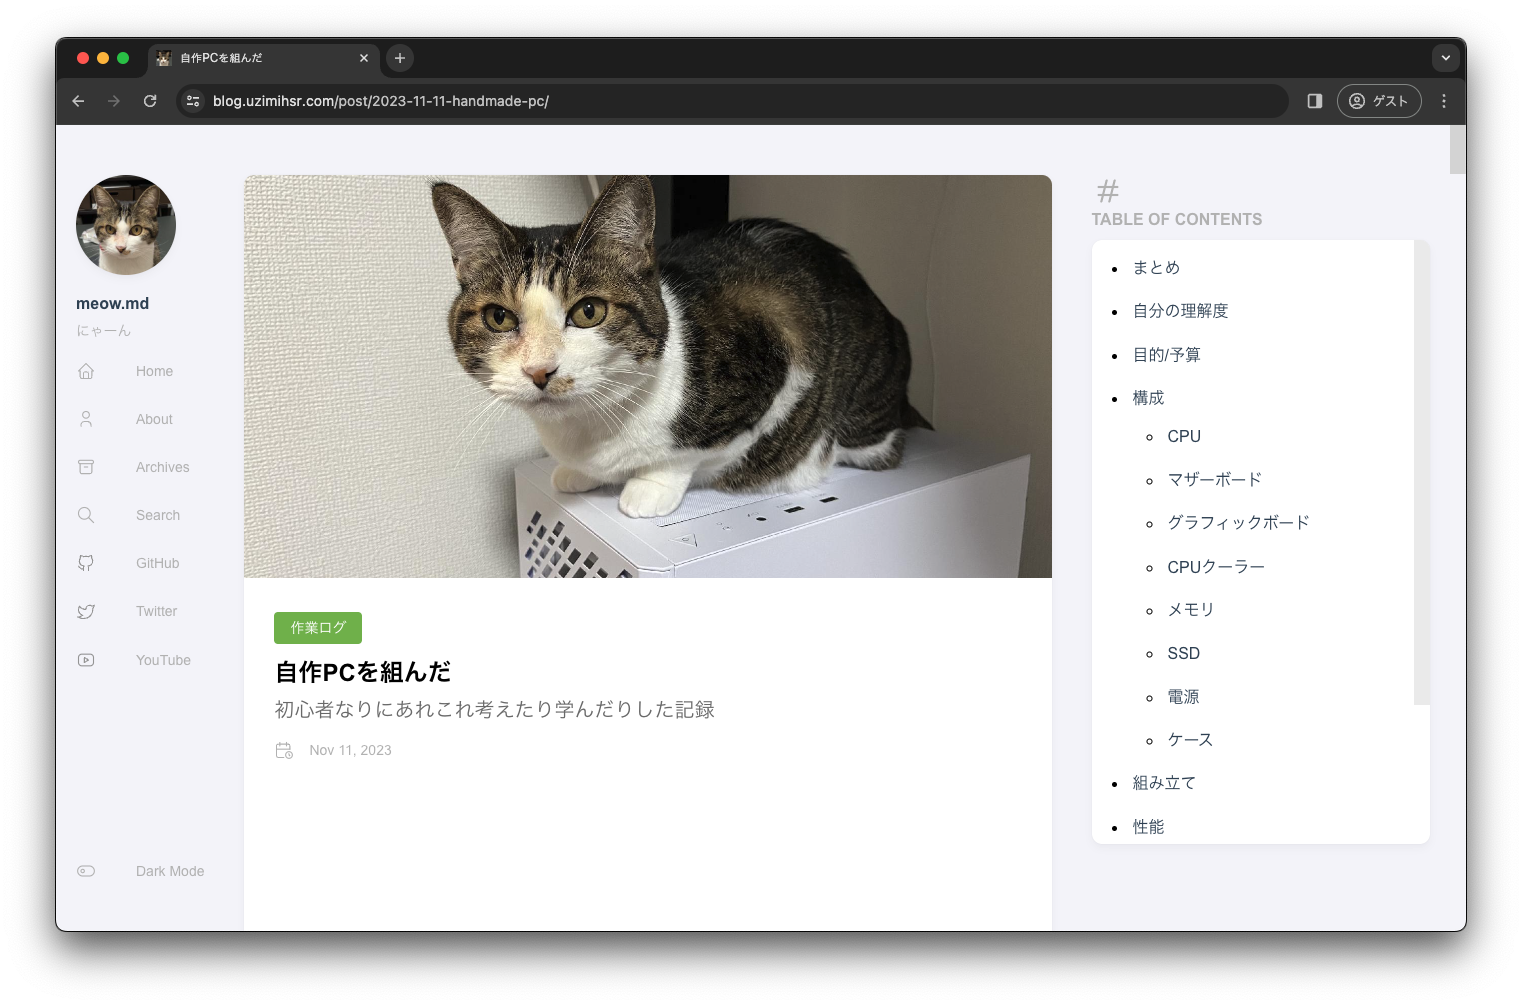
https://uzimihsr.github.io/post/2023-11-11-handmade-pc/みたいにホスト名以降のパスが指定されている場合、404.htmlによってhttps://blog.uzimihsr.com/post/2023-11-11-handmade-pc/にリダイレクトする。
これで移行元から移行先へのリダイレクト設定もできた。
ブログのお引越し作業は以上で終わり。
おつかれさまでした…
おわり
手探りでめちゃめちゃ時間はかかったが、
なんとかブログのお引越しができた(はず)。
たいへんだった〜。
Firebase Hostingならページのサイズは10Gまで無料だし、
それを超えても課金すれば継続して利用できるはずなので
きっと二度とやることはないでしょう…🚩
おまけ