Summary
This is my note on running CentOS Stream 8 via VirtualBox on MacOS.
Prerequisites
- macOS Big Sur 11.6.4
- 2.5GHz quad-core Intel Core i7
- VirtualBox 6.1.32
- CentOS Stream release 8
- Linux version 4.18.0-365.el8.x86_64
What I did
Install VirtualBox
Install the dmg for OS X hosts from https://www.virtualbox.org/ then run VirtualBox.pkg.
Follow the instructions and VirtualBox will appear on /Applications.
Create a VM
Start VirtualBox and click “New” to create a VM.
My settings are as follows.
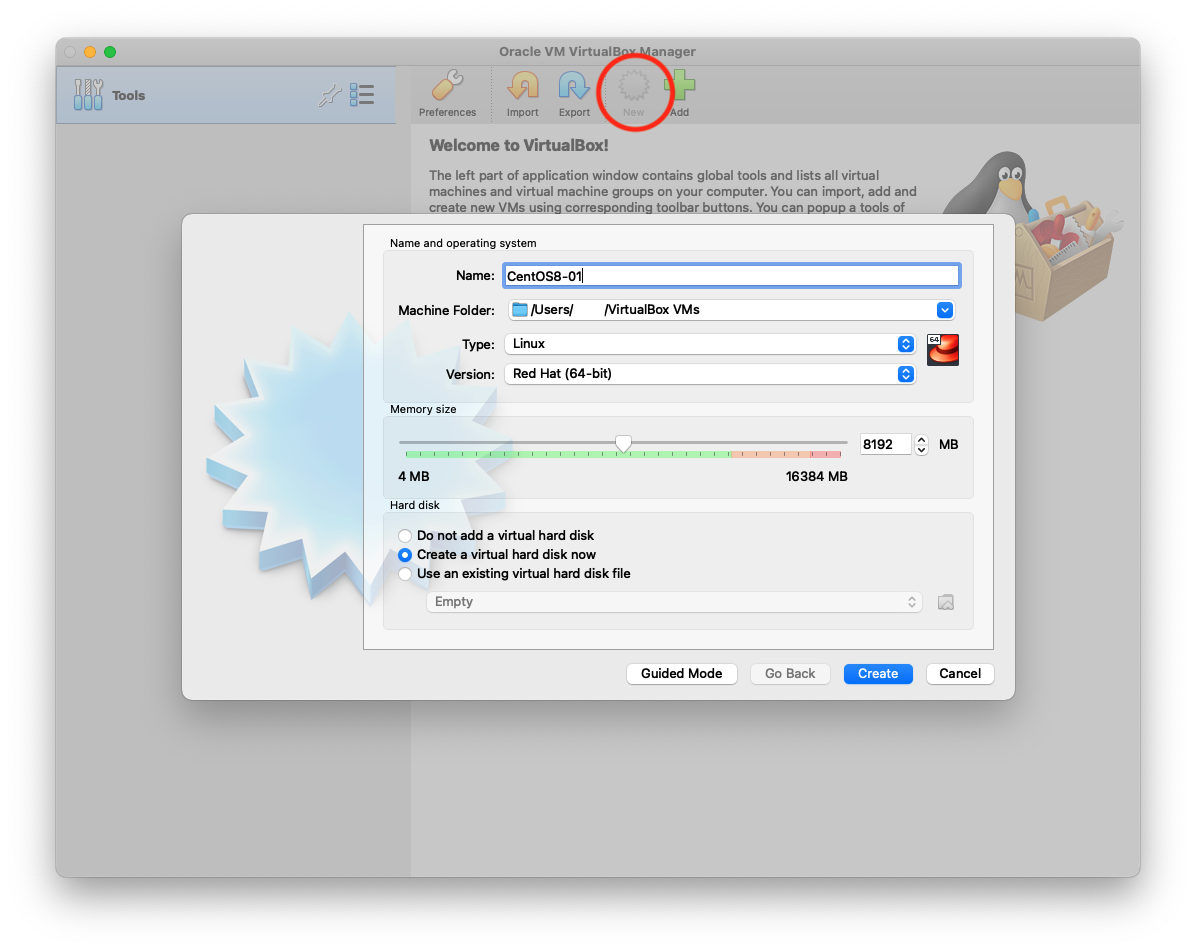
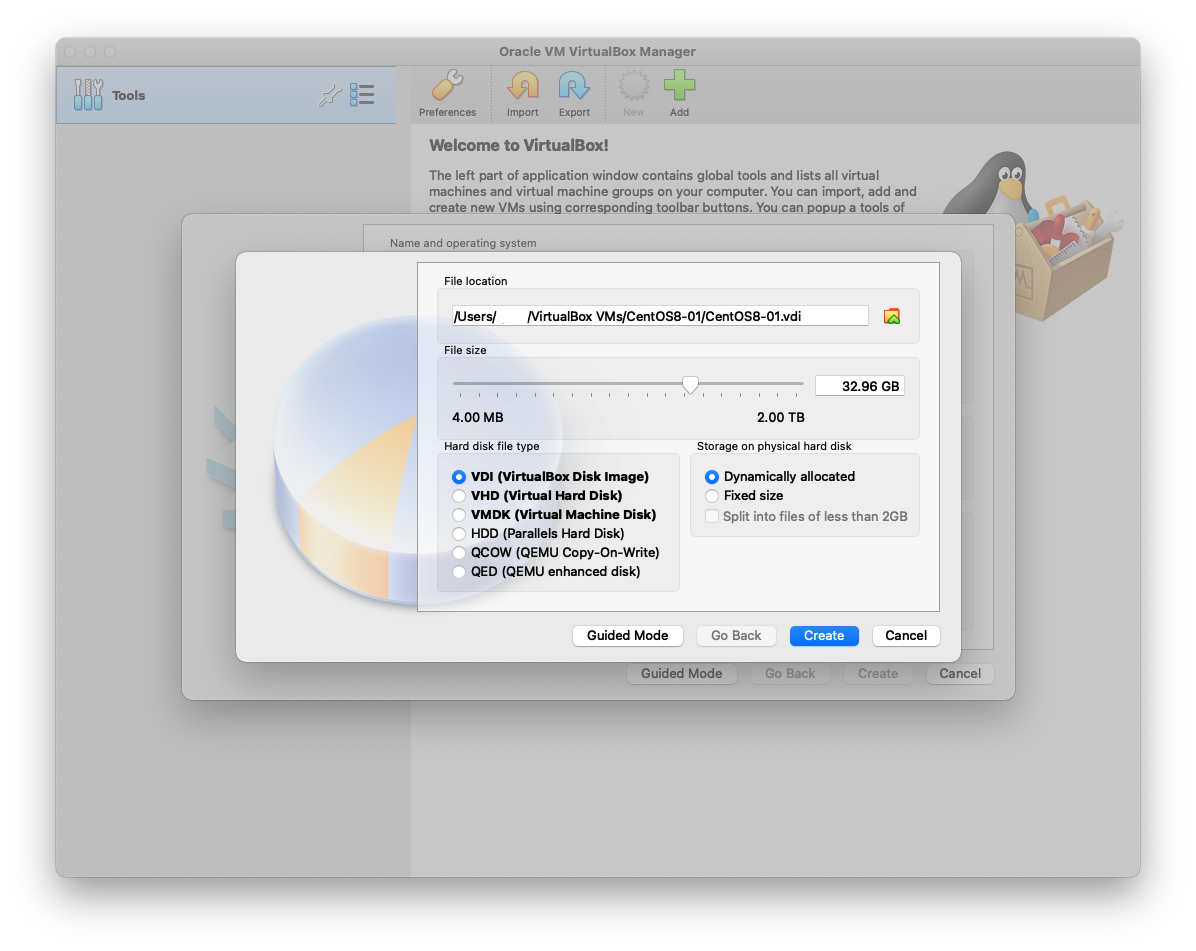
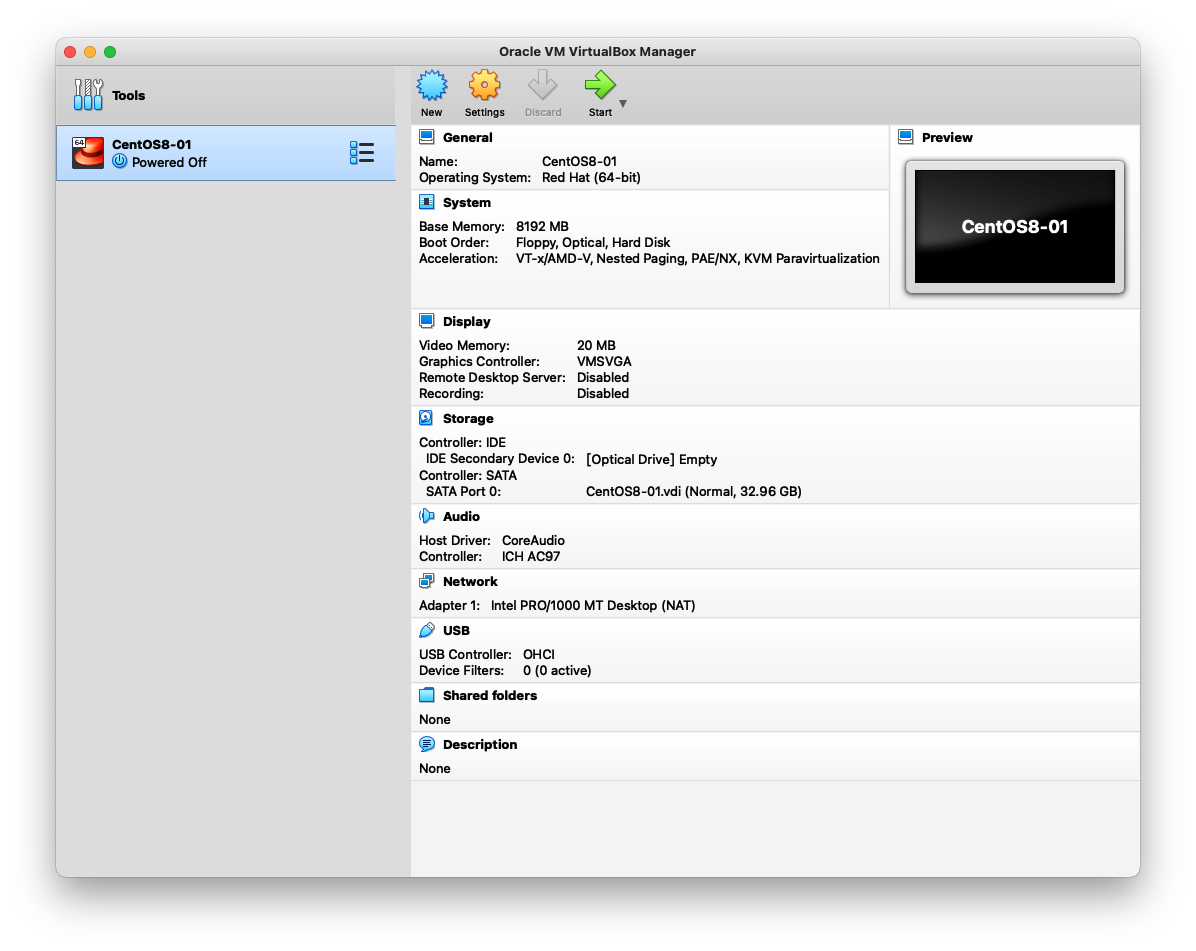
The following is an overview of the VM I created.
Install CentOS Stream 8
In order to run CentOS on a VM, you have to download the image from https://www.centos.org/download/ .
I selected CentOS Stream 8(x86_64) for this time.
Any mirror will do, but you need to download CentOS-Stream-8-x86_64-YYYYMMDD-dvd1.iso.
The file is about 10GB and took about 20 minutes or more to download.
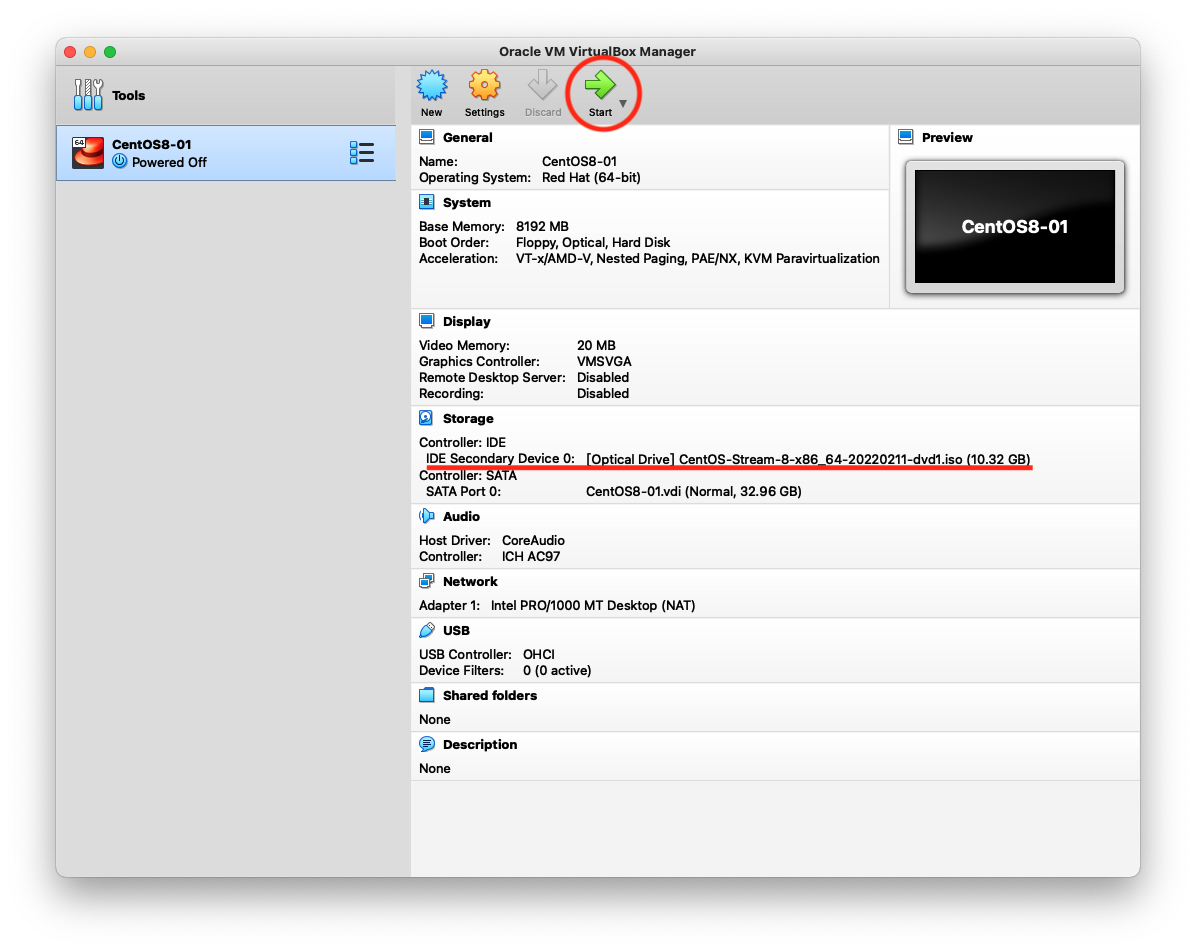
After downloading the .iso file, mount it in the VM on VirtualBox.
In the “Storage” section, specify the downloaded .iso file for “IDE Secondary Device 0”.
Click “Start”.
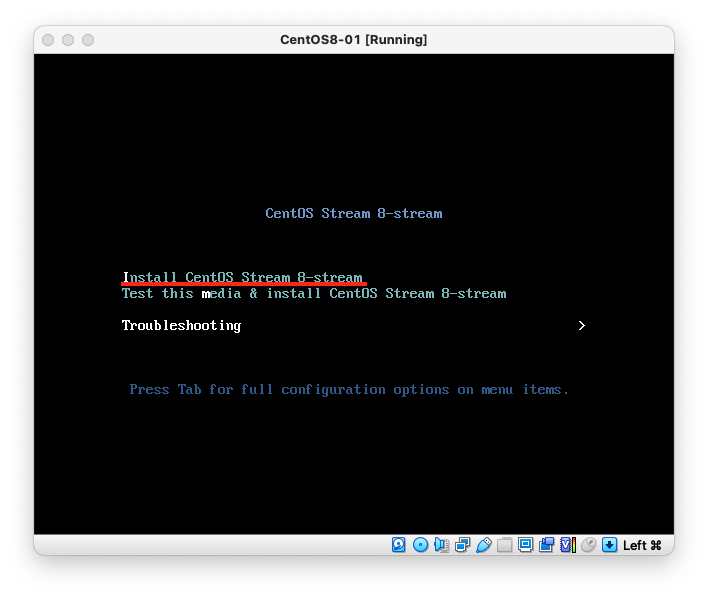
A new window will appears. Select “Install CentOS Stream 8-stream”.
Select any language you use in the next window.
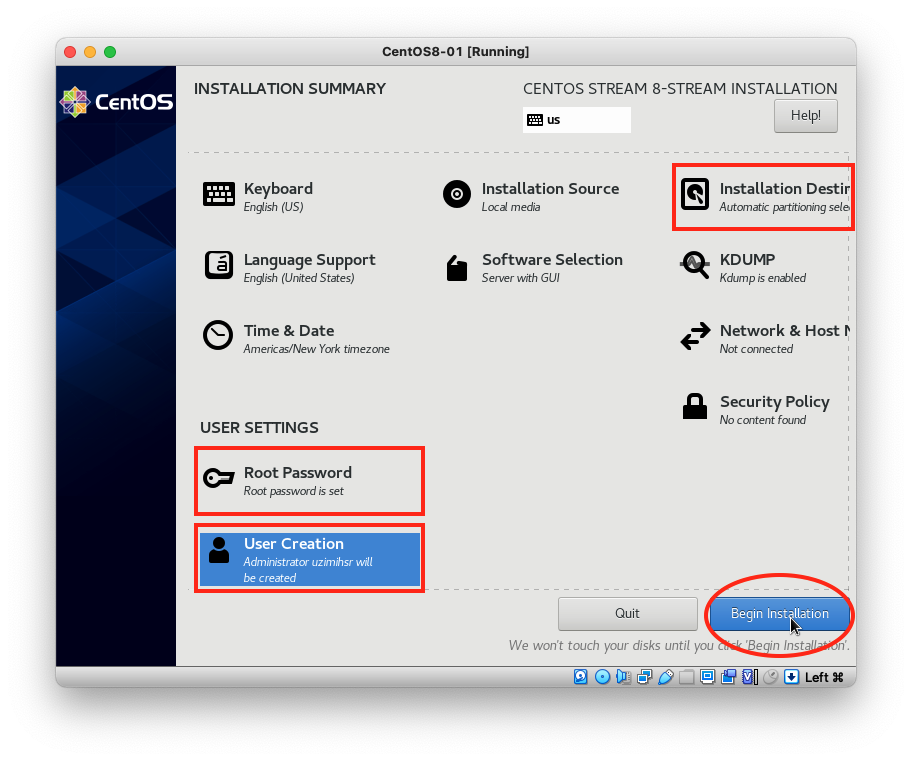
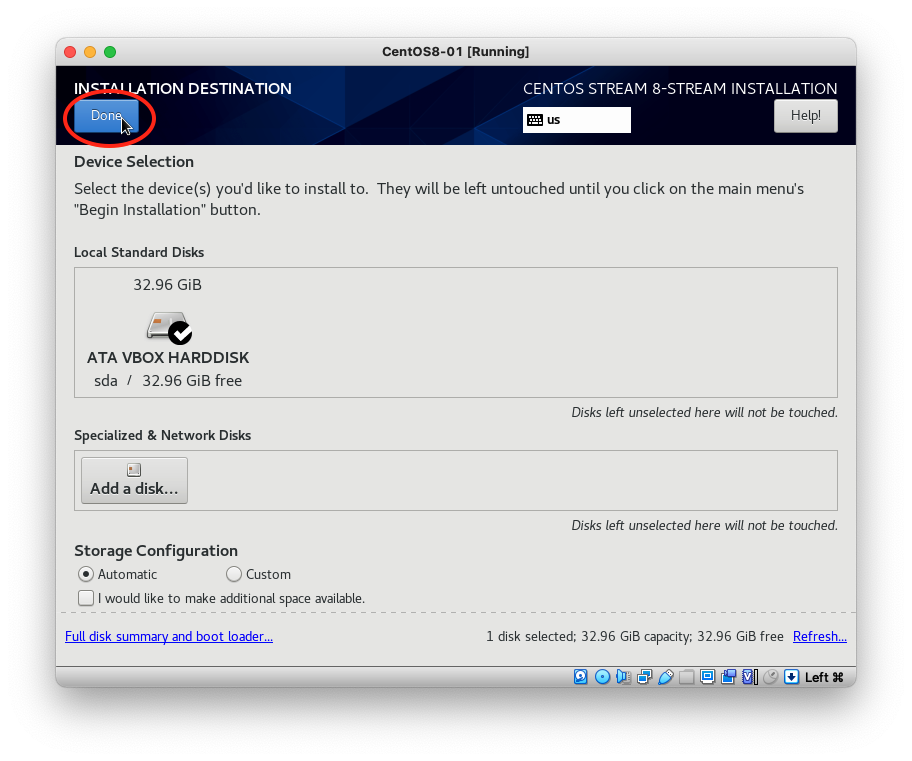
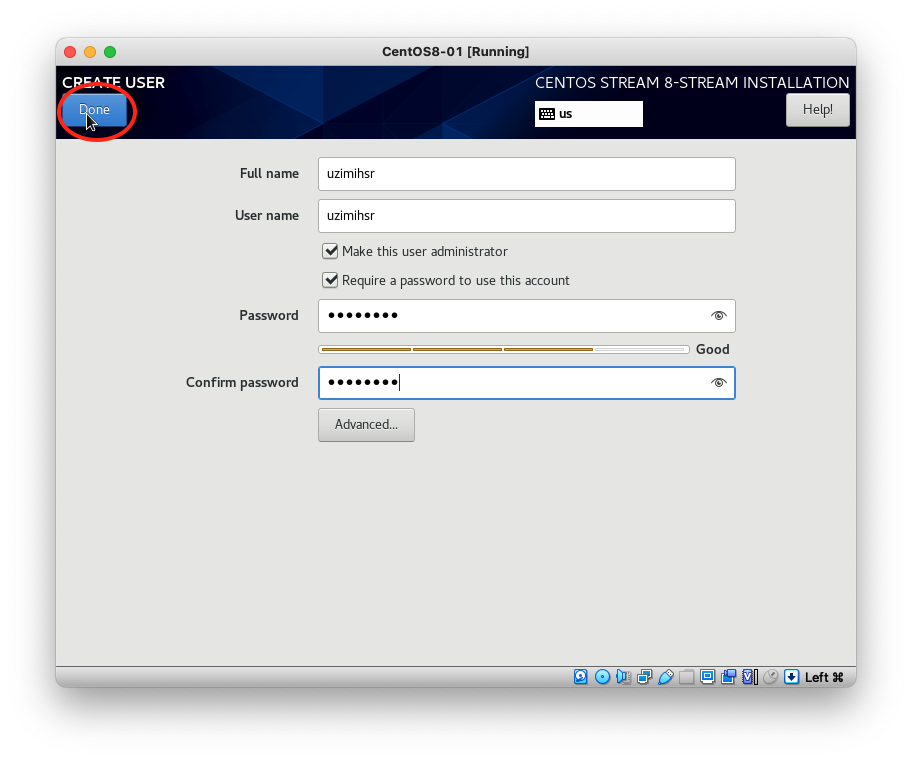
When the following window appears, fix the options marked with a color.
I configured “Installation Destination”, “Root Password”, and “User Creation” for this time.
After configuration, click “Begin Installation”.

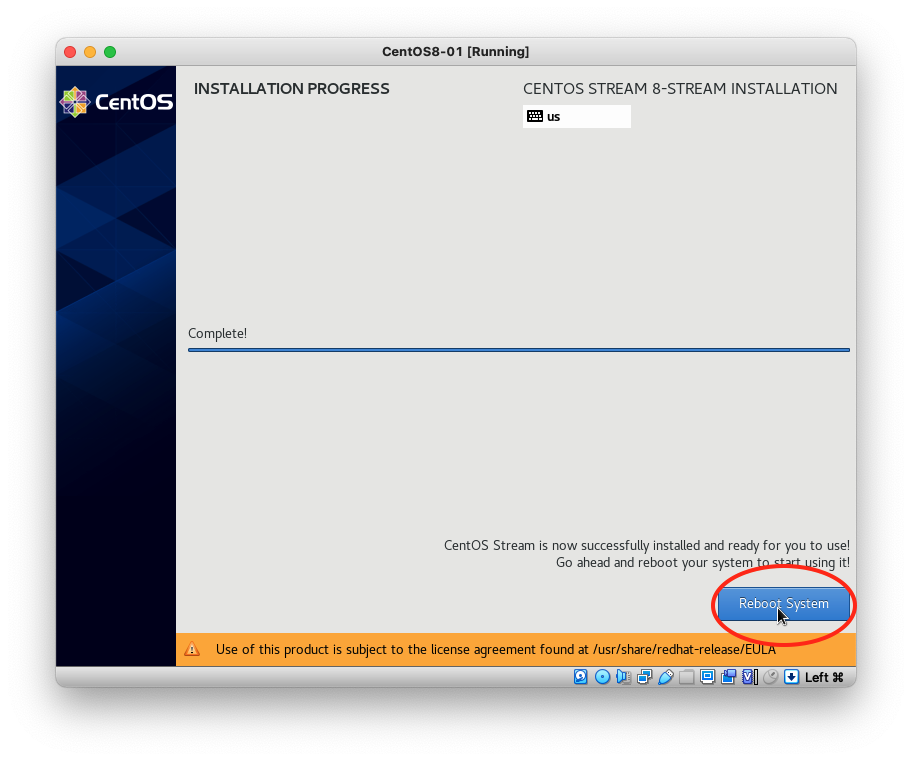
It took about 10 minutes to install.
After installation, click “Reboot System”.
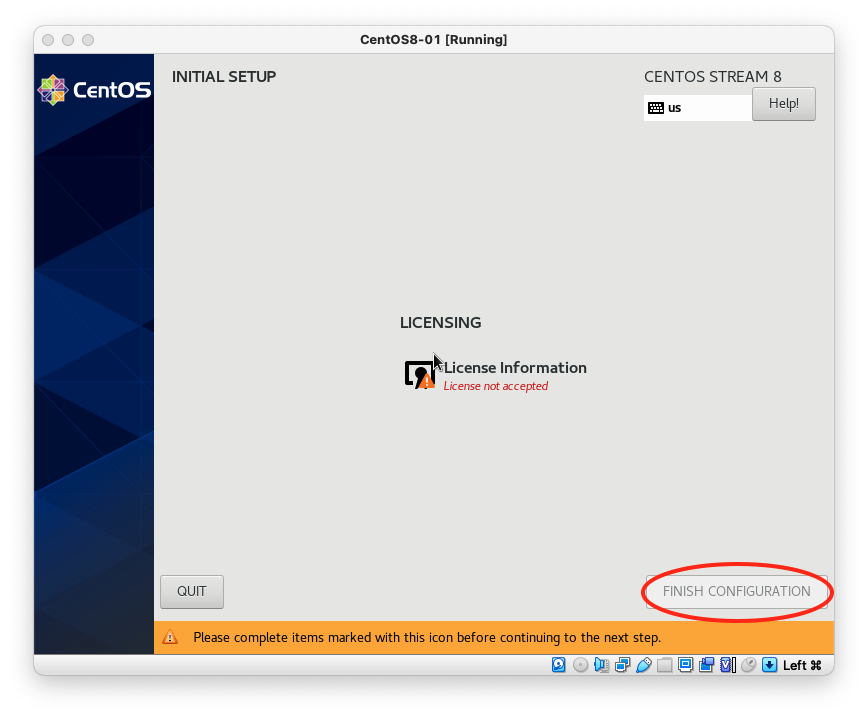
A new window will appear.
Accept the license and click “FINISH CONFIGURATION”.
Some option windows will appear, but you can proceed as you wish.
Finally you can see GNOME Desktop.🎉
At first, update rpm packages.
Launch a terminal from “Activities” in the upper-left corner then run yum update.
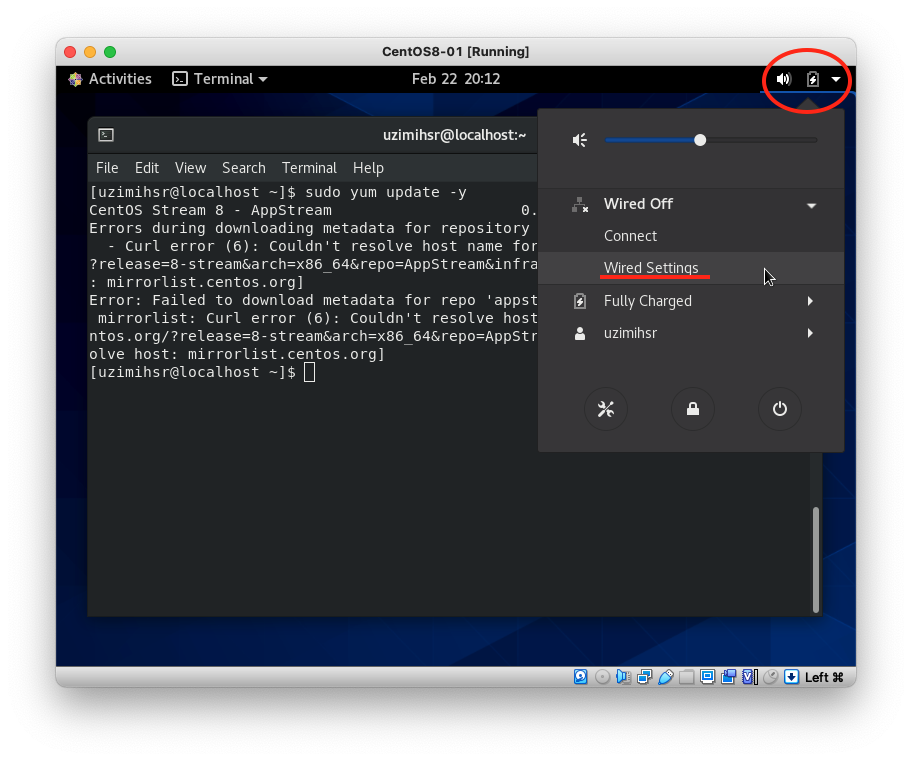
Oops! I met the error “Could not resolve host”.
[uzimihsr@localhost ~]$ sudo yum update -y
CentOS Stream 8 - AppStream                     0.0  B/s |   0  B     00:00
Errors during downloading metadata for repository 'appstream':
  - Curl error (6): Couldn't resolve host name for http://mirrorlist.centos.org/?release=8-stream&arch=x86_64&repo=AppStream&infra=stock [Could not resolve host: mirrorlist.centos.org]
Error: Failed to download metadata for repo 'appstream': Cannot prepare internal mirrorlist: Curl error (6): Couldn't resolve host name for http://mirrorlist.centos.org/?release=8-stream&arch=x86_64&repo=AppStream&infra=stock [Could not resolve host: mirrorlist.centos.org]
You can see the status in the upper-right corner shows “Wired Off”.
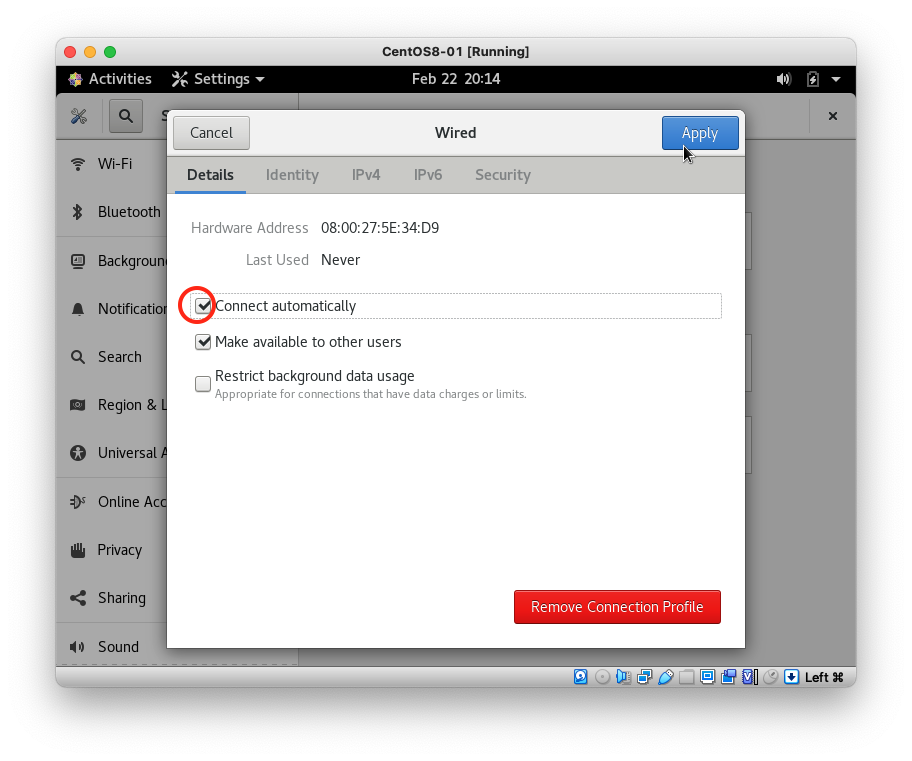
Go to “Wired Settings” > “⚙️” and enable “Connect automatically”.
Now we can see “Wired Connected” in the status.
Try yum update again. It will succeed this time.
sudo yum update -y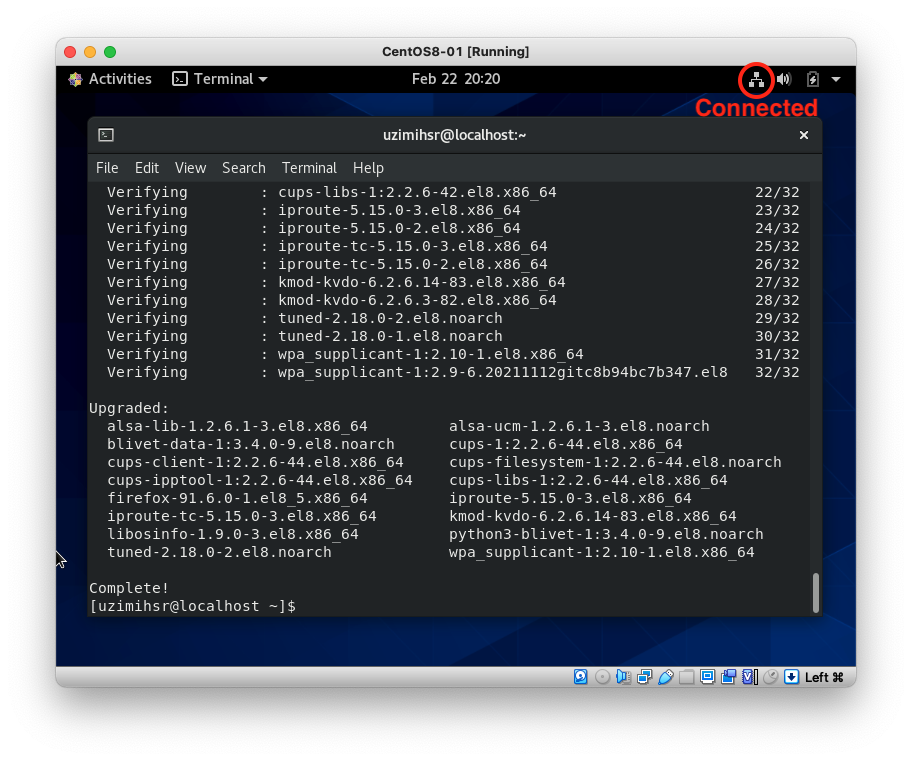
Install Guest Additions
Guest Additions make it easy to integrate VirtualBox VMs and the host OS.
https://www.virtualbox.org/manual/ch04.html
Back to the host OS.
Select “VirtualBox VM”→“Devices”→“Insert Guest Additions CD image…”.
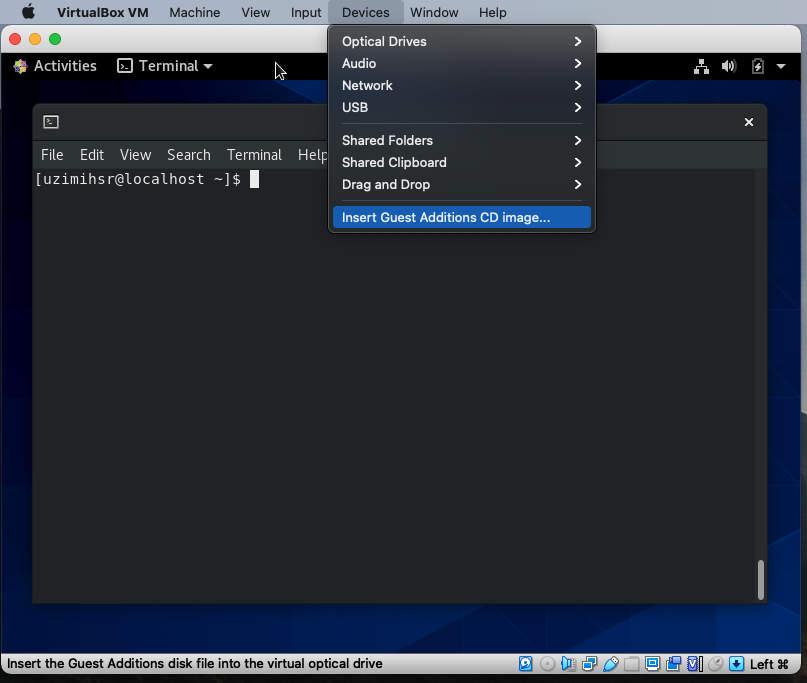
You will see some windows with warnings about the software or a request for the administrator password, but proceed anyway.
A new terminal will appear and the scripts will run on it.
Aww. I met the error “Kernel headers not found for target kernel”.
Verifying archive integrity... All good.
Uncompressing VirtualBox 6.1.32 Guest Additions for Linux........
VirtualBox Guest Additions installer
Copying additional installer modules ...
Installing additional modules ...
VirtualBox Guest Additions: Starting.
VirtualBox Guest Additions: Building the VirtualBox Guest Additions kernel
modules.  This may take a while.
VirtualBox Guest Additions: To build modules for other installed kernels, run
VirtualBox Guest Additions:   /sbin/rcvboxadd quicksetup <version>
VirtualBox Guest Additions: or
VirtualBox Guest Additions:   /sbin/rcvboxadd quicksetup all
VirtualBox Guest Additions: Kernel headers not found for target kernel
4.18.0-365.el8.x86_64. Please install them and execute
  /sbin/rcvboxadd setup
modprobe vboxguest failed
The log file /var/log/vboxadd-setup.log may contain further information.
Press Return to close this window...
Let’s install kernel-headers and kernel-devel, then reboot the OS.
sudo yum install -y kernel-headers kernel-devel
sudo reboot
After rebooting, open a terminal and execute the command shown in the previous message.
Oh, no. I met the different error “Please install the gcc make perl packages from your distribution”.
[uzimihsr@localhost ~]$ sudo /sbin/rcvboxadd setup
VirtualBox Guest Additions: Starting.
VirtualBox Guest Additions: Building the VirtualBox Guest Additions kernel
modules.  This may take a while.
VirtualBox Guest Additions: To build modules for other installed kernels, run
VirtualBox Guest Additions:   /sbin/rcvboxadd quicksetup <version>
VirtualBox Guest Additions: or
VirtualBox Guest Additions:   /sbin/rcvboxadd quicksetup all
VirtualBox Guest Additions: Building the modules for kernel
4.18.0-365.el8.x86_64.

This system is currently not set up to build kernel modules.
Please install the gcc make perl packages from your distribution.
ValueError: File context for /opt/VBoxGuestAdditions-6.1.32/other/mount.vboxsf already defined
modprobe vboxguest failed
The log file /var/log/vboxadd-setup.log may contain further information.
Install them.
sudo yum install -y gcc make perlExecute the command again.
The new error came out, but I couldn’t figure it out.
[uzimihsr@localhost ~]$ sudo /sbin/rcvboxadd setup
VirtualBox Guest Additions: Starting.
VirtualBox Guest Additions: Building the VirtualBox Guest Additions kernel
modules.  This may take a while.
VirtualBox Guest Additions: To build modules for other installed kernels, run
VirtualBox Guest Additions:   /sbin/rcvboxadd quicksetup <version>
VirtualBox Guest Additions: or
VirtualBox Guest Additions:   /sbin/rcvboxadd quicksetup all
VirtualBox Guest Additions: Building the modules for kernel
4.18.0-365.el8.x86_64.

VirtualBox Guest Additions: Look at /var/log/vboxadd-setup.log to find out what
went wrong
ValueError: File context for /opt/VBoxGuestAdditions-6.1.32/other/mount.vboxsf already defined
modprobe vboxguest failed
The log file /var/log/vboxadd-setup.log may contain further information.
Let’s open the log file to see the details.
It said “please install libelf-dev, libelf-devel or elfutils-libelf-devel”.
[uzimihsr@localhost ~]$ cat /var/log/vboxadd-setup.log
Building the main Guest Additions 6.1.32 module for kernel 4.18.0-365.el8.x86_64.
Error building the module.  Build output follows.
make V=1 CONFIG_MODULE_SIG= CONFIG_MODULE_SIG_ALL= -C /lib/modules/4.18.0-365.el8.x86_64/build M=/tmp/vbox.0 SRCROOT=/tmp/vbox.0 -j1 modules
Makefile:985: *** "Cannot generate ORC metadata for CONFIG_UNWINDER_ORC=y, please install libelf-dev, libelf-devel or elfutils-libelf-devel".  Stop.
make: *** [/tmp/vbox.0/Makefile-footer.gmk:117: vboxguest] Error 2
modprobe vboxguest failed
I tried yum search for the package, but there was only elfutils-libelf-devel.
Install it.
sudo yum install -y elfutils-libelf-devel
Try again.
Maybe it worked?
[uzimihsr@localhost ~]$ sudo /sbin/rcvboxadd setup
VirtualBox Guest Additions: Starting.
VirtualBox Guest Additions: Building the VirtualBox Guest Additions kernel
modules.  This may take a while.
VirtualBox Guest Additions: To build modules for other installed kernels, run
VirtualBox Guest Additions:   /sbin/rcvboxadd quicksetup <version>
VirtualBox Guest Additions: or
VirtualBox Guest Additions:   /sbin/rcvboxadd quicksetup all
VirtualBox Guest Additions: Building the modules for kernel
4.18.0-365.el8.x86_64.

VirtualBox Guest Additions: Look at /var/log/vboxadd-setup.log to find out what
went wrong
ValueError: File context for /opt/VBoxGuestAdditions-6.1.32/other/mount.vboxsf already defined
VirtualBox Guest Additions: Running kernel modules will not be replaced until
the system is restarted
[uzimihsr@localhost ~]$ echo $?
0
Although there is another compilation error in the log file, but the exit code of the command was 0, and the message told me to reboot to let kernels load the modules.
[uzimihsr@localhost ~]$ cat /var/log/vboxadd-setup.log
Building the main Guest Additions 6.1.32 module for kernel 4.18.0-365.el8.x86_64.
Building the shared folder support module.
Building the graphics driver module.
Error building the module.  Build output follows.
make V=1 CONFIG_MODULE_SIG= CONFIG_MODULE_SIG_ALL= -C /lib/modules/4.18.0-365.el8.x86_64/build M=/tmp/vbox.0 SRCROOT=/tmp/vbox.0 -j1 modules
test -e include/generated/autoconf.h -a -e include/config/auto.conf || (	\
echo >&2;							\
echo >&2 "  ERROR: Kernel configuration is invalid.";		\
echo >&2 "         include/generated/autoconf.h or include/config/auto.conf are missing.";\
echo >&2 "         Run 'make oldconfig && make prepare' on kernel src to fix it.";	\
echo >&2 ;							\
/bin/false)
mkdir -p /tmp/vbox.0/.tmp_versions ; rm -f /tmp/vbox.0/.tmp_versions/*
make -f ./scripts/Makefile.build obj=/tmp/vbox.0
(cat /dev/null;   echo kernel//tmp/vbox.0/vboxvideo.ko;) > /tmp/vbox.0/modules.order
  gcc -Wp,-MD,/tmp/vbox.0/.hgsmi_base.o.d  -nostdinc -isystem /usr/lib/gcc/x86_64-redhat-linux/8/include -I./arch/x86/include -I./arch/x86/include/generated   -I./include/drm-backport -I./include -I./arch/x86/include/uapi -I./arch/x86/include/generated/uapi -I./include/uapi -I./include/generated/uapi -include ./include/linux/kconfig.h -include ./include/linux/compiler_types.h -D__KERNEL__ -Wall -Wundef -Wstrict-prototypes -Wno-trigraphs -fno-strict-aliasing -fno-common -fshort-wchar -Werror-implicit-function-declaration -Wno-format-security -std=gnu89 -fno-PIE -DCC_HAVE_ASM_GOTO -mno-sse -mno-mmx -mno-sse2 -mno-3dnow -mno-avx -m64 -falign-jumps=1 -falign-loops=1 -mno-80387 -mno-fp-ret-in-387 -mpreferred-stack-boundary=3 -mskip-rax-setup -mtune=generic -mno-red-zone -mcmodel=kernel -funit-at-a-time -DCONFIG_AS_CFI=1 -DCONFIG_AS_CFI_SIGNAL_FRAME=1 -DCONFIG_AS_CFI_SECTIONS=1 -DCONFIG_AS_SSSE3=1 -DCONFIG_AS_CRC32=1 -DCONFIG_AS_AVX=1 -DCONFIG_AS_AVX2=1 -DCONFIG_AS_AVX512=1 -DCONFIG_AS_SHA1_NI=1 -DCONFIG_AS_SHA256_NI=1 -DCONFIG_TPAUSE=1 -pipe -Wno-sign-compare -fno-asynchronous-unwind-tables -mindirect-branch=thunk-extern -mindirect-branch-register -fno-jump-tables -fno-delete-null-pointer-checks -Wno-frame-address -Wno-format-truncation -Wno-format-overflow -Wno-int-in-bool-context -O2 --param=allow-store-data-races=0 -Wframe-larger-than=2048 -fstack-protector-strong -Wno-unused-but-set-variable -Wno-unused-const-variable -g -gdwarf-4 -pg -mrecord-mcount -mfentry -DCC_USING_FENTRY -fno-inline-functions-called-once -Wdeclaration-after-statement -Wno-pointer-sign -Wno-stringop-truncation -Wno-maybe-uninitialized -fno-strict-overflow -fno-merge-all-constants -fmerge-constants -fno-stack-check -fconserve-stack -Werror=implicit-int -Werror=strict-prototypes -Werror=date-time -Werror=incompatible-pointer-types -Werror=designated-init -fmacro-prefix-map=./= -Wno-packed-not-aligned -I./include -I/tmp/vbox.0/ -I./include/drm -D__KERNEL__ -DMODULE -DRT_WITHOUT_PRAGMA_ONCE -DRT_ARCH_AMD64  -DMODULE  -DKBUILD_BASENAME='"hgsmi_base"' -DKBUILD_MODNAME='"vboxvideo"' -c -o /tmp/vbox.0/.tmp_hgsmi_base.o /tmp/vbox.0/hgsmi_base.c
In file included from /tmp/vbox.0/hgsmi_base.c:27:
/tmp/vbox.0/vbox_drv.h:175:11: fatal error: drm/ttm/ttm_memory.h: No such file or directory
 # include <drm/ttm/ttm_memory.h>
           ^~~~~~~~~~~~~~~~~~~~~~
compilation terminated.
make[2]: *** [scripts/Makefile.build:316: /tmp/vbox.0/hgsmi_base.o] Error 1
make[1]: *** [Makefile:1577: _module_/tmp/vbox.0] Error 2
make: *** [/tmp/vbox.0/Makefile-footer.gmk:117: vboxvideo] Error 2
[uzimihsr@localhost ~]$ sudo reboot
Now the mouse pointer moves seamlessly. Yeah.
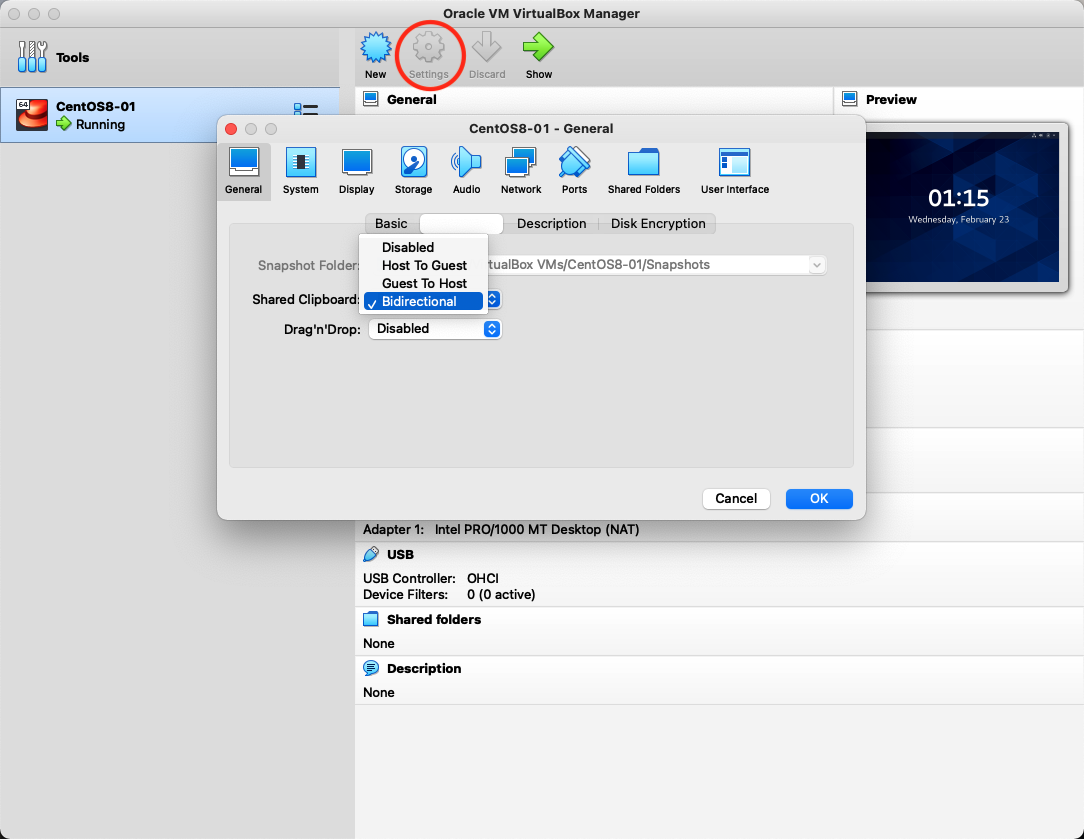
As a final touch, enable the shared clipboard.
On VirtualBox, set “Settings” > “General” > “Advanced” > “Shared Clipboard” to “Bidirectional”.
Now you can copy and paste across the VM(CentOS) and the host(macOS).
That’s it for this time.
(The following is the same content in Japanese.)
まとめ
久しぶりにVirtualBoxで遊ぼうとしたら動かなくなってたので最初から環境構築しなおした。
いろいろ詰まったので手順を残しておく。
環境
- macOS Big Sur 11.6.4
- 2.5GHz quad-core Intel Core i7
- VirtualBox 6.1.32
- CentOS Stream release 8
- Linux version 4.18.0-365.el8.x86_64
やったこと
VirtualBoxのインストール
https://www.virtualbox.org/ からOSX用のdmgファイルをダウンロードして中に入っているインストーラを起動する。
インストーラを起動して指示に従っていけば/Applications配下にVirtualBoxがインストールされる。
VMの作成
VirtualBoxを起動して"New"からVMの作成を行う。
名前は適当で、メモリのサイズも無理のない範囲で選ぶ。
ストレージは32GB程度確保する。
作成したVMの情報はこんな感じ。
CentOS Stream 8のインストールとセットアップ
作成したVMで起動するOSのイメージが必要なので、
https://www.centos.org/download/ から持ってくる。
今回はx86_64用CentOS Stream 8を選択。
ミラーはどこでもいいのでCentOS-Stream-8-x86_64-YYYYMMDD-dvd1.isoをダウンロードする。
10GBくらいあってダウンロードには30分程度かかった。
isoを落とせたら再度VirtualBoxに戻り、
先程作成したVMの設定の"Storage"で"IDE Secondary Device 0"を押して先程ダウンロードしたisoファイルを選択した状態で"Start"する。
別ウインドウが出るので"Install CentOS Stream 8-stream"を押す。
CentOSのインストール画面が開くので適当に言語を選んで進む。
次の画面になったら色が変わっている項目を埋める。
今回は"Installation Destination", “Root Password”, “User Creation"だけいじった。
“Begin Installation"を押してインストールを開始。
インストールは10分ちょっとかかる。
インストールが終わったら"Reboot System"から再起動する。
再起動が成功するとライセンスに同意しろ的な画面が出るので同意した上で"FINISH CONFIGURATION"を押す。
またまた言語とかの設定画面が出るが適当に選択すればデスクトップ画面にたどり着ける。
まずはパッケージを更新したいので、左上の"Activities"から端末を開いてyum updateする。
すると名前解決できないぞ的なエラーに。
[uzimihsr@localhost ~]$ sudo yum update -y
CentOS Stream 8 - AppStream                     0.0  B/s |   0  B     00:00
Errors during downloading metadata for repository 'appstream':
  - Curl error (6): Couldn't resolve host name for http://mirrorlist.centos.org/?release=8-stream&arch=x86_64&repo=AppStream&infra=stock [Could not resolve host: mirrorlist.centos.org]
Error: Failed to download metadata for repo 'appstream': Cannot prepare internal mirrorlist: Curl error (6): Couldn't resolve host name for http://mirrorlist.centos.org/?release=8-stream&arch=x86_64&repo=AppStream&infra=stock [Could not resolve host: mirrorlist.centos.org]
いろいろ見てると右上のステータスで"Wired Off"になっていて、どうやらネットワークにつながっていないっぽい。
“Wired Settings”→"⚙️"を開いて"Connect automatically"にチェックを入れて適用する。
すると右上に"wired connected"のマークが出るようになるので再度パッケージ更新を試す。
今度はうまく行った。
sudo yum update -y
Guest Additionsの導入
VirtualBoxで立てたVMにGuest Additionsっていうのを入れるとホストOSとシームレスにGUI(マウス)操作ができたりして色々便利らしい。
https://www.virtualbox.org/manual/ch04.html
ホスト(Mac)側の操作に戻り、
“VirtualBox VM”→“Devices”→“Insert Guest Additions CD image…“を選択。
なんかVMの画面でソフトウェアの警告が出たり管理者権限を要求されるけどガンガン進む。
勝手に新しい端末が開いてスクリプトが動く。
…が、“モジュールのビルドに必要なカーネルヘッダがないよ"的なエラーで失敗する。
Verifying archive integrity... All good.
Uncompressing VirtualBox 6.1.32 Guest Additions for Linux........
VirtualBox Guest Additions installer
Copying additional installer modules ...
Installing additional modules ...
VirtualBox Guest Additions: Starting.
VirtualBox Guest Additions: Building the VirtualBox Guest Additions kernel
modules.  This may take a while.
VirtualBox Guest Additions: To build modules for other installed kernels, run
VirtualBox Guest Additions:   /sbin/rcvboxadd quicksetup <version>
VirtualBox Guest Additions: or
VirtualBox Guest Additions:   /sbin/rcvboxadd quicksetup all
VirtualBox Guest Additions: Kernel headers not found for target kernel
4.18.0-365.el8.x86_64. Please install them and execute
  /sbin/rcvboxadd setup
modprobe vboxguest failed
The log file /var/log/vboxadd-setup.log may contain further information.
Press Return to close this window...言われたとおりkernel-headersとkernel-develを入れる。
カーネル関連のパッケージを入れたときは再起動。
sudo yum install -y kernel-headers kernel-devel
sudo reboot
再起動後、さっきのエラーメッセージでカーネルヘッダのインストール後に実行するよう指定されていたコマンドを打つ。
またエラー。つらい。
今度は”gcc, make, perlが無いよ"と言われた。
[uzimihsr@localhost ~]$ sudo /sbin/rcvboxadd setup
VirtualBox Guest Additions: Starting.
VirtualBox Guest Additions: Building the VirtualBox Guest Additions kernel
modules.  This may take a while.
VirtualBox Guest Additions: To build modules for other installed kernels, run
VirtualBox Guest Additions:   /sbin/rcvboxadd quicksetup <version>
VirtualBox Guest Additions: or
VirtualBox Guest Additions:   /sbin/rcvboxadd quicksetup all
VirtualBox Guest Additions: Building the modules for kernel
4.18.0-365.el8.x86_64.

This system is currently not set up to build kernel modules.
Please install the gcc make perl packages from your distribution.
ValueError: File context for /opt/VBoxGuestAdditions-6.1.32/other/mount.vboxsf already defined
modprobe vboxguest failed
The log file /var/log/vboxadd-setup.log may contain further information.
言われたとおりに入れる。
sudo yum install -y gcc make perl再度実行。
またまたエラー。
[uzimihsr@localhost ~]$ sudo /sbin/rcvboxadd setup
VirtualBox Guest Additions: Starting.
VirtualBox Guest Additions: Building the VirtualBox Guest Additions kernel
modules.  This may take a while.
VirtualBox Guest Additions: To build modules for other installed kernels, run
VirtualBox Guest Additions:   /sbin/rcvboxadd quicksetup <version>
VirtualBox Guest Additions: or
VirtualBox Guest Additions:   /sbin/rcvboxadd quicksetup all
VirtualBox Guest Additions: Building the modules for kernel
4.18.0-365.el8.x86_64.

VirtualBox Guest Additions: Look at /var/log/vboxadd-setup.log to find out what
went wrong
ValueError: File context for /opt/VBoxGuestAdditions-6.1.32/other/mount.vboxsf already defined
modprobe vboxguest failed
The log file /var/log/vboxadd-setup.log may contain further information.
今度は何もわからないので、指定されたログファイルを確認する。
なんかlibelf-devがないよ的なことを言われている。
[uzimihsr@localhost ~]$ cat /var/log/vboxadd-setup.log
Building the main Guest Additions 6.1.32 module for kernel 4.18.0-365.el8.x86_64.
Error building the module.  Build output follows.
make V=1 CONFIG_MODULE_SIG= CONFIG_MODULE_SIG_ALL= -C /lib/modules/4.18.0-365.el8.x86_64/build M=/tmp/vbox.0 SRCROOT=/tmp/vbox.0 -j1 modules
Makefile:985: *** "Cannot generate ORC metadata for CONFIG_UNWINDER_ORC=y, please install libelf-dev, libelf-devel or elfutils-libelf-devel".  Stop.
make: *** [/tmp/vbox.0/Makefile-footer.gmk:117: vboxguest] Error 2
modprobe vboxguest failedlibelf-develはELFバイナリファイルをいじるためのユーティリティらしい(あんまり知らない)。
https://sourceware.org/elfutils/
yum searchかけた感じだとelfutils-libelf-develしか見つからなかったのでこれを入れる。
sudo yum install -y elfutils-libelf-devel
再度実行。
今度は行けたっぽい?
[uzimihsr@localhost ~]$ sudo /sbin/rcvboxadd setup
VirtualBox Guest Additions: Starting.
VirtualBox Guest Additions: Building the VirtualBox Guest Additions kernel
modules.  This may take a while.
VirtualBox Guest Additions: To build modules for other installed kernels, run
VirtualBox Guest Additions:   /sbin/rcvboxadd quicksetup <version>
VirtualBox Guest Additions: or
VirtualBox Guest Additions:   /sbin/rcvboxadd quicksetup all
VirtualBox Guest Additions: Building the modules for kernel
4.18.0-365.el8.x86_64.

VirtualBox Guest Additions: Look at /var/log/vboxadd-setup.log to find out what
went wrong
ValueError: File context for /opt/VBoxGuestAdditions-6.1.32/other/mount.vboxsf already defined
VirtualBox Guest Additions: Running kernel modules will not be replaced until
the system is restarted
[uzimihsr@localhost ~]$ echo $?
0
さっきと同じログファイルにはヘッダファイルが見つからない的なエラーが出てるんだけど、
終了コードが0だしモジュールを読み込むために再起動するよう言われてるのでそれに従う。
[uzimihsr@localhost ~]$ cat /var/log/vboxadd-setup.log
Building the main Guest Additions 6.1.32 module for kernel 4.18.0-365.el8.x86_64.
Building the shared folder support module.
Building the graphics driver module.
Error building the module.  Build output follows.
make V=1 CONFIG_MODULE_SIG= CONFIG_MODULE_SIG_ALL= -C /lib/modules/4.18.0-365.el8.x86_64/build M=/tmp/vbox.0 SRCROOT=/tmp/vbox.0 -j1 modules
test -e include/generated/autoconf.h -a -e include/config/auto.conf || (	\
echo >&2;							\
echo >&2 "  ERROR: Kernel configuration is invalid.";		\
echo >&2 "         include/generated/autoconf.h or include/config/auto.conf are missing.";\
echo >&2 "         Run 'make oldconfig && make prepare' on kernel src to fix it.";	\
echo >&2 ;							\
/bin/false)
mkdir -p /tmp/vbox.0/.tmp_versions ; rm -f /tmp/vbox.0/.tmp_versions/*
make -f ./scripts/Makefile.build obj=/tmp/vbox.0
(cat /dev/null;   echo kernel//tmp/vbox.0/vboxvideo.ko;) > /tmp/vbox.0/modules.order
  gcc -Wp,-MD,/tmp/vbox.0/.hgsmi_base.o.d  -nostdinc -isystem /usr/lib/gcc/x86_64-redhat-linux/8/include -I./arch/x86/include -I./arch/x86/include/generated   -I./include/drm-backport -I./include -I./arch/x86/include/uapi -I./arch/x86/include/generated/uapi -I./include/uapi -I./include/generated/uapi -include ./include/linux/kconfig.h -include ./include/linux/compiler_types.h -D__KERNEL__ -Wall -Wundef -Wstrict-prototypes -Wno-trigraphs -fno-strict-aliasing -fno-common -fshort-wchar -Werror-implicit-function-declaration -Wno-format-security -std=gnu89 -fno-PIE -DCC_HAVE_ASM_GOTO -mno-sse -mno-mmx -mno-sse2 -mno-3dnow -mno-avx -m64 -falign-jumps=1 -falign-loops=1 -mno-80387 -mno-fp-ret-in-387 -mpreferred-stack-boundary=3 -mskip-rax-setup -mtune=generic -mno-red-zone -mcmodel=kernel -funit-at-a-time -DCONFIG_AS_CFI=1 -DCONFIG_AS_CFI_SIGNAL_FRAME=1 -DCONFIG_AS_CFI_SECTIONS=1 -DCONFIG_AS_SSSE3=1 -DCONFIG_AS_CRC32=1 -DCONFIG_AS_AVX=1 -DCONFIG_AS_AVX2=1 -DCONFIG_AS_AVX512=1 -DCONFIG_AS_SHA1_NI=1 -DCONFIG_AS_SHA256_NI=1 -DCONFIG_TPAUSE=1 -pipe -Wno-sign-compare -fno-asynchronous-unwind-tables -mindirect-branch=thunk-extern -mindirect-branch-register -fno-jump-tables -fno-delete-null-pointer-checks -Wno-frame-address -Wno-format-truncation -Wno-format-overflow -Wno-int-in-bool-context -O2 --param=allow-store-data-races=0 -Wframe-larger-than=2048 -fstack-protector-strong -Wno-unused-but-set-variable -Wno-unused-const-variable -g -gdwarf-4 -pg -mrecord-mcount -mfentry -DCC_USING_FENTRY -fno-inline-functions-called-once -Wdeclaration-after-statement -Wno-pointer-sign -Wno-stringop-truncation -Wno-maybe-uninitialized -fno-strict-overflow -fno-merge-all-constants -fmerge-constants -fno-stack-check -fconserve-stack -Werror=implicit-int -Werror=strict-prototypes -Werror=date-time -Werror=incompatible-pointer-types -Werror=designated-init -fmacro-prefix-map=./= -Wno-packed-not-aligned -I./include -I/tmp/vbox.0/ -I./include/drm -D__KERNEL__ -DMODULE -DRT_WITHOUT_PRAGMA_ONCE -DRT_ARCH_AMD64  -DMODULE  -DKBUILD_BASENAME='"hgsmi_base"' -DKBUILD_MODNAME='"vboxvideo"' -c -o /tmp/vbox.0/.tmp_hgsmi_base.o /tmp/vbox.0/hgsmi_base.c
In file included from /tmp/vbox.0/hgsmi_base.c:27:
/tmp/vbox.0/vbox_drv.h:175:11: fatal error: drm/ttm/ttm_memory.h: No such file or directory
 # include <drm/ttm/ttm_memory.h>
           ^~~~~~~~~~~~~~~~~~~~~~
compilation terminated.
make[2]: *** [scripts/Makefile.build:316: /tmp/vbox.0/hgsmi_base.o] Error 1
make[1]: *** [Makefile:1577: _module_/tmp/vbox.0] Error 2
make: *** [/tmp/vbox.0/Makefile-footer.gmk:117: vboxvideo] Error 2
[uzimihsr@localhost ~]$ sudo reboot
再起動後はたしかにマウス操作がやりやすくなっている。
最後にクリップボード共有の設定を入れる。
VirtualBoxの画面で"Settings”→“General”→“Advanced”→“Shared Clipboard"を"Bidirectional"にすると、
ホスト(Mac)とVM(CentOS)をまたいだコピペができるようになって便利。
疲れたのでとりあえずここまで。
おわり
こういった地味な環境構築をたまにやるとたのしい。
VirtualBox使うのが久しぶりでいろいろ詰まったが良い練習になった。
おまけ