特定の人だけ許可したい
サーバー証明書のしくみを学んだので, 今度はクライアント認証のしくみを作ってみる.
やったことのまとめ
- 認証局を立ててクライアント証明書を作成した
- nginxでクライアント認証の設定をした
- MacからcurlとChromeでクライアント認証のかかったnginxに接続した

サーバー証明書がサーバーの正当性を証明してクライアントがサーバーを信頼するためのものであるのに対し,
クライアント証明書はその逆でクライアントの正当性を証明してサーバーがクライアントを信頼するためのもの.
不特定多数の相手に公開したくないサーバーにクライアント認証をかけることで,
有効なクライアント証明書を持つ特定の相手だけにこれを公開することができる.
つかうもの
- Raspberry Pi 3 Model B+
- OSはRaspbian(10.0)
- SSLサーバーとして使用
- IP固定済み
- OpenSSL
- OpenSSL 1.1.1c 28 May 2019
- ラズパイの初期装備
- nginx
- version 1.14.2
- ラズパイにインストール済み
- macOS Mojave 10.14
- クライアントとして使用
- Google Chrome
- バージョン: 83.0.4103.61(Official Build) (64 ビット)
やったこと
クライアント証明書の作成
まずはクライアント証明書を作成する.
といっても途中までの手順はサーバー証明書を作成したときとほとんど同じ.
まずはオレオレ認証局を建てる.
## 以下すべてラズパイで実行
# オレオレ認証局用ディレクトリ(ClientCA)で作業
$ mkdir ClientCA && cd ClientCA

# 認証局用の秘密鍵(ClientCA-private-key.pem)を作成
$ openssl genpkey -algorithm RSA -out ClientCA-private-key.pem

# 認証局の秘密鍵(ClientCA-private-key.pem)を使ったオレオレ証明書(ClientCA.pem)の作成
$ openssl req -x509 -key ClientCA-private-key.pem -out ClientCA.pem
You are about to be asked to enter information that will be incorporated
into your certificate request.
What you are about to enter is what is called a Distinguished Name or a DN.
There are quite a few fields but you can leave some blank
For some fields there will be a default value,
If you enter '.', the field will be left blank.
-----
Country Name (2 letter code) [AU]:
State or Province Name (full name) [Some-State]:
Locality Name (eg, city) []:
Organization Name (eg, company) [Internet Widgits Pty Ltd]:
Organizational Unit Name (eg, section) []:
Common Name (e.g. server FQDN or YOUR name) []:ClientCA
Email Address []:

# 署名のための準備
$ mkdir -p demoCA/newcerts
$ touch ./demoCA/index.txt
$ echo 01 > ./demoCA/serial次にクライアント証明書用の秘密鍵と証明書署名要求(CSR)を作成する.
# クライアント用ディレクトリ(Client)で作業
$ cd ../
$ mkdir Client && cd Client

# クライアント用の秘密鍵(Client-private-key.pem)を作成
$ openssl genpkey -algorithm RSA -out Client-private-key.pem

# クライアントの秘密鍵(Client-private-key.pem)からCSR(Client-csr.pem)を作成
$ openssl req -new -key Client-private-key.pem -out Client-csr.pem
You are about to be asked to enter information that will be incorporated
into your certificate request.
What you are about to enter is what is called a Distinguished Name or a DN.
There are quite a few fields but you can leave some blank
For some fields there will be a default value,
If you enter '.', the field will be left blank.
-----
Country Name (2 letter code) [AU]:
State or Province Name (full name) [Some-State]:
Locality Name (eg, city) []:
Organization Name (eg, company) [Internet Widgits Pty Ltd]:
Organizational Unit Name (eg, section) []:
Common Name (e.g. server FQDN or YOUR name) []:Client
Email Address []:

Please enter the following 'extra' attributes
to be sent with your certificate request
A challenge password []:
An optional company name []:次はクライアントのCSRを認証局で署名してクライアント証明書を作成する.
これによりこの証明書を持つクライアントの正当性を認証局(ClientCA)が証明したことになる.
# クライアントのCSR(Client-csr.pem)を認証局(ClientCA)に渡す
$ cp Client-csr.pem ../ClientCA/

# 認証局の秘密鍵(ClientCA-private-key.pem)と証明書(ClientCA.pem)で
# クライアントのCSR(Client-csr.pem)に署名してクライアント証明書(Client.pem)を作成
$ cd ../ClientCA
$ openssl ca -in Client-csr.pem -out Client.pem -keyfile ClientCA-private-key.pem -cert ClientCA.pem
Using configuration from /usr/lib/ssl/openssl.cnf
Check that the request matches the signature
Signature ok
Certificate Details:
        Serial Number: 1 (0x1)
        Validity
            Not Before: Jun 24 14:02:29 2020 GMT
            Not After : Jun 24 14:02:29 2021 GMT
        Subject:
            countryName               = AU
            stateOrProvinceName       = Some-State
            organizationName          = Internet Widgits Pty Ltd
            commonName                = Client
        X509v3 extensions:
            X509v3 Basic Constraints:
                CA:FALSE
            Netscape Comment:
                OpenSSL Generated Certificate
            X509v3 Subject Key Identifier:
                13:E6:B2:5D:88:06:CC:2C:17:BE:AA:98:92:B2:09:C3:BF:D4:AA:A4
            X509v3 Authority Key Identifier:
                keyid:9C:C0:54:1F:93:4C:F1:F9:0A:6D:2B:AF:8E:B0:80:54:F1:2A:EC:F3

Certificate is to be certified until Jun 24 14:02:29 2021 GMT (365 days)
Sign the certificate? [y/n]:y


1 out of 1 certificate requests certified, commit? [y/n]y
Write out database with 1 new entries
Data Base Updated

# クライアントに証明書(Client.pem)を渡す
$ mv ./Client.pem ../Client/さいごにクライアントの秘密鍵と証明書をくっつけてPKCS#12形式に変換する.
なんかしらんけどクライアント認証で使うときに一番メジャーなフォーマットらしい.
# 証明書(Client.pem)と秘密鍵(Client-private-key.pem)からPKCS#12形式のファイル(Client.p12)を作成
$ cd ../Client/
$ openssl pkcs12 -export -clcerts -in Client.pem -inkey Client-private-key.pem -out Client.p12
Enter Export Password:              # 任意のパスワードを設定する
Verifying - Enter Export Password: # 再度パスワードを入力以上の手順でクライアント証明書と秘密鍵をあわせたPKCS#12形式ファイルが作成できた.
これでクライアント側の準備は完了.
nginxの設定
次にnginxでクライアント認証の設定を行う.
まずはクライアント証明書を発行した認証局の証明書をnginx用のディレクトリに配置する.
# CA証明書(ClientCA.pem)をnginx用ディレクトリに配置
$ cd ..
$ sudo cp ClientCA/ClientCA.pem /etc/nginx/
$ ls /etc/nginx/ClientCA.pem
/etc/nginx/ClientCA.pem次にnginxの設定を変更して再起動する.
# nginxの設定ファイル(https.conf)を編集
$ sudo vim /etc/nginx/conf.d/https.conf

# nginx再起動
$ sudo nginx -t
nginx: the configuration file /etc/nginx/nginx.conf syntax is ok
nginx: configuration file /etc/nginx/nginx.conf test is successful
$ sudo systemctl restart nginx今回変更した部分以外(サーバー証明書など)は前回と全く同じ状態.
これでnginxにはクライアント認証がかかり,
信頼しているCA証明書(ClientCA.pem)の認証局によって署名されたクライアント証明書を持つ相手のみを信頼して内容を公開するようになった.
クライアント証明書を用いた接続
サーバー(nginx)側の設定が終わったので, 試しにMacからnginxに接続してみる.
なにもしない状態でcurlで https://<ラズパイのIP>/ をたたくとクライアント証明書がないので怒られる.
## 以下はすべてMacから実行

# nginx(ラズパイ)にcurlしてみる
# nginxの持ってるサーバーの証明書が信頼できないものなので --insecure をつけて実行する
$ curl https://raspberrypi --insecure
<html>
<head><title>400 No required SSL certificate was sent</title></head>
<body bgcolor="white">
<center><h1>400 Bad Request</h1></center>
<center>No required SSL certificate was sent</center>
<hr><center>nginx/1.14.2</center>
</body>
</html>
# クライアント証明書がないので怒られる次にMacにPKCS#12形式のクライアント証明書をもたせた状態で接続してみる.
今度はnginx側が持つCA証明書とMacが持つクライアント証明書の照合が行われ,
問題がなければクライアント認証を突破できる.
# ラズパイからMacにPKCS#12のクライアント証明書を持ってくる
$ scp pi@raspberrypi://path/to/Client/Client.p12 ./

# PKCS#12形式のファイル(Client.p12)からクライアント証明書(Client.pem)を取り出す
$ openssl pkcs12 -in ./Client.p12 -out Client.pem -clcerts -nokeys
Enter Import Password: # pkcs12作成時に設定したパスワードを入力
MAC verified OK

# PKCS#12形式のファイル(Client.p12)からクライアント秘密鍵(Client-private-key.pem)を取り出す
# 秘密鍵にパスフレーズをつけていないので -nodes をつける
$ openssl pkcs12 -in ./Client.p12 -out Client-private-key.pem -nocerts -nodes
Enter Import Password: # pkcs12作成時に設定したパスワードを入力
MAC verified OK

# クライアントの証明書(Client.pem)と秘密鍵(Client-private-key.pem)をもたせた状態でcurlしてみると認証に成功してHTMLが表示される
$ curl --key ./Client-private-key.pem --cert ./Client.pem https://raspberrypi --insecure
<!DOCTYPE html>
<html>
<head>
<title>Welcome to nginx!</title>
<style>
    body {
        width: 35em;
        margin: 0 auto;
        font-family: Tahoma, Verdana, Arial, sans-serif;
    }
</style>
</head>
<body>
<h1>Welcome to nginx!</h1>
<p>If you see this page, the nginx web server is successfully installed and
working. Further configuration is required.</p>

<p>For online documentation and support please refer to
<a href="http://nginx.org/">nginx.org</a>.<br/>
Commercial support is available at
<a href="http://nginx.com/">nginx.com</a>.</p>

<p><em>Thank you for using nginx.</em></p>
</body>
</html>
ついでにブラウザでも試してみる.
何もしない状態で https://<ラズパイのIP>/ をChromeで開くと証明書がないから怒られる.

Macにクライアント証明書をもたせてみる.
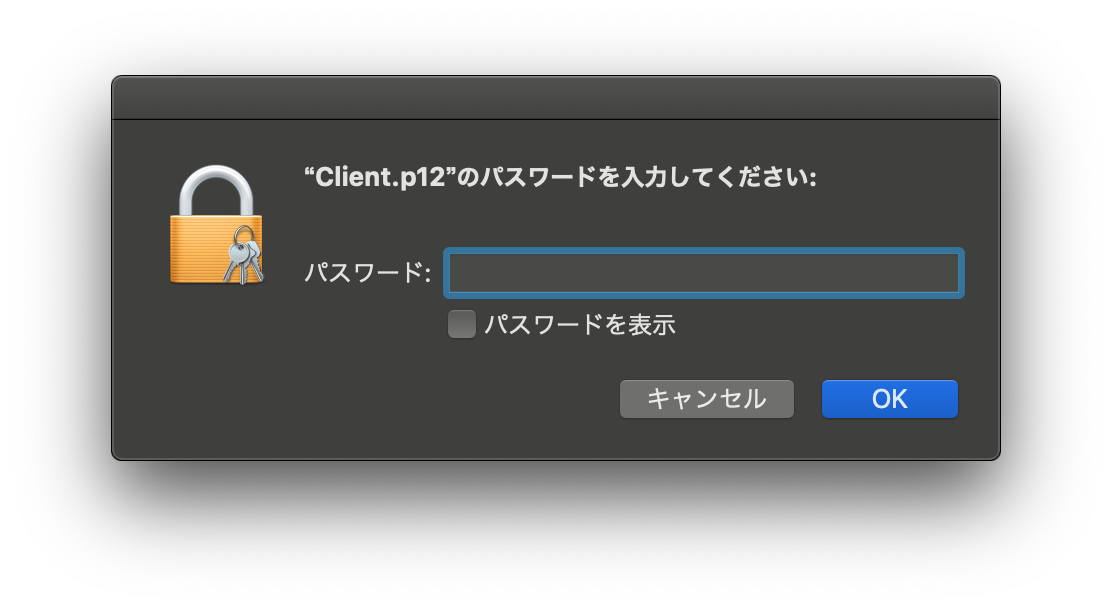
先程ラズパイから持ってきたPKCS#12のファイルをダブルクリックする.
![]()
パスワードを求められるのでPKCS#12の作成時に設定したパスワードを入力する.

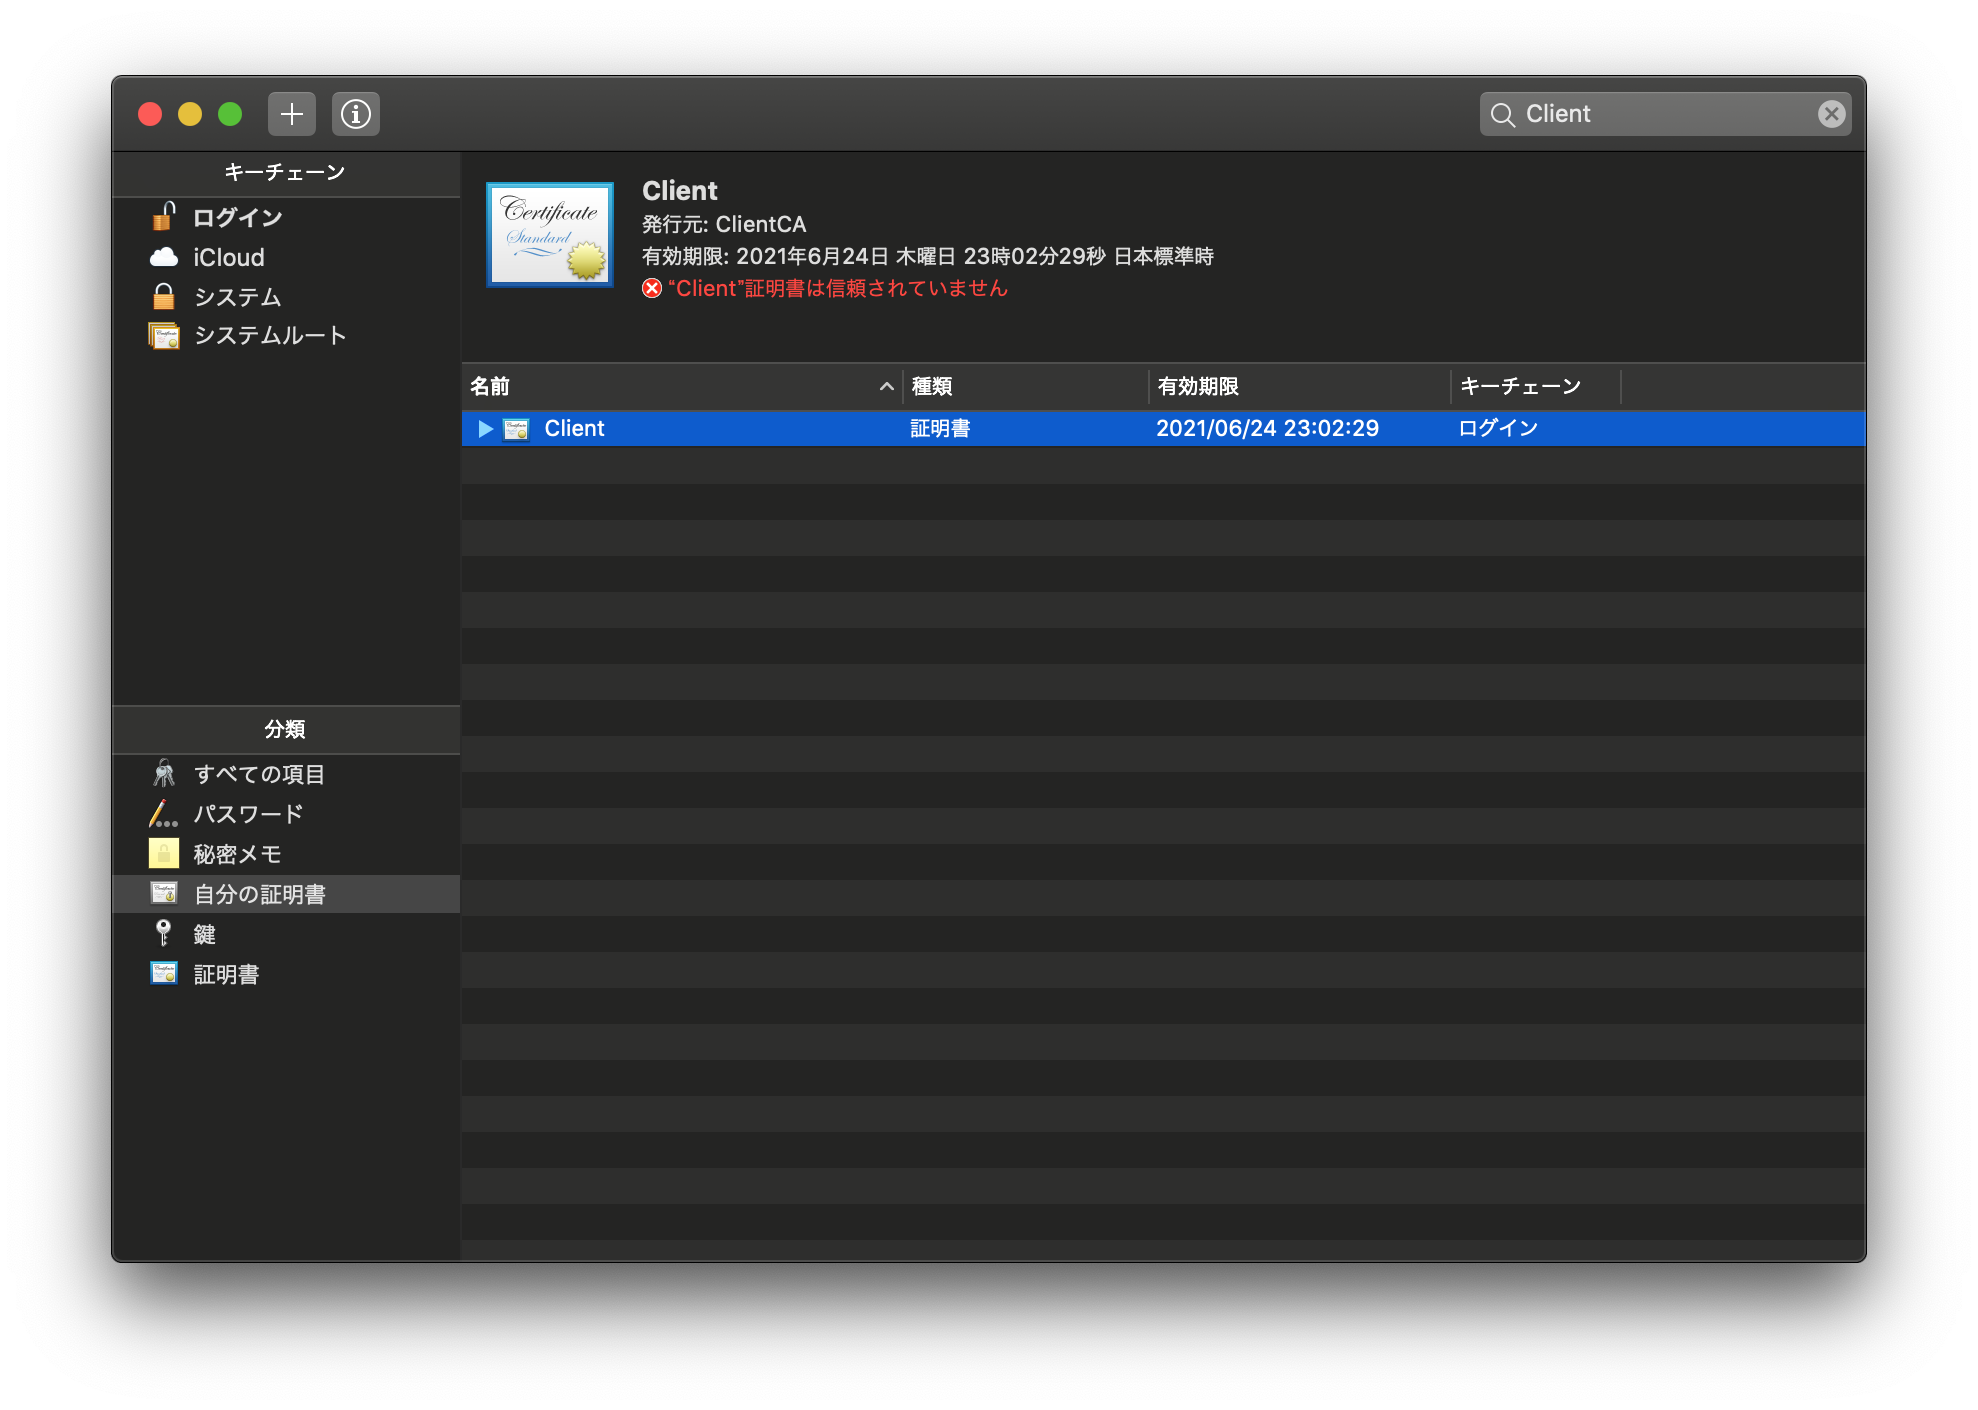
キーチェーンアクセスが開くので, この画面でPKCS#12ファイルをダブルクリック.

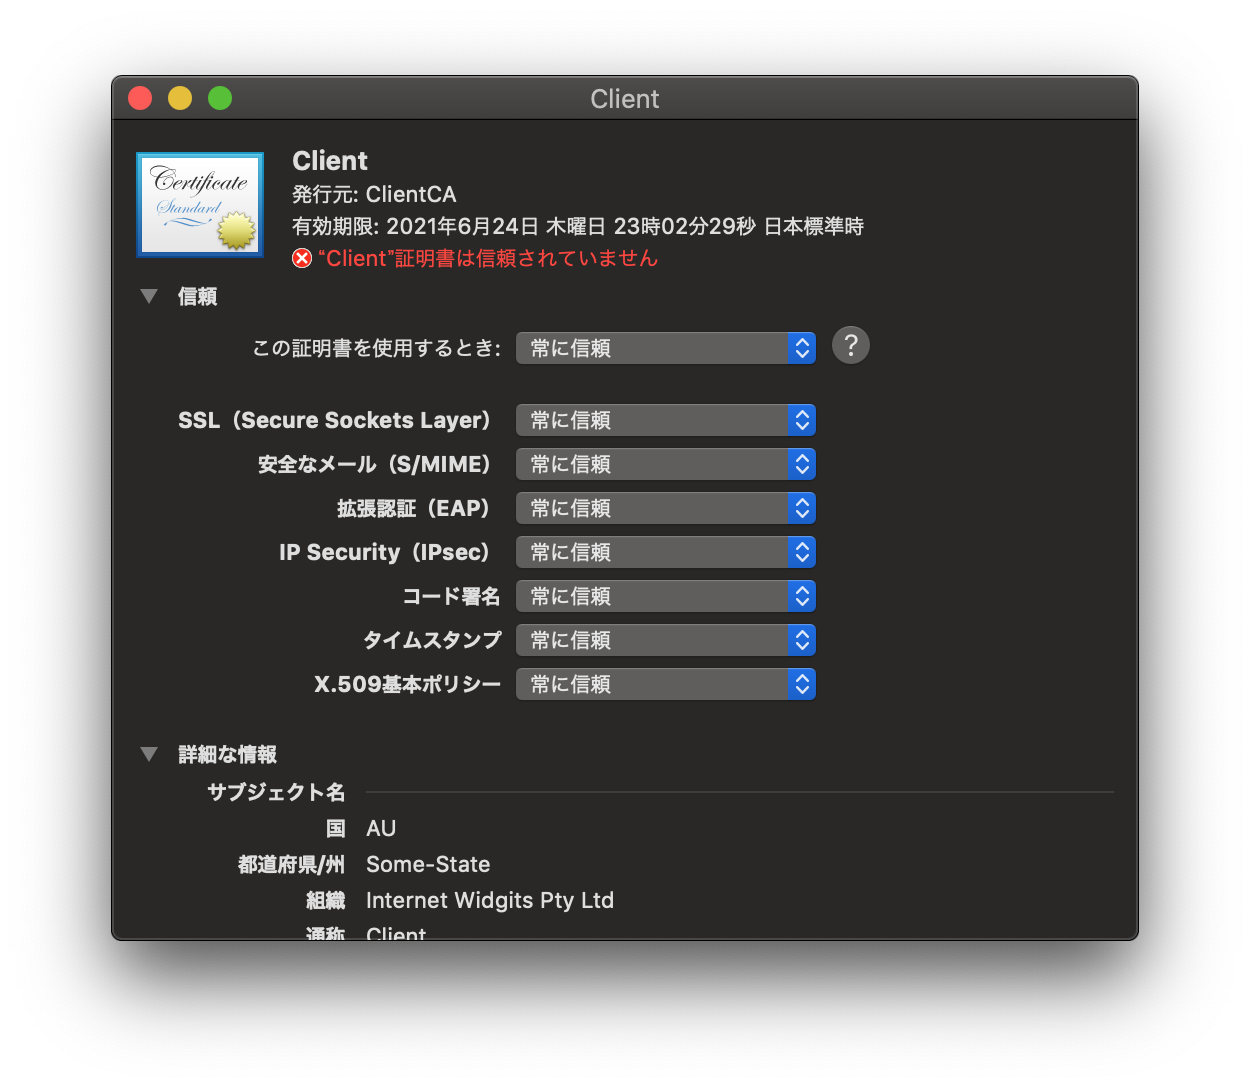
詳細画面が開くので, 信頼->この証明書を信頼するときを常に信頼に変更してウィンドウを閉じる.
これでMacがこのクライアント証明書を使えるようになった.

再度 https://<ラズパイのIP>/ をChromeで開く.
今度はこのサーバー(nginx)のクライアント認証に使用するクライアント証明書を選択する画面が開くので, OK を選択する.
これでChromeがクライアント証明書を持ってnginxにアクセスするようになる.

クライアント認証に成功し,nginxのスタートページのHTMLが表示された.

やったぜ.
これでクライアント認証のしくみを実装することができた.
おわり
以上の手順でOpenSSLとnginxを使ったクライアント認証のしくみを試してみた.
不特定多数に公開したくない独自APIをチーム内だけに公開するときとかにサクッと作れると便利そう.
おまけ
