オレオレ証明書でHTTPS
OpenSSLで証明書を作る方法を勉強したので, nginxと組み合わせてHTTPSサーバーを立ててみる.
やったことのまとめ
- オレオレ証明書を使ってルート認証局を立てた
- ルート認証局を使って中間認証局を立てた
- 中間認証局でサーバー証明書に署名した
- サーバー証明書をnginxにインストールしてブラウザで確認した
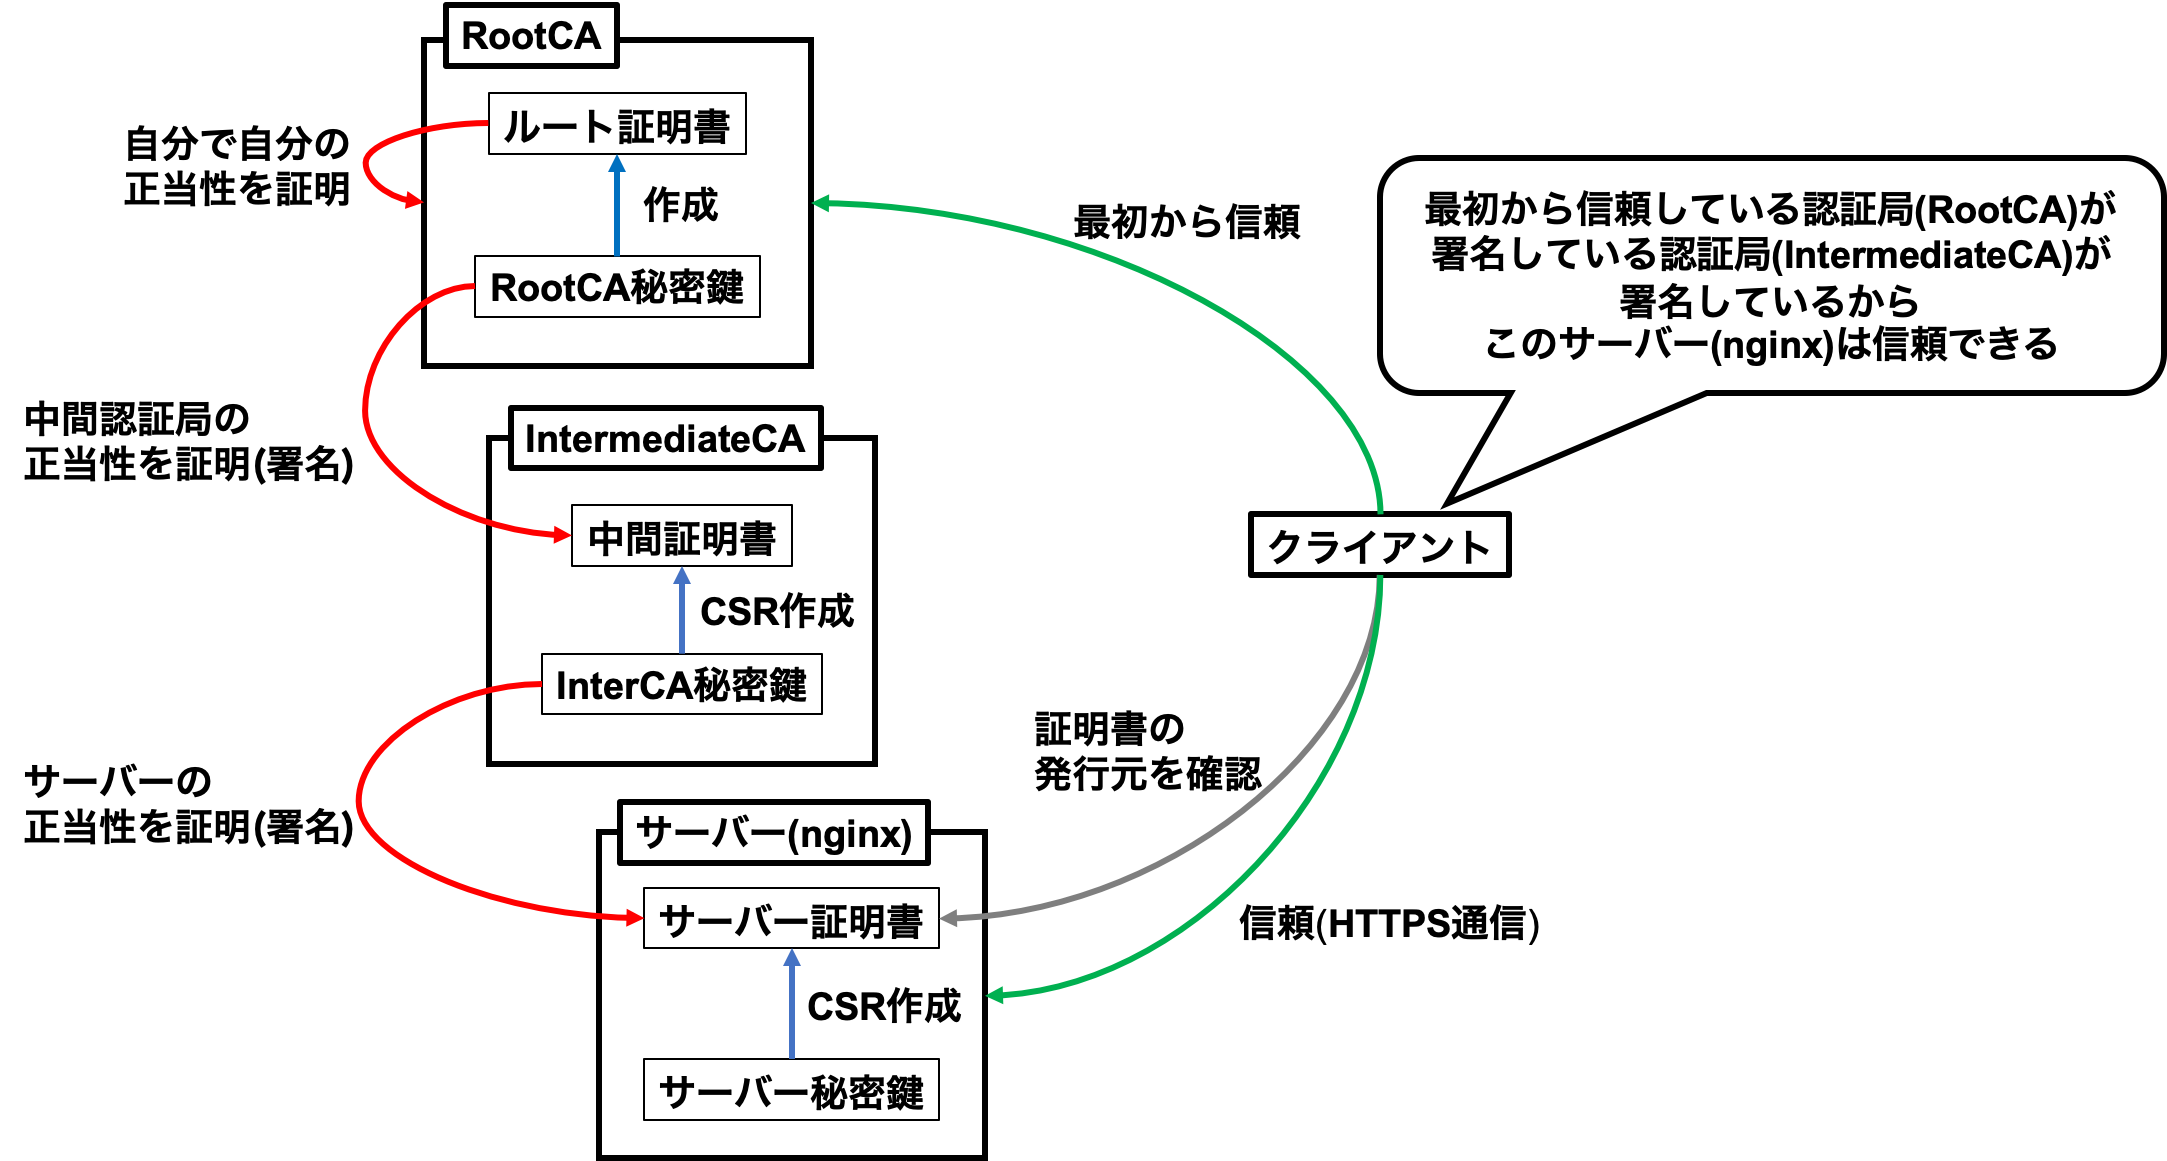
サーバー証明書とはHTTPSで通信する際にサーバーの正当性を認証局が証明していることを示すもの.
クライアントがHTTPSサーバーと通信する際はサーバーの証明書を確認してサーバーの正当性を誰(認証局)が証明しているのかを確認する.
さらにその認証局(中間認証局)の正当性を証明するのがルート認証局で,
クライアントは最初から信頼できるルート認証局の情報を持っているので証明書の発行者をたどることでそのサーバーの正当性を確認することができる.
今回はこのしくみをローカルでつくって試してみる.
OpenSSLの使い方とかは既にメモを作成済み.
つかうもの
- Raspberry Pi 3 Model B+
- OSはRaspbian(10.0)
- SSLサーバーとして使用
- OpenSSL
- OpenSSL 1.1.1c 28 May 2019
- ラズパイの初期装備
- nginx
- version 1.14.2
- インストール済み
- macOS Mojave 10.14
- ブラウザ用
- Google Chrome
- バージョン: 83.0.4103.61(Official Build) (64 ビット)
やったこと
オレオレ証明書とルート認証局の作成
本来であれば正式な認証局に依頼してちゃんとしたサーバー証明書を作ってもらうべきなんだけど,
お金もかかるし自分で遊ぶだけなのでオレオレ証明書でルート認証局を立ててみる.
まずはOpenSSLでオレオレ証明書用の秘密鍵を作成する.
普段はgenrsaを使ってるんだけどgenpkeyのほうが新しくてオススメされているみたいなのでそちらで作ってみる.
(OpenSSLのサブコマンド多すぎ問題)
## 以下すべてラズパイで実行
# ルート認証局用ディレクトリ(RootCA)で作業
$ mkdir RootCA && cd RootCA

# ルート認証局用の秘密鍵(RootCA-private-key.pem)を作成
$ openssl genpkey -algorithm RSA -out RootCA-private-key.pem
秘密鍵からルート認証局の正当性を主張するためのオレオレ証明書を作成する.
質問の内容は適当でいい. はず…
# ルート認証局の秘密鍵(RootCA-private-key.pem)を使ったオレオレ証明書(RootCA.pem)の作成
$ openssl req -x509 -key RootCA-private-key.pem -out RootCA.pem
You are about to be asked to enter information that will be incorporated
into your certificate request.
What you are about to enter is what is called a Distinguished Name or a DN.
There are quite a few fields but you can leave some blank
For some fields there will be a default value,
If you enter '.', the field will be left blank.
-----
Country Name (2 letter code) [AU]:
State or Province Name (full name) [Some-State]:
Locality Name (eg, city) []:
Organization Name (eg, company) [Internet Widgits Pty Ltd]:
Organizational Unit Name (eg, section) []:
Common Name (e.g. server FQDN or YOUR name) []:RootCA # ここだけ入れてみる
Email Address []:
オレオレ証明書ができたので, これでルート認証局ができた.
この認証局は自分で自分の正当性を主張しているだけで公的な信頼は一切ないので注意.
繰り返しになるけどちゃんとしたSSLサーバーを立てたいならここは公的な認証局にお願いするべき.
中間証明書と中間認証局の作成
作成したルート認証局でそのままサーバー証明書を作ってもいいんだけど,
今回は勉強のために中間認証局を立てて, その正当性を先程作ったルート認証局で証明する.
まずは中間認証局用の秘密鍵を作成する.
# 中間認証局用ディレクトリ(IntermediateCA)で作業
$ cd ..
$ mkdir IntermediateCA && cd IntermediateCA

# 中間認証局用の秘密鍵(RootCA-private-key.pem)を作成
$ openssl genpkey -algorithm RSA -out IntermediateCA-private-key.pem
この中間認証局の正当性をオレオレ証明書以外で証明するには他の認証局にお願いするしかないので,
証明書署名要求(CSR)を作成する.
質問の内容はこちらも適当でいい. はず…
# 中間認証局の秘密鍵(IntermediateCA-private-key.pem)から中間認証局のCSR(IntermediateCA-csr.pem)を作成
$ openssl req -new -key IntermediateCA-private-key.pem -out IntermediateCA-csr.pem
You are about to be asked to enter information that will be incorporated
into your certificate request.
What you are about to enter is what is called a Distinguished Name or a DN.
There are quite a few fields but you can leave some blank
For some fields there will be a default value,
If you enter '.', the field will be left blank.
-----
Country Name (2 letter code) [AU]:
State or Province Name (full name) [Some-State]:
Locality Name (eg, city) []:
Organization Name (eg, company) [Internet Widgits Pty Ltd]:
Organizational Unit Name (eg, section) []:
Common Name (e.g. server FQDN or YOUR name) []:IntermediateCA # ここだけ入れてみる
Email Address []:

Please enter the following 'extra' attributes
to be sent with your certificate request
A challenge password []:
An optional company name []:作成した中間認証局のCSRをルート認証局に渡し, ルート認証局はそれに署名して中間認証局の正当性を証明する…
つもりだったのに怒られてしまった.
# 中間認証局のCSR(IntermediateCA-csr.pem)をルート認証局に渡す
$ mv IntermediateCA-csr.pem ../RootCA/

# ルート認証局の秘密鍵(RootCA-private-key.pem)とルート証明書(RootCA.pem)で
# 中間認証局のCSR(IntermediateCA-csr.pem)に署名して中間証明書(IntermediateCA-certicifation.pem)を作成
# したかったけど怒られた...
$ cd ../RootCA
$ openssl ca -in IntermediateCA-csr.pem -out IntermediateCA-certicifation.pem -keyfile RootCA-private-key.pem -cert RootCA.pem
Using configuration from /usr/lib/ssl/openssl.cnf
ca: ./demoCA/newcerts is not a directory
./demoCA/newcerts: No such file or directoryなんかディレクトリ./demoCA/newcertsが足りてないらしいので作って再挑戦.
# ディレクトリを作成
$ mkdir -p demoCA/newcerts

# 再挑戦したけどだめ
$ openssl ca -in IntermediateCA-csr.pem -out IntermediateCA-certicifation.pem -keyfile RootCA-private-key.pem -cert RootCA.pem
Using configuration from /usr/lib/ssl/openssl.cnf
1996152848:error:02001002:system library:fopen:No such file or directory:../crypto/bio/bss_file.c:72:fopen('./demoCA/index.txt','r')
1996152848:error:2006D080:BIO routines:BIO_new_file:no such file:../crypto/bio/bss_file.c:79:
また怒られた.
ファイル./demoCA/index.txtが足りてないみたいなので空ファイルを作る.
# 空ファイルを作成
$ touch ./demoCA/index.txt

# 再挑戦したけどだめ
$ openssl ca -in IntermediateCA-csr.pem -out IntermediateCA-certicifation.pem -keyfile RootCA-private-key.pem -cert RootCA.pem
Using configuration from /usr/lib/ssl/openssl.cnf
./demoCA/serial: No such file or directory
error while loading serial number
1995452432:error:02001002:system library:fopen:No such file or directory:../crypto/bio/bss_file.c:72:fopen('./demoCA/serial','r')
1995452432:error:2006D080:BIO routines:BIO_new_file:no such file:../crypto/bio/bss_file.c:79:
またまた怒られた. つらい.
ファイル/demoCA/serialが足りてないらしい.
# 空ファイルを作成
$ touch ./demoCA/serial

# 再挑戦したけどだめ
$ openssl ca -in IntermediateCA-csr.pem -out IntermediateCA-certicifation.pem -keyfile RootCA-private-key.pem -cert RootCA.pem
Using configuration from /usr/lib/ssl/openssl.cnf
unable to load number from ./demoCA/serial
error while loading serial number
1995870224:error:0D066096:asn1 encoding routines:a2i_ASN1_INTEGER:short line:../crypto/asn1/f_int.c:140:
またまたまた怒られた. キレそう.
今度はシリアルナンバーが読めないよ的なエラーが出ているので, 適当な数字を入れてあげる.
# 空ファイルに適当な数字を書き込む
$ echo 00 >> ./demoCA/serial

# いけた
$ openssl ca -in IntermediateCA-csr.pem -out IntermediateCA-certicifation.pem -keyfile RootCA-private-key.pem -cert RootCA.pem
Using configuration from /usr/lib/ssl/openssl.cnf
Check that the request matches the signature
Signature ok
Certificate Details:
        Serial Number: 0 (0x0)
        Validity
            Not Before: Jun  1 14:24:19 2020 GMT
            Not After : Jun  1 14:24:19 2021 GMT
        Subject:
            countryName               = AU
            stateOrProvinceName       = Some-State
            organizationName          = Internet Widgits Pty Ltd
            commonName                = IntermediateCA
        X509v3 extensions:
            X509v3 Basic Constraints:
                CA:FALSE
            Netscape Comment:
                OpenSSL Generated Certificate
            X509v3 Subject Key Identifier:
                FF:A3:92:E0:F3:10:A9:28:AC:5F:4A:D2:BE:FD:D7:2B:19:EC:DD:02
            X509v3 Authority Key Identifier:
                keyid:A9:96:E7:CD:B2:77:F2:8F:CA:4C:4A:E9:75:52:91:3E:6C:53:42:0B

Certificate is to be certified until Jun  1 14:24:19 2021 GMT (365 days)
Sign the certificate? [y/n]:y


1 out of 1 certificate requests certified, commit? [y/n]y
Write out database with 1 new entries
Data Base Updated
こんどは成功した.
ちなみに./demoCA/index.txtは証明書発行の記録を残すためのファイルで,/demoCA/serialはシリアルナンバーを設定するためのファイルだったらしい.
# index.txtの内容を確認
$ cat ./demoCA/index.txt
V	210601142419Z		00	unknown	/C=AU/ST=Some-State/O=Internet Widgits Pty Ltd/CN=IntermediateCA
あとはルート認証局で作成した中間認証局の証明書(中間証明書)を中間認証局に渡す.
# 中間証明書(IntermediateCA-certicifation.pem)を中間認証局に返す
$ mv IntermediateCA-certicifation.pem ../IntermediateCA/
これで中間認証局の正当性をルート認証局が証明したことになる.
サーバー証明書の作成
認証局の準備ができたので,
いよいよHTTPSで使うためのサーバー証明書を作る.
まずは中間認証局を立てたときと同じようにサーバーの正当性を証明するためのCSRを作成する.
# サーバー用ディレクトリ(Server)で作業
$ cd ..
$ mkdir Server && cd Server

# サーバー用の秘密鍵(Server-private-key.pem)を作成
$ openssl genpkey -algorithm RSA -out Server-private-key.pem

# サーバーの秘密鍵(Server-private-key.pem)からCSR(Server-csr.pem)を作成
$ openssl req -new -key Server-private-key.pem -out Server-csr.pem
You are about to be asked to enter information that will be incorporated
into your certificate request.
What you are about to enter is what is called a Distinguished Name or a DN.
There are quite a few fields but you can leave some blank
For some fields there will be a default value,
If you enter '.', the field will be left blank.
-----
Country Name (2 letter code) [AU]:
State or Province Name (full name) [Some-State]:
Locality Name (eg, city) []:
Organization Name (eg, company) [Internet Widgits Pty Ltd]:
Organizational Unit Name (eg, section) []:
Common Name (e.g. server FQDN or YOUR name) []:uzimihsr.example.com # ここだけ入れてみる
Email Address []:

Please enter the following 'extra' attributes
to be sent with your certificate request
A challenge password []:
An optional company name []:サーバーのCSRを中間認証局に渡し,
中間認証局は受け取ったCSRに署名してサーバー証明書を作成する.
# サーバーのCSR(Server-csr.pem)を中間認証局に渡す
$ mv Server-csr.pem ../IntermediateCA/

# 署名のための準備
$ cd ../IntermediateCA
$ mkdir -p demoCA/newcerts
$ touch ./demoCA/index.txt
$ echo 01 > ./demoCA/serial

# 中間認証局の秘密鍵(IntermediateCA-private-key.pem)と中間証明書(IntermediateCA-certicifation.pem)で
# サーバーのCSR(Server-csr.pem)に署名してサーバー証明書(Server-certicifation.pem)を作成
$ openssl ca -in Server-csr.pem -out Server-certicifation.pem -keyfile IntermediateCA-private-key.pem -cert IntermediateCA-certicifation.pem
Using configuration from /usr/lib/ssl/openssl.cnf
Check that the request matches the signature
Signature ok
Certificate Details:
        Serial Number: 1 (0x1)
        Validity
            Not Before: Jun  1 14:49:49 2020 GMT
            Not After : Jun  1 14:49:49 2021 GMT
        Subject:
            countryName               = AU
            stateOrProvinceName       = Some-State
            organizationName          = Internet Widgits Pty Ltd
            commonName                = uzimihsr.example.com
        X509v3 extensions:
            X509v3 Basic Constraints:
                CA:FALSE
            Netscape Comment:
                OpenSSL Generated Certificate
            X509v3 Subject Key Identifier:
                67:F1:62:B9:B4:FB:81:BD:E9:11:55:45:CF:43:D1:59:0B:66:D9:10
            X509v3 Authority Key Identifier:
                keyid:FF:A3:92:E0:F3:10:A9:28:AC:5F:4A:D2:BE:FD:D7:2B:19:EC:DD:02

Certificate is to be certified until Jun  1 14:49:49 2021 GMT (365 days)
Sign the certificate? [y/n]:y


1 out of 1 certificate requests certified, commit? [y/n]y
Write out database with 1 new entries
Data Base Updated

# サーバーに証明書(Server-certicifation.pem)を渡す
$ mv ./Server-certicifation.pem ../Server/
以上の手順でサーバーの正当性を中間認証局が証明したことになる.
nginxに証明書を持たせる
サーバーの証明書ができたので,
これをnginxに持たせてHTTPSサーバーを建てる.
まずはサーバー証明書の発行元の正当性を証明するために,
ルート証明書と中間証明書とサーバー証明書をくっつける.
# サーバー証明書(Server-certicifation.pem), 中間証明書(IntermediateCA-certicifation.pem), ルート証明書(RootCA.pem)をくっつける(cert.pem)
$ cd ../Server
$ cat Server-certicifation.pem ../IntermediateCA/IntermediateCA-certicifation.pem ../RootCA/RootCA.pem > cert.pem次にnginxにHTTPSサーバーとして動かすための設定を追加する.
# nginx設定ファイルの作成
$ sudo vim /etc/nginx/conf.d/https.confnginx.confは初期設定のまま.
https.confで指定している場所にサーバーの証明書と秘密鍵を配置する.
これにより, nginxがHTTPSでリクエストを受けたときにクライアントにこの証明書を提示できるようになる.
# サーバー証明書(cert.pem)と秘密鍵(Server-private-key.pem)の配置
$ sudo mkdir /etc/nginx/https
$ sudo cp ./cert.pem /etc/nginx/https/
$ sudo cp ./Server-private-key.pem /etc/nginx/https/ここまでできたら,nginxを再起動する.
# nginxの設定を確認して再起動
$ sudo nginx -t
nginx: the configuration file /etc/nginx/nginx.conf syntax is ok
nginx: configuration file /etc/nginx/nginx.conf test is successful
$ sudo systemctl restart nginx
ここまでできたら, Macのブラウザで https://<ラズパイのIP>/ を開く.
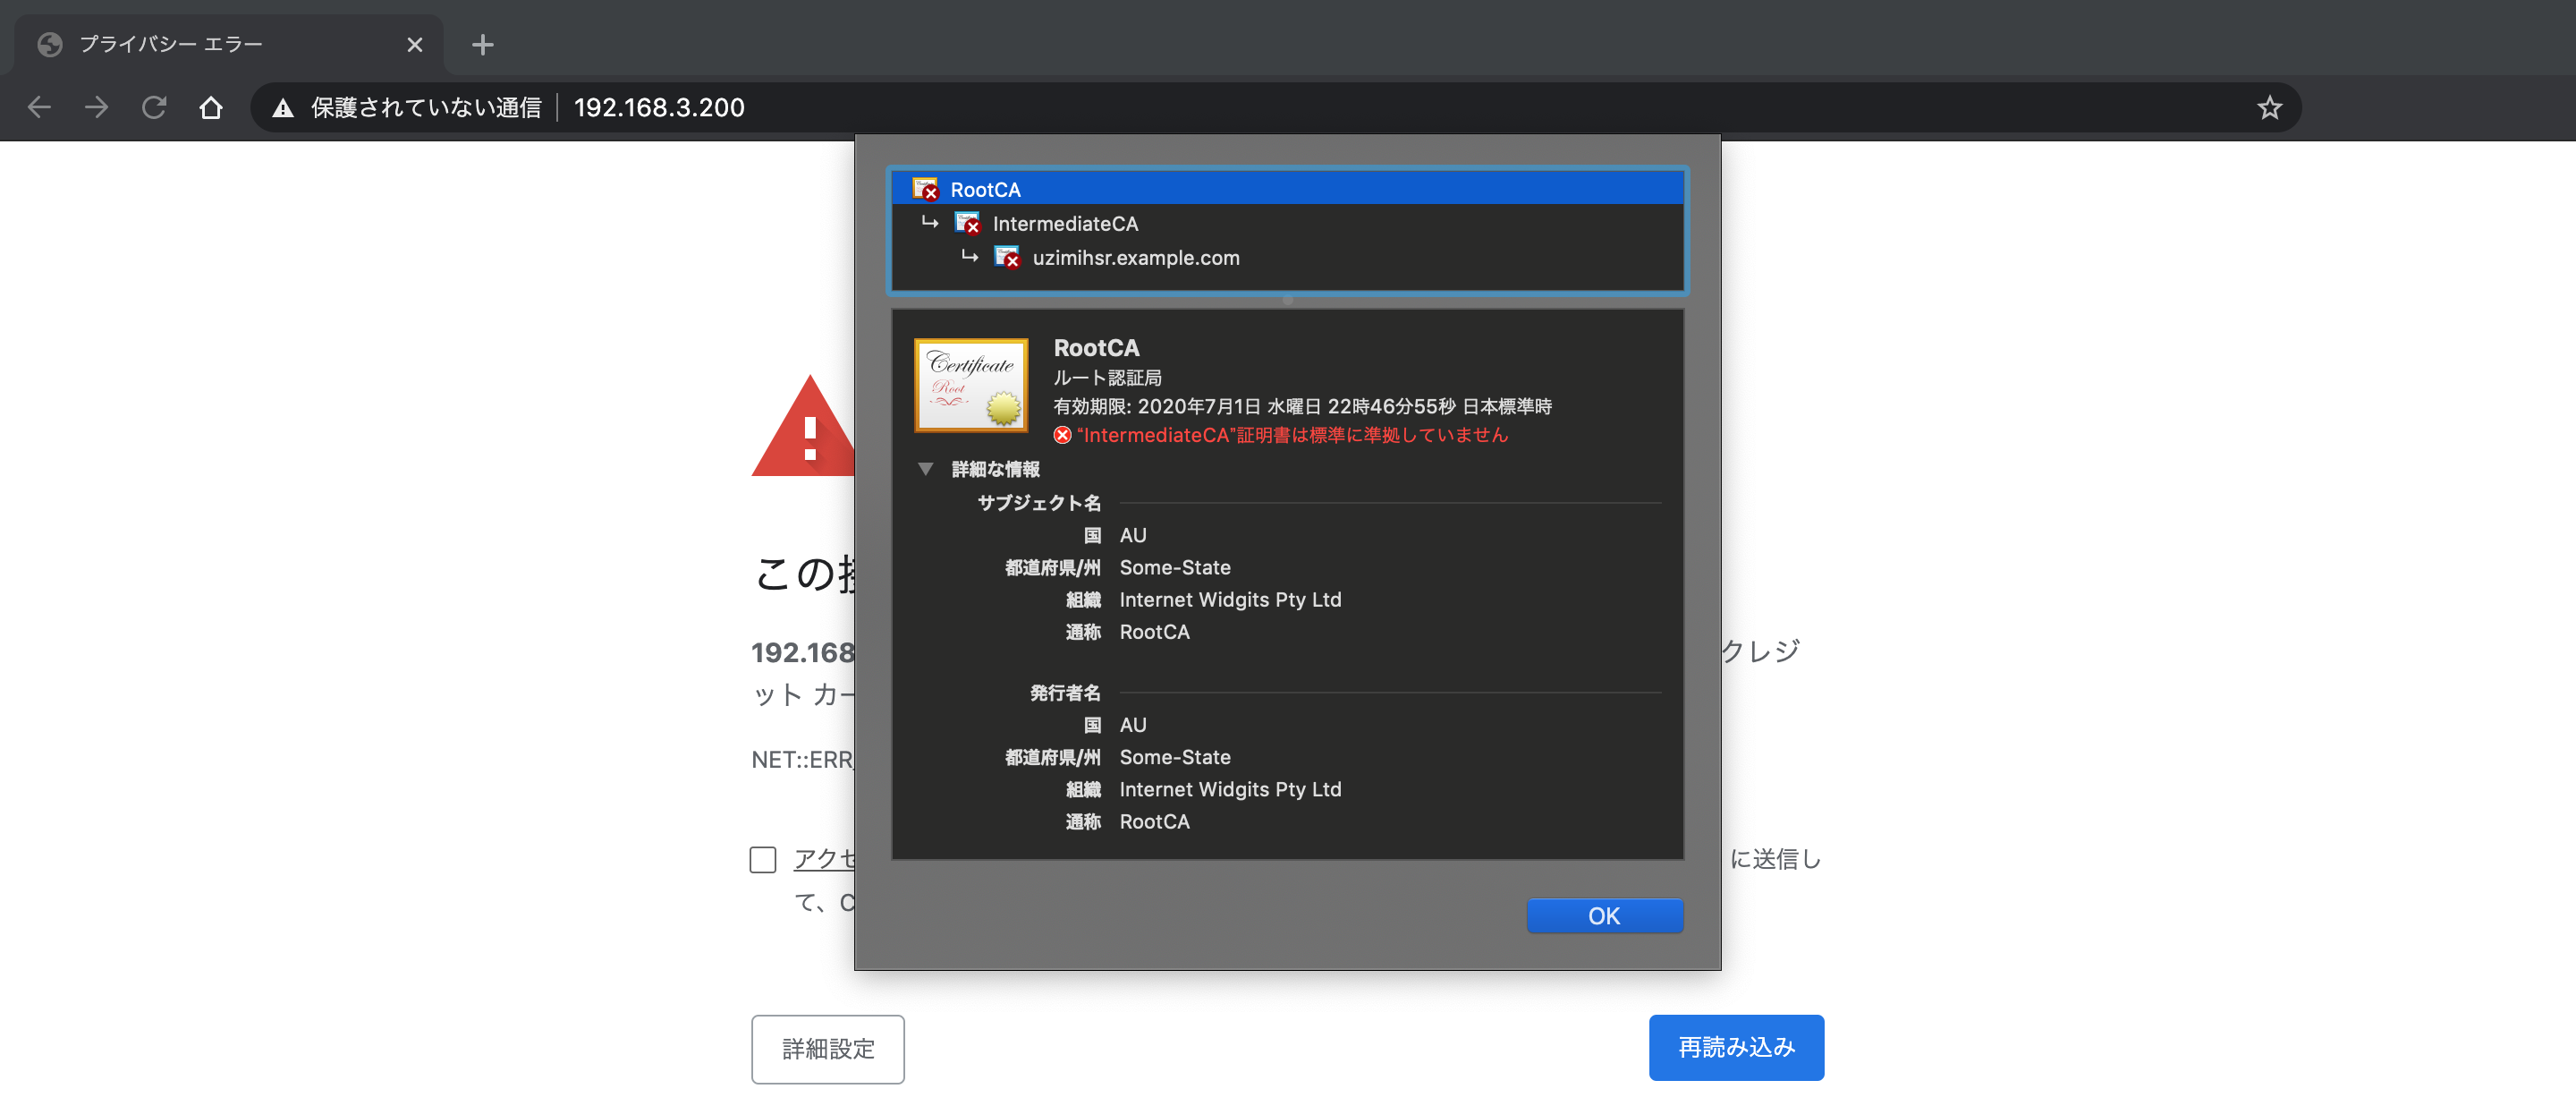
しかしこのサーバー(nginx)から提示された証明書がMacに信頼されていないため, 警告が出てしまう.
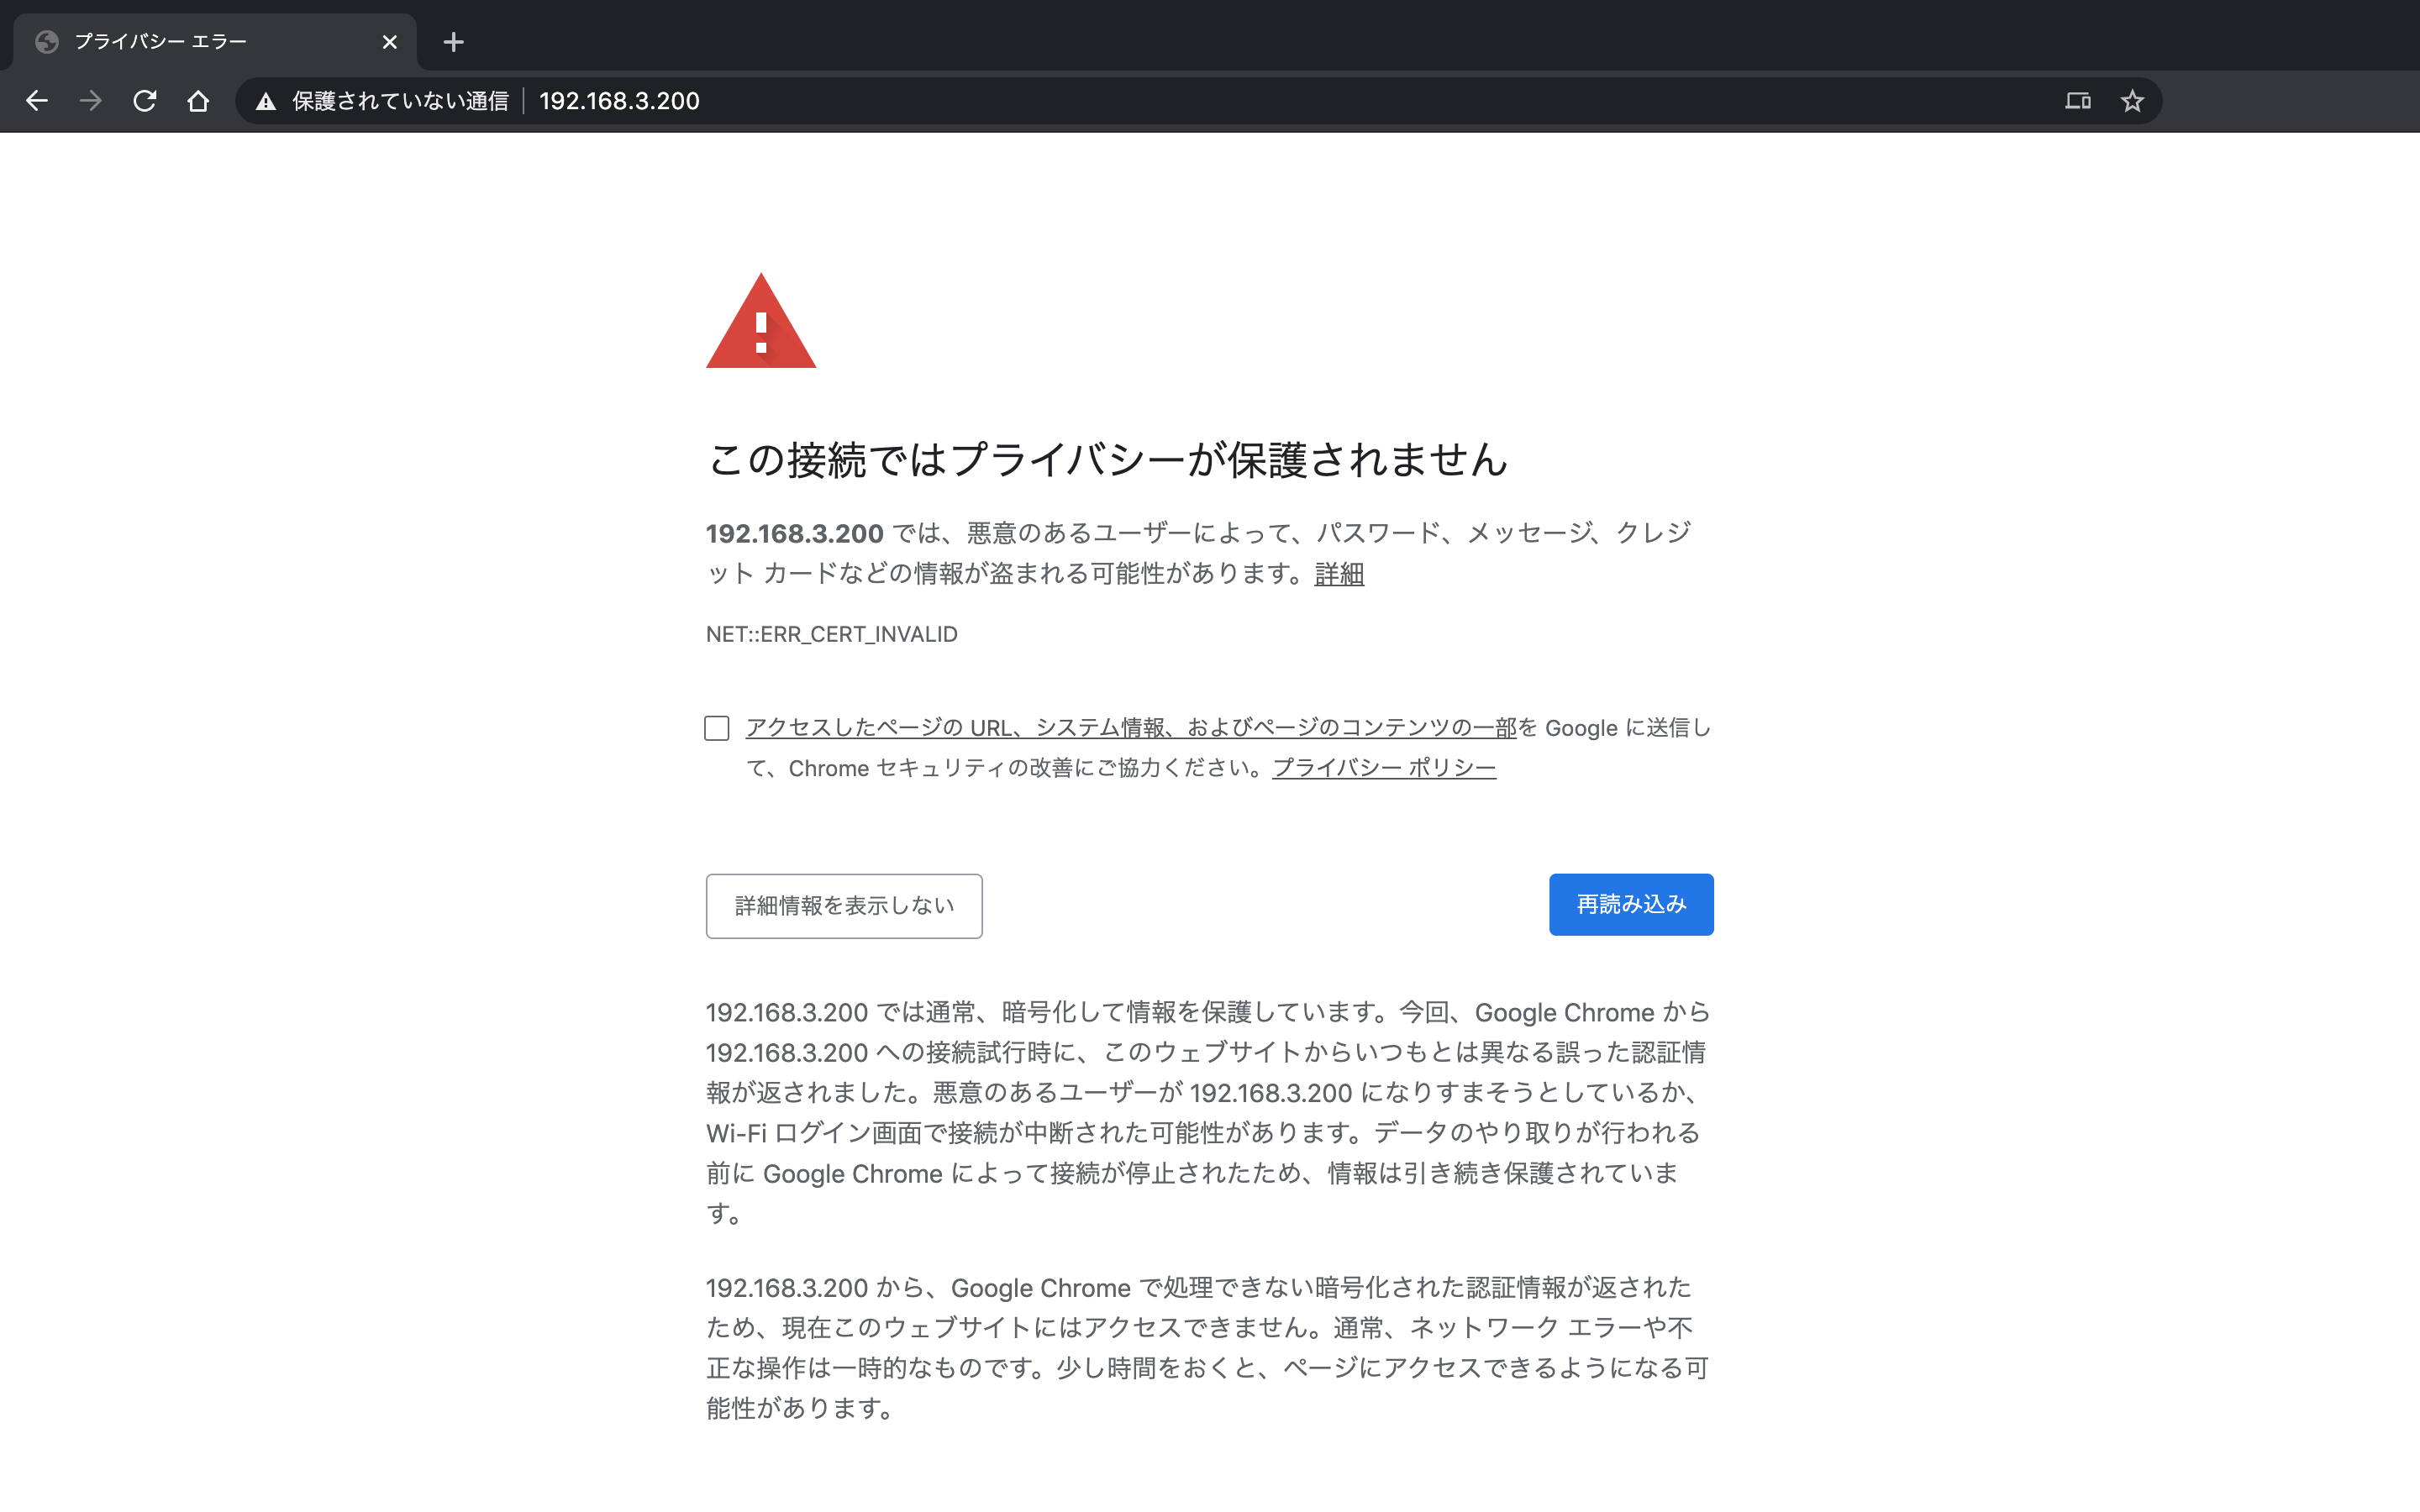
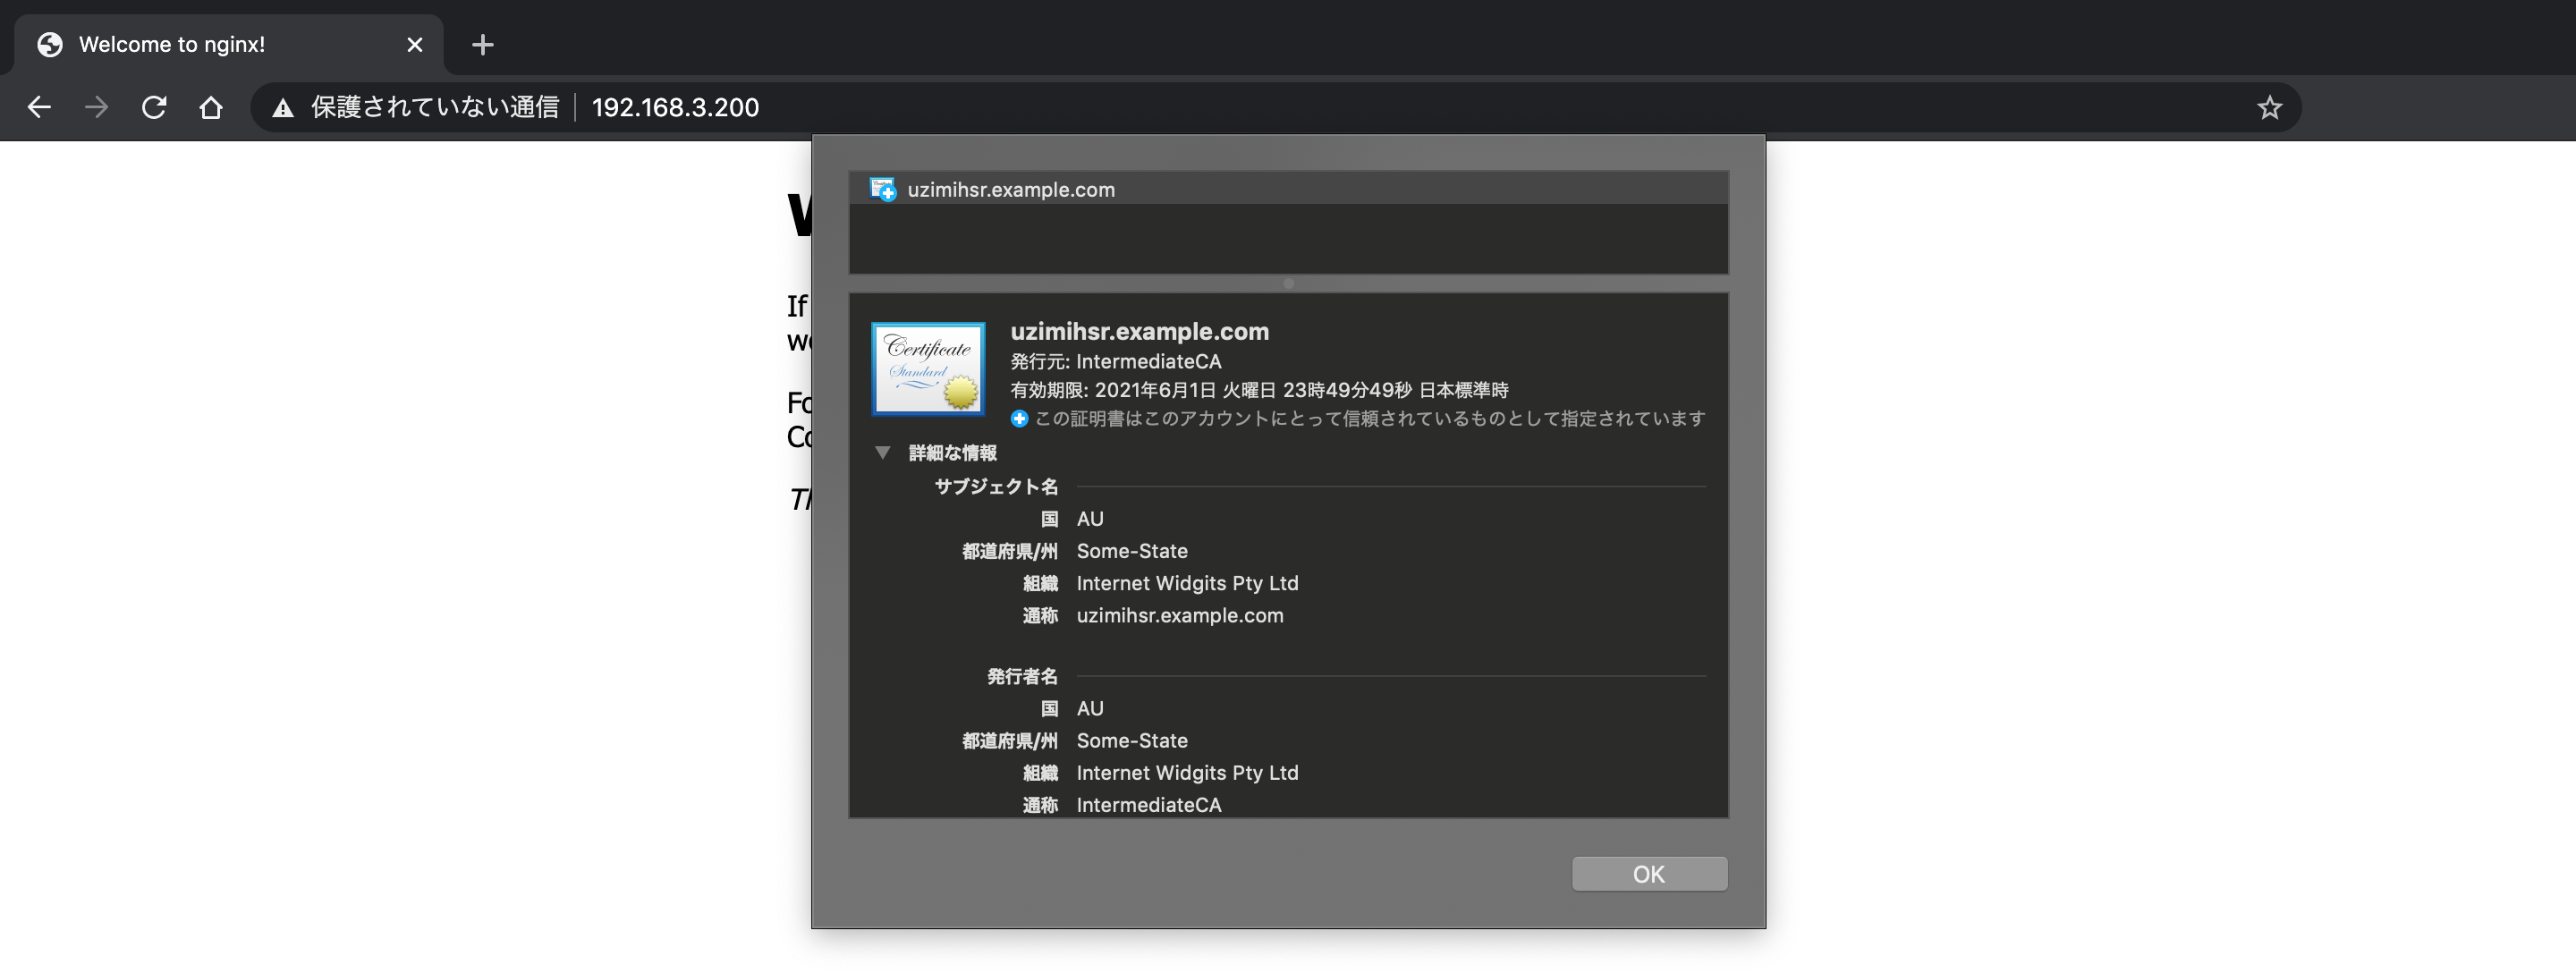
左上の鍵マークから証明書を表示して確認する.
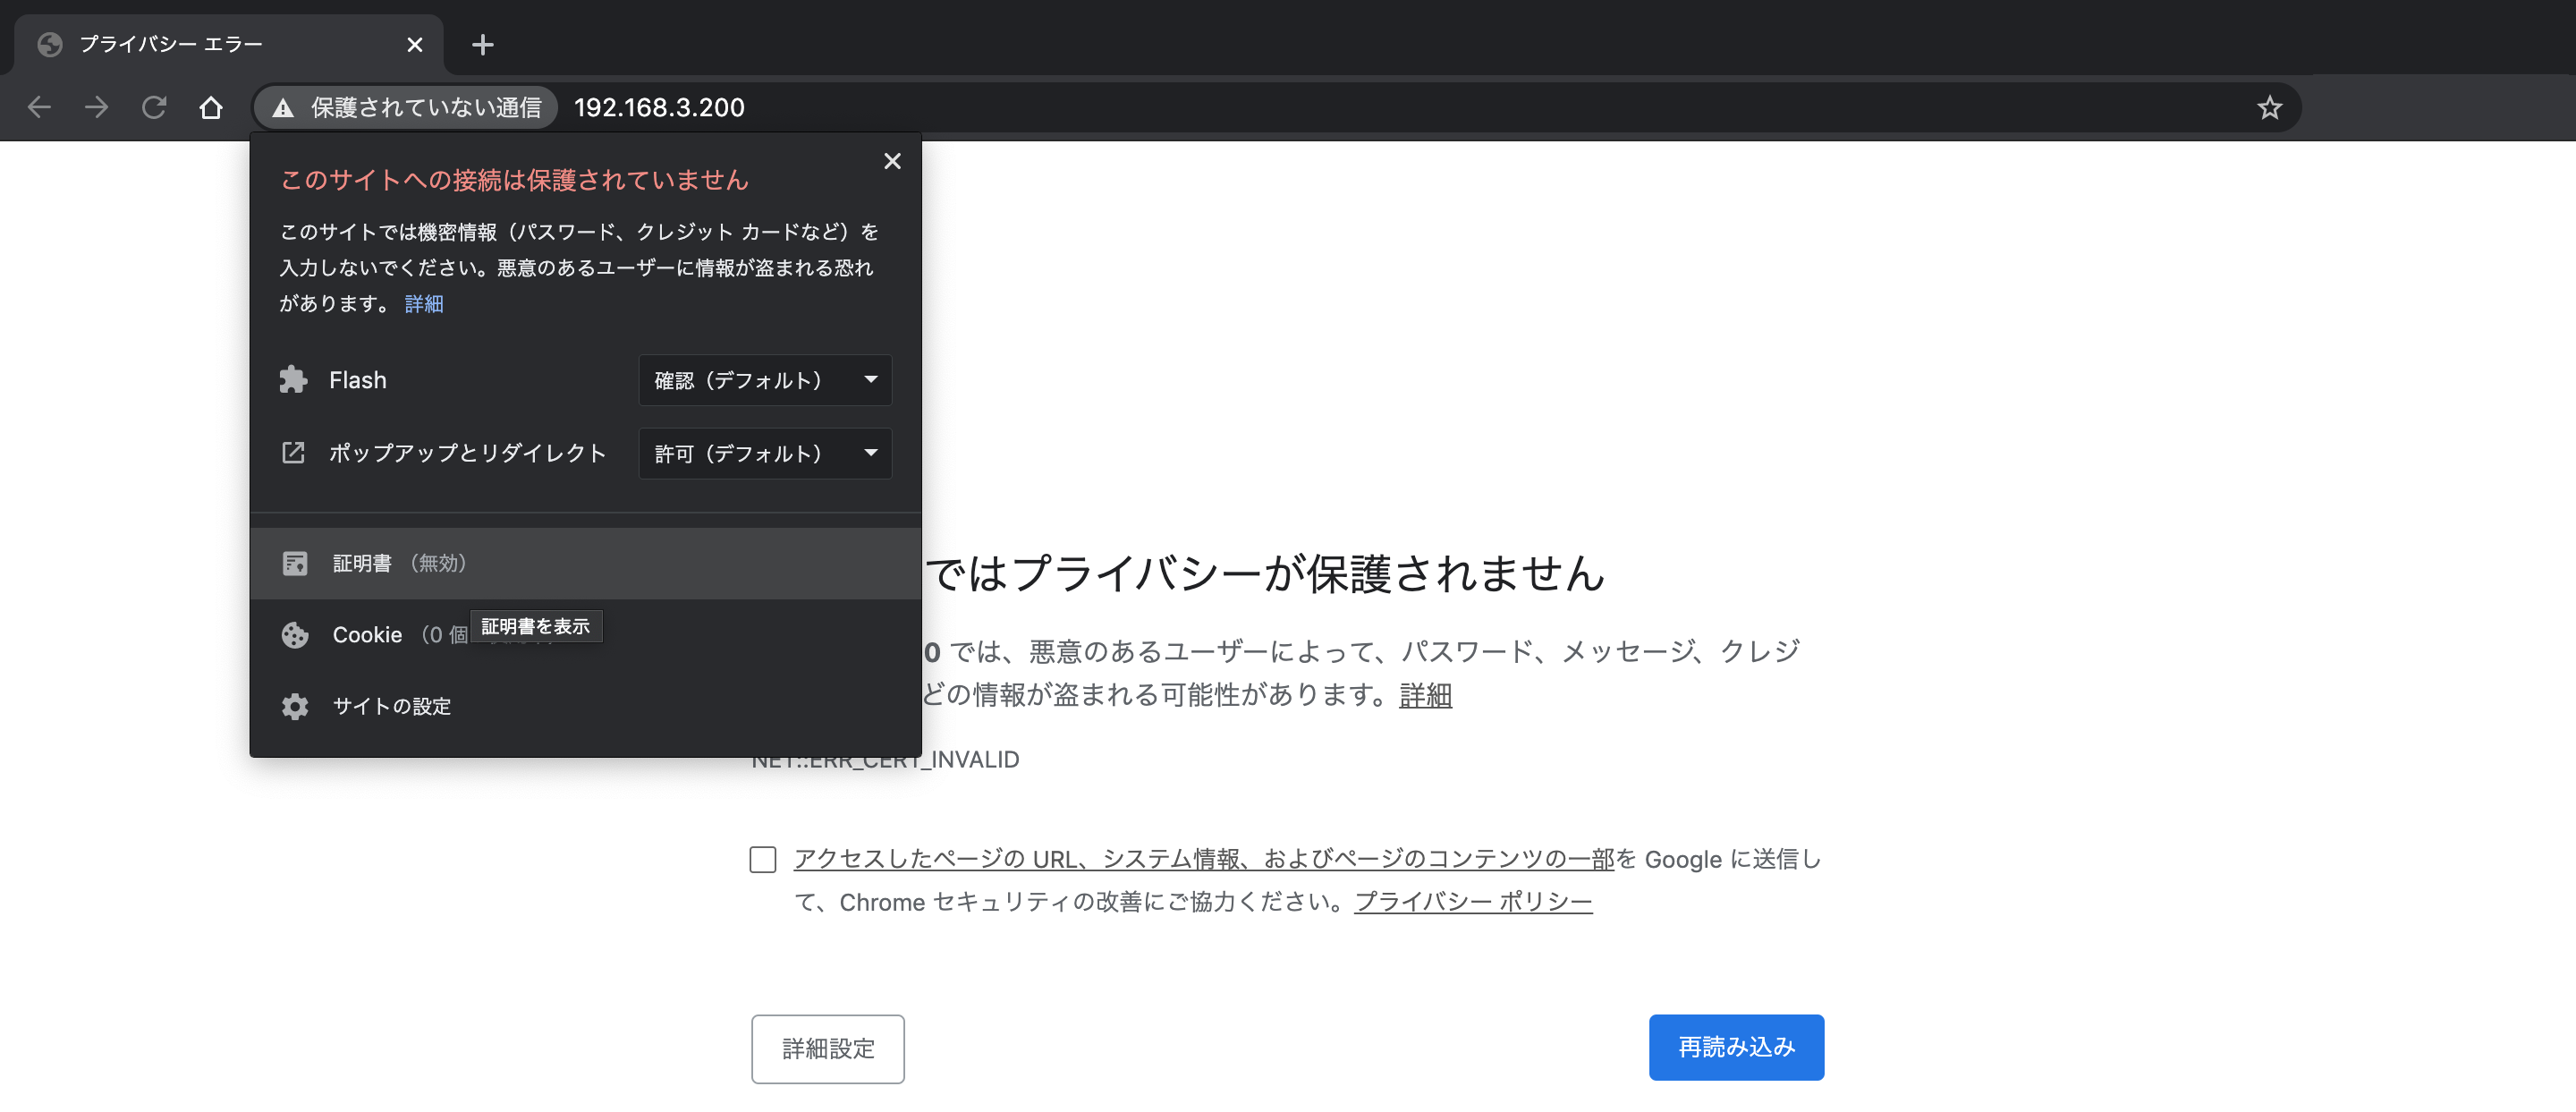
サーバー証明書(uzimihsr.example.com)が表示される.
この証明書は中間認証局(IntermediateCA)が発行者になっているが,
これが公的な認証局でないために信頼できない状態であることがわかる.
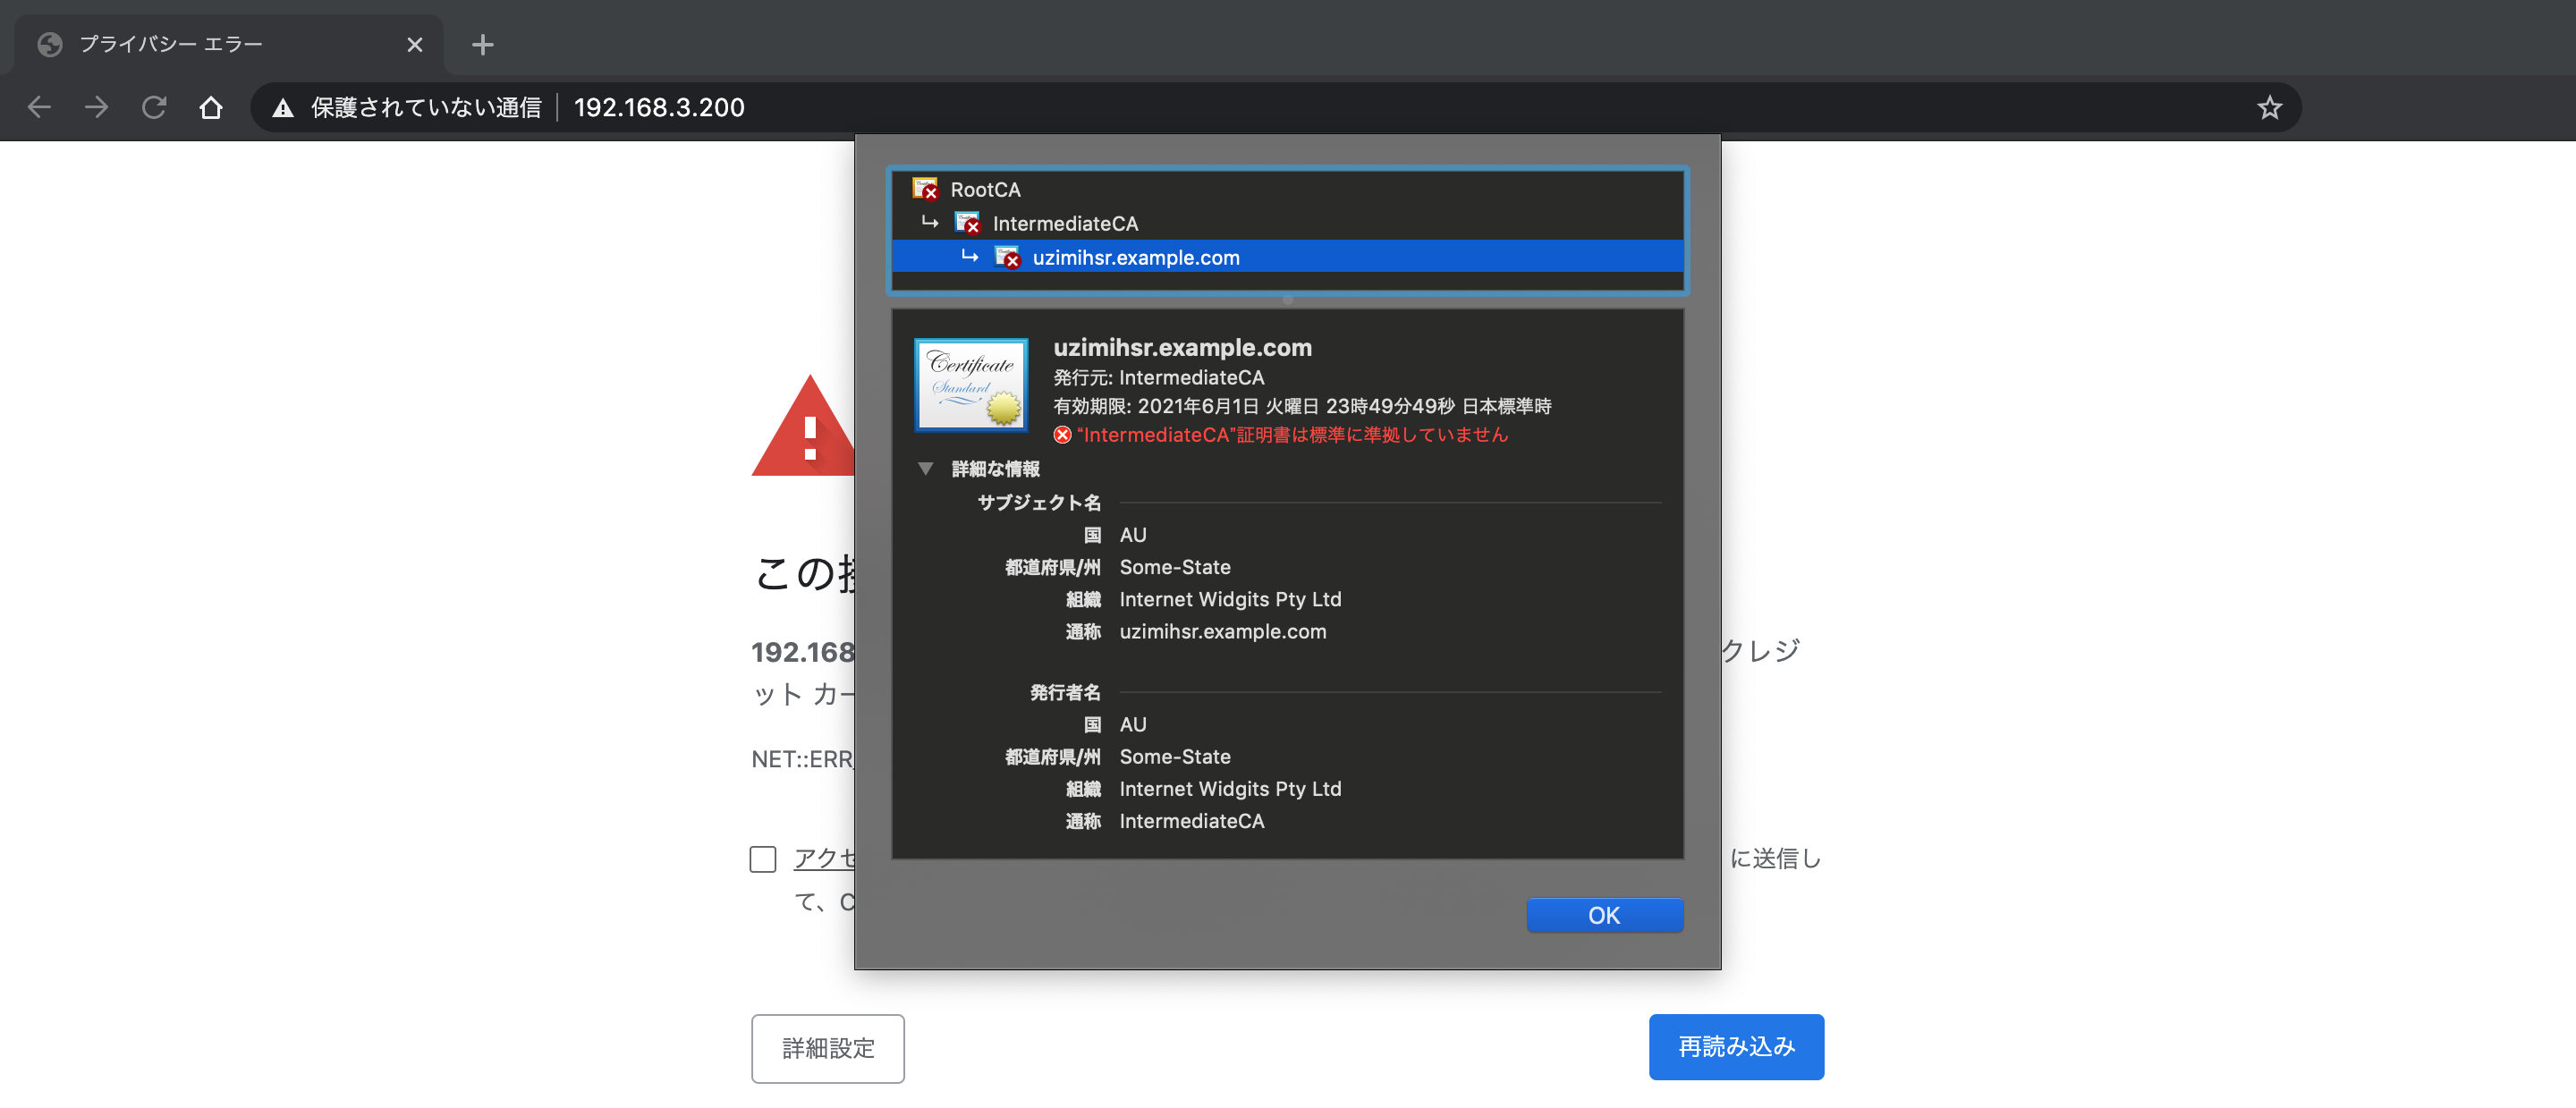
nginxに持たせた証明書はサーバー証明書の他に中間証明書とルート証明書が連結してあるので,
これらの内容も確認できる.
中間証明書(IntermediateCA)を確認する.
こちらはルート認証局(RootCA)によって発行されているが,
これも公的な認証局でないために信頼されていない.

ルート証明書(RootCA)についても同様.
ルート認証局はどれもオレオレ証明書で自分の正当性を主張しているが,
Macはこのルート認証局が信頼できる認証局のリストにないため,
この認証局が発行した証明書を信頼していない状態であることがわかる.
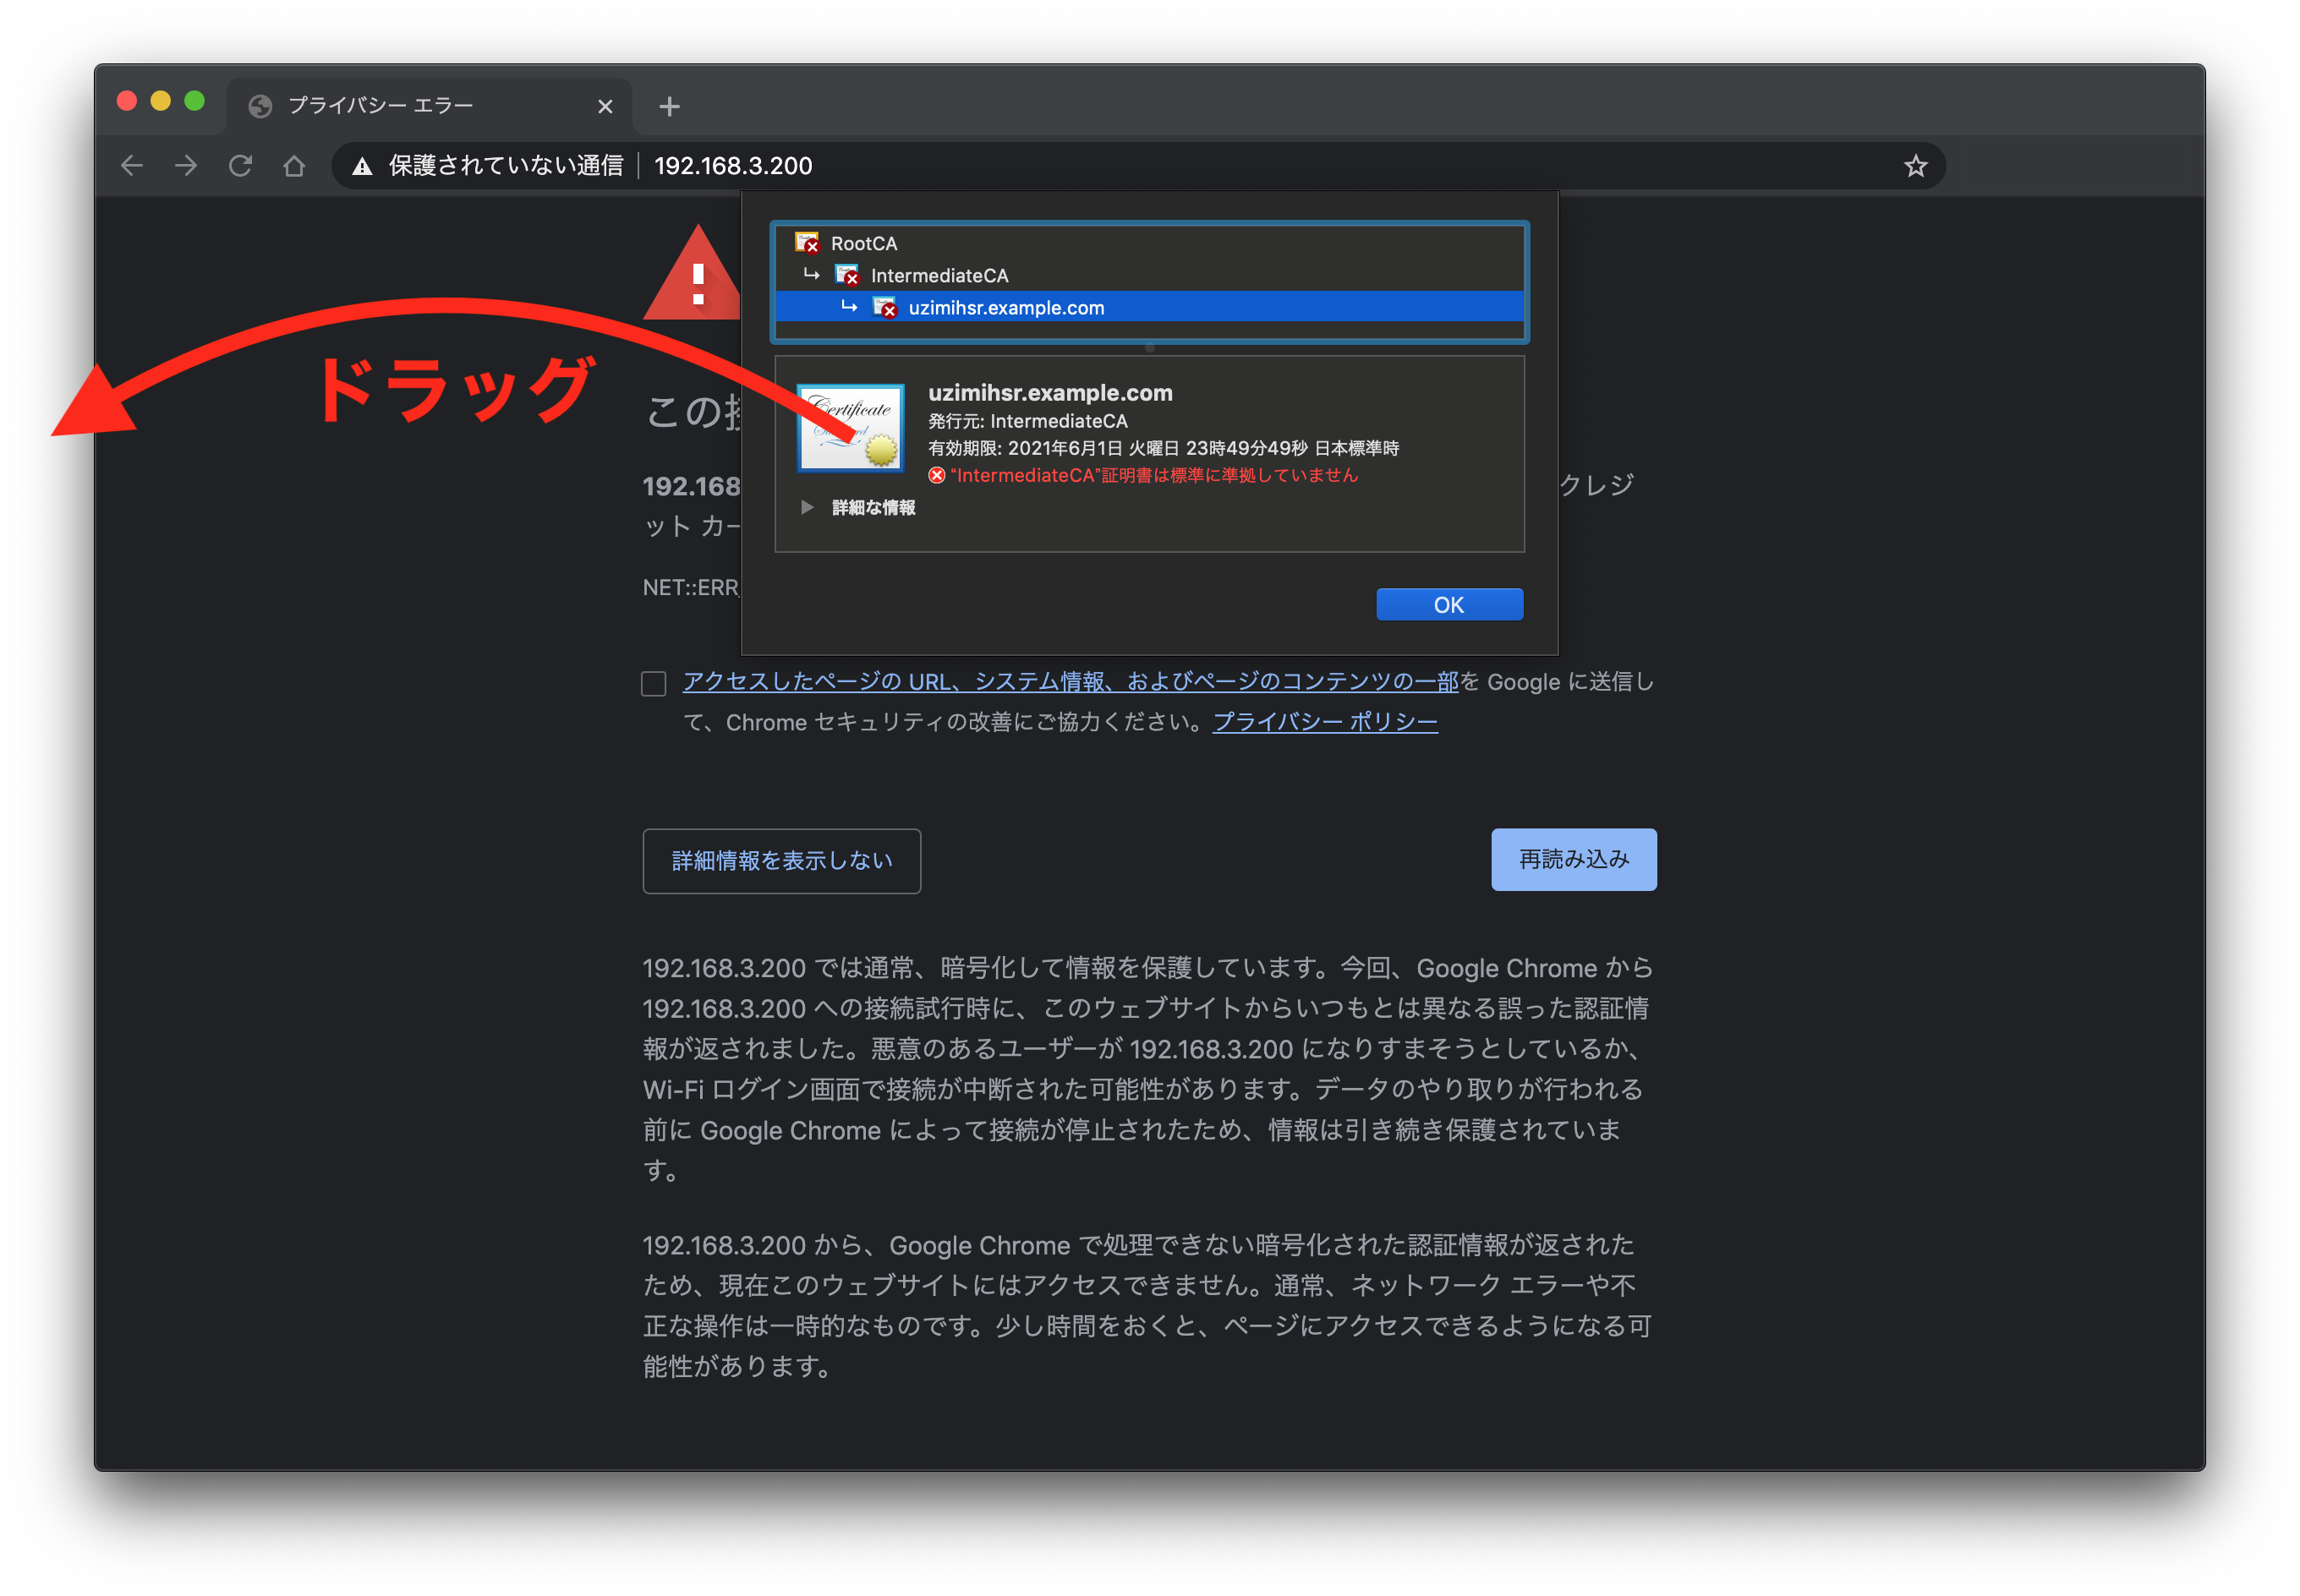
このままだとnginxの画面が開けないので,
サーバー証明書をMacに信頼させるようにする.
まずはChromeの証明書を開いている画面からサーバー証明書のアイコンをデスクトップにドラッグ&ドロップする.
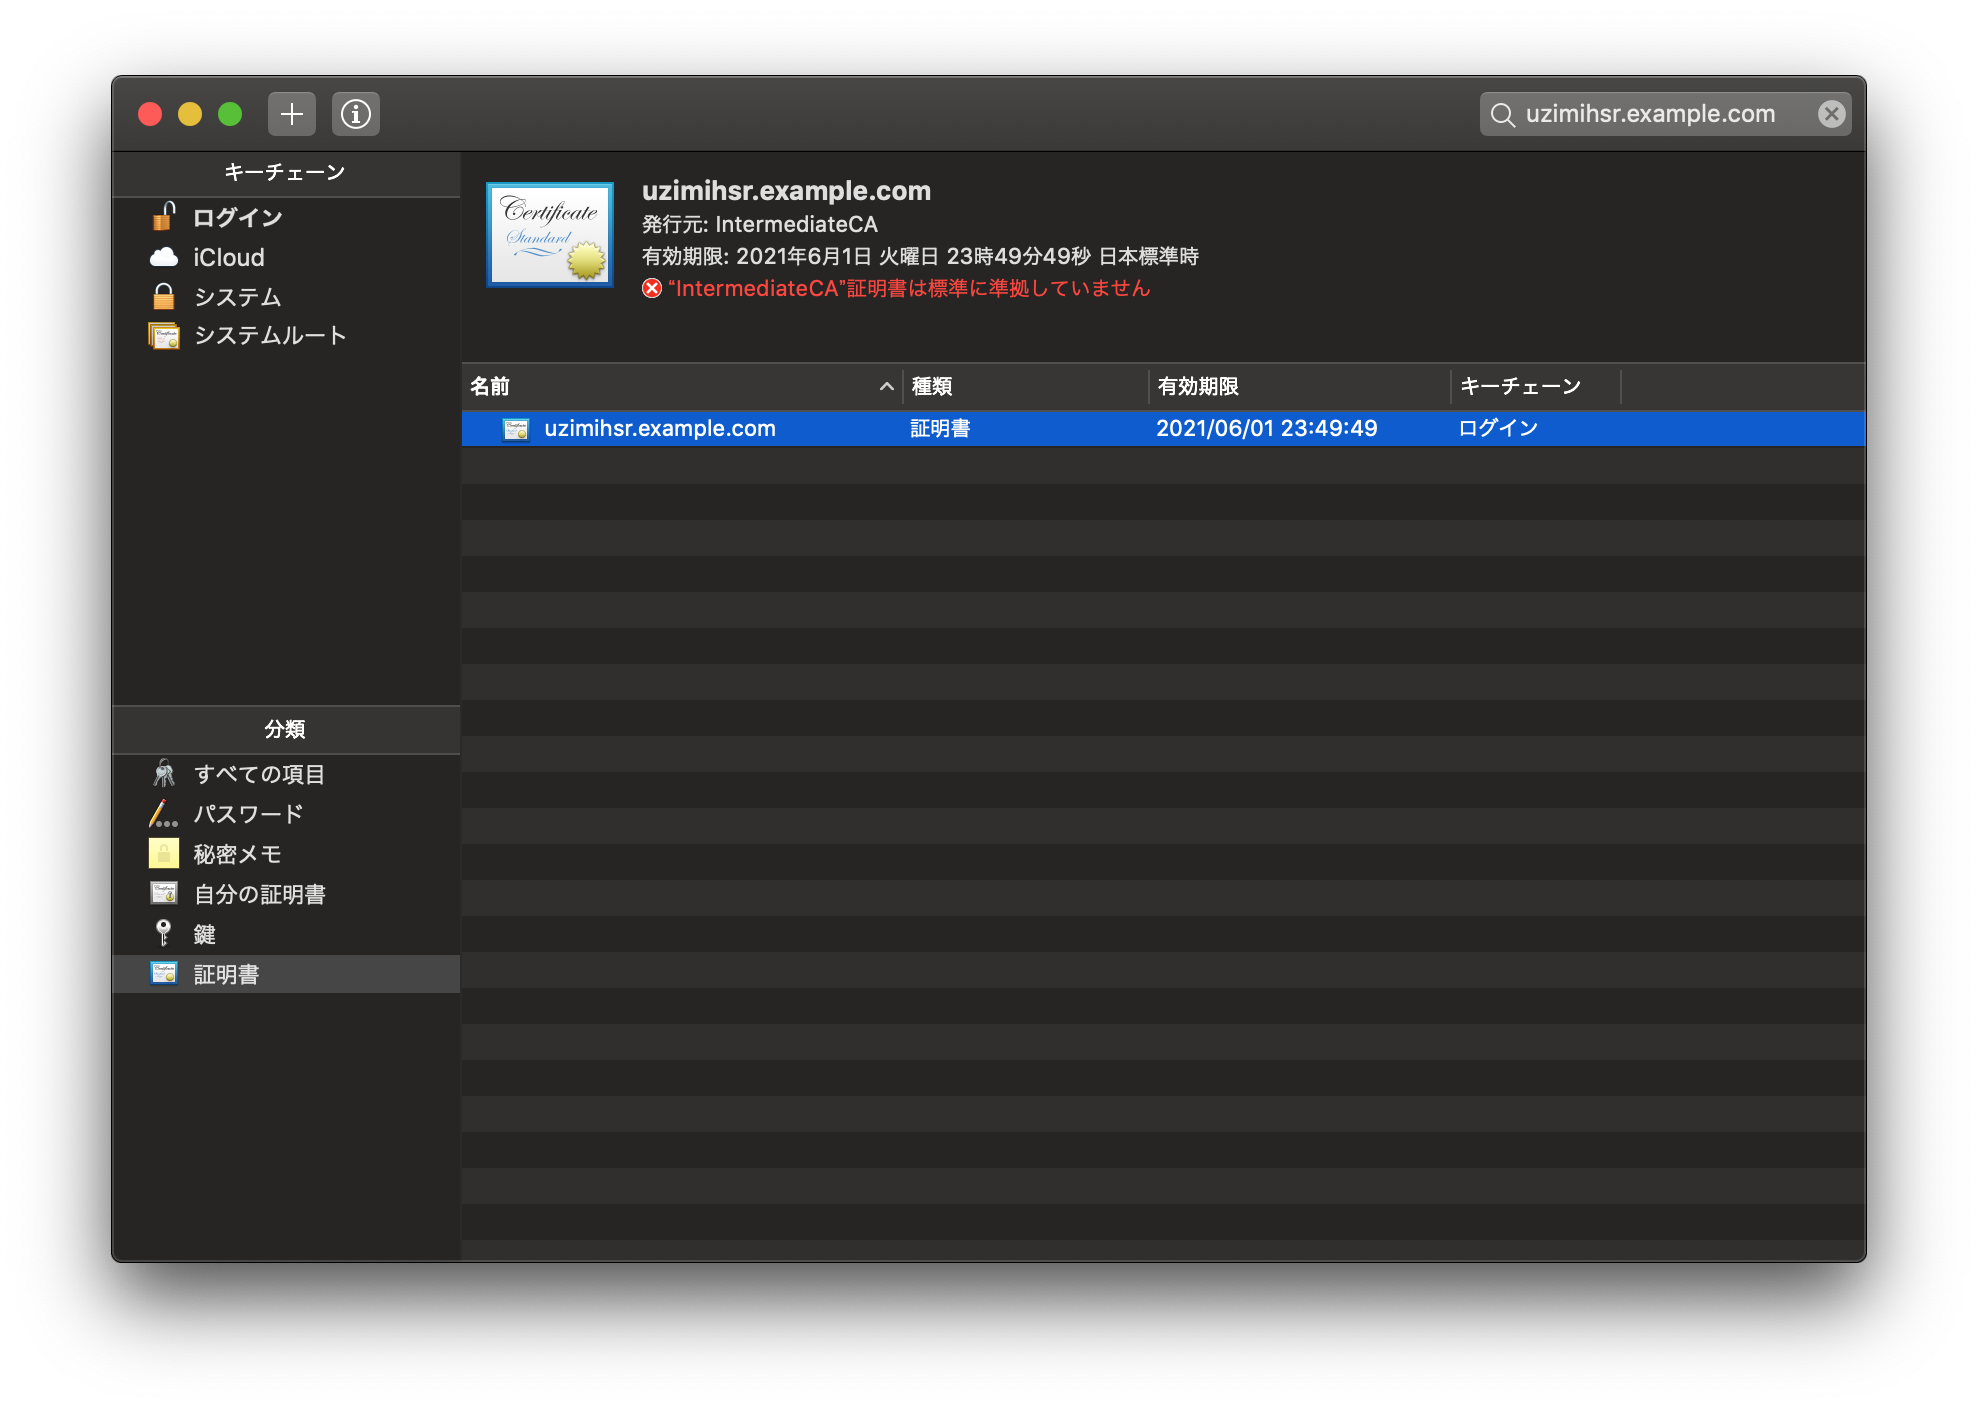
デスクトップに落ちた証明書をダブルクリックすると,キーチェーンアクセスが開く.
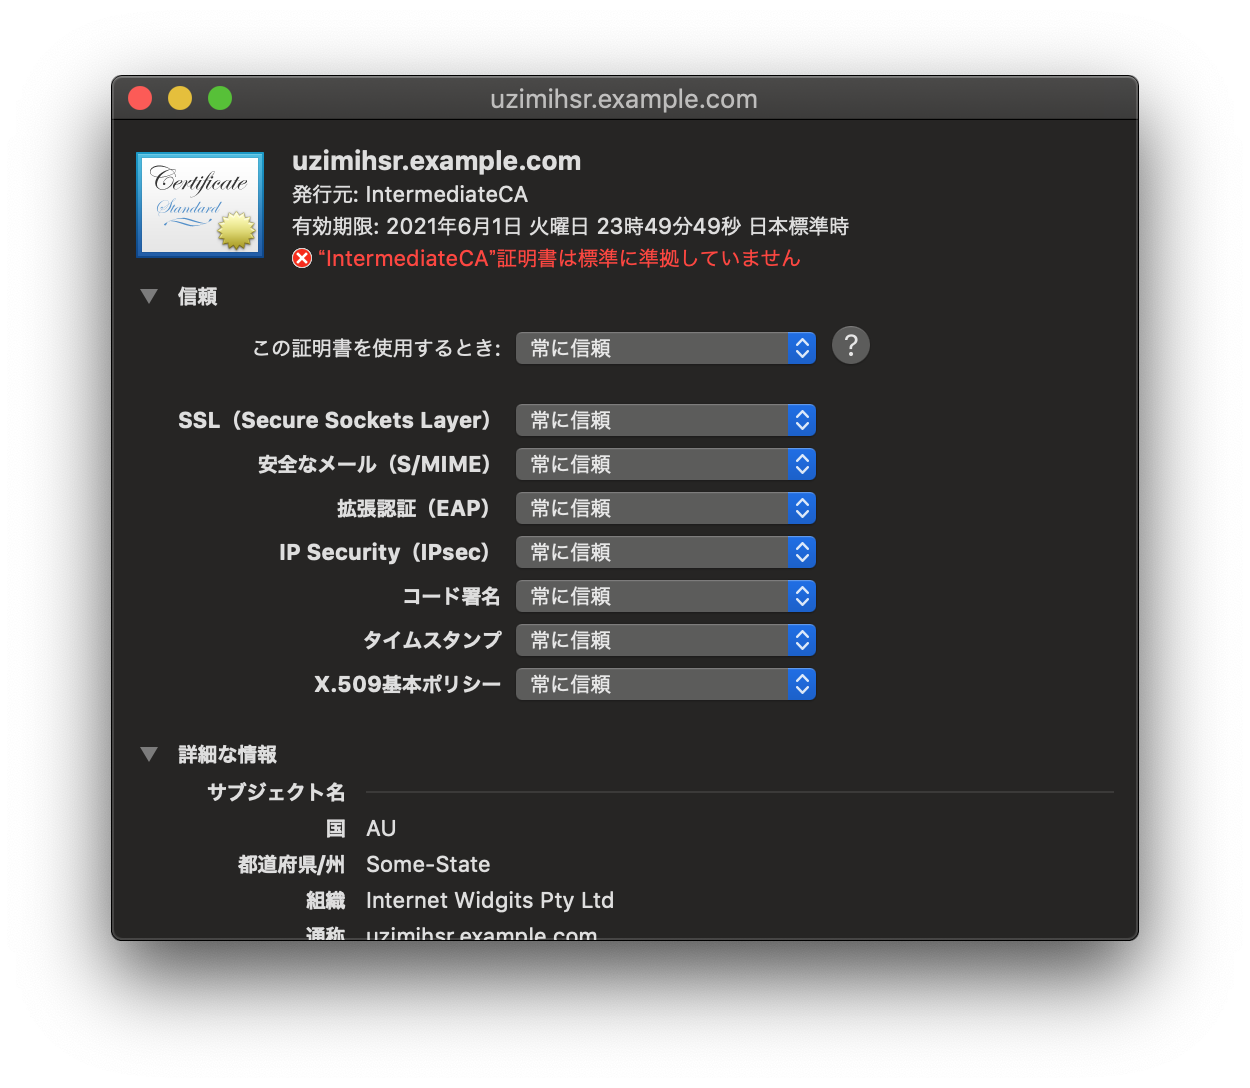
サーバー証明書をダブルクリックすると詳細画面が開くので,信頼->この証明書を信頼するときを常に信頼に変更してウィンドウを閉じる.
これでMacがこの証明書を信頼するようになった.
再度Macのブラウザで https://<ラズパイのIP>/ を開く.
今度はnginxのデフォルト画面が開けた.
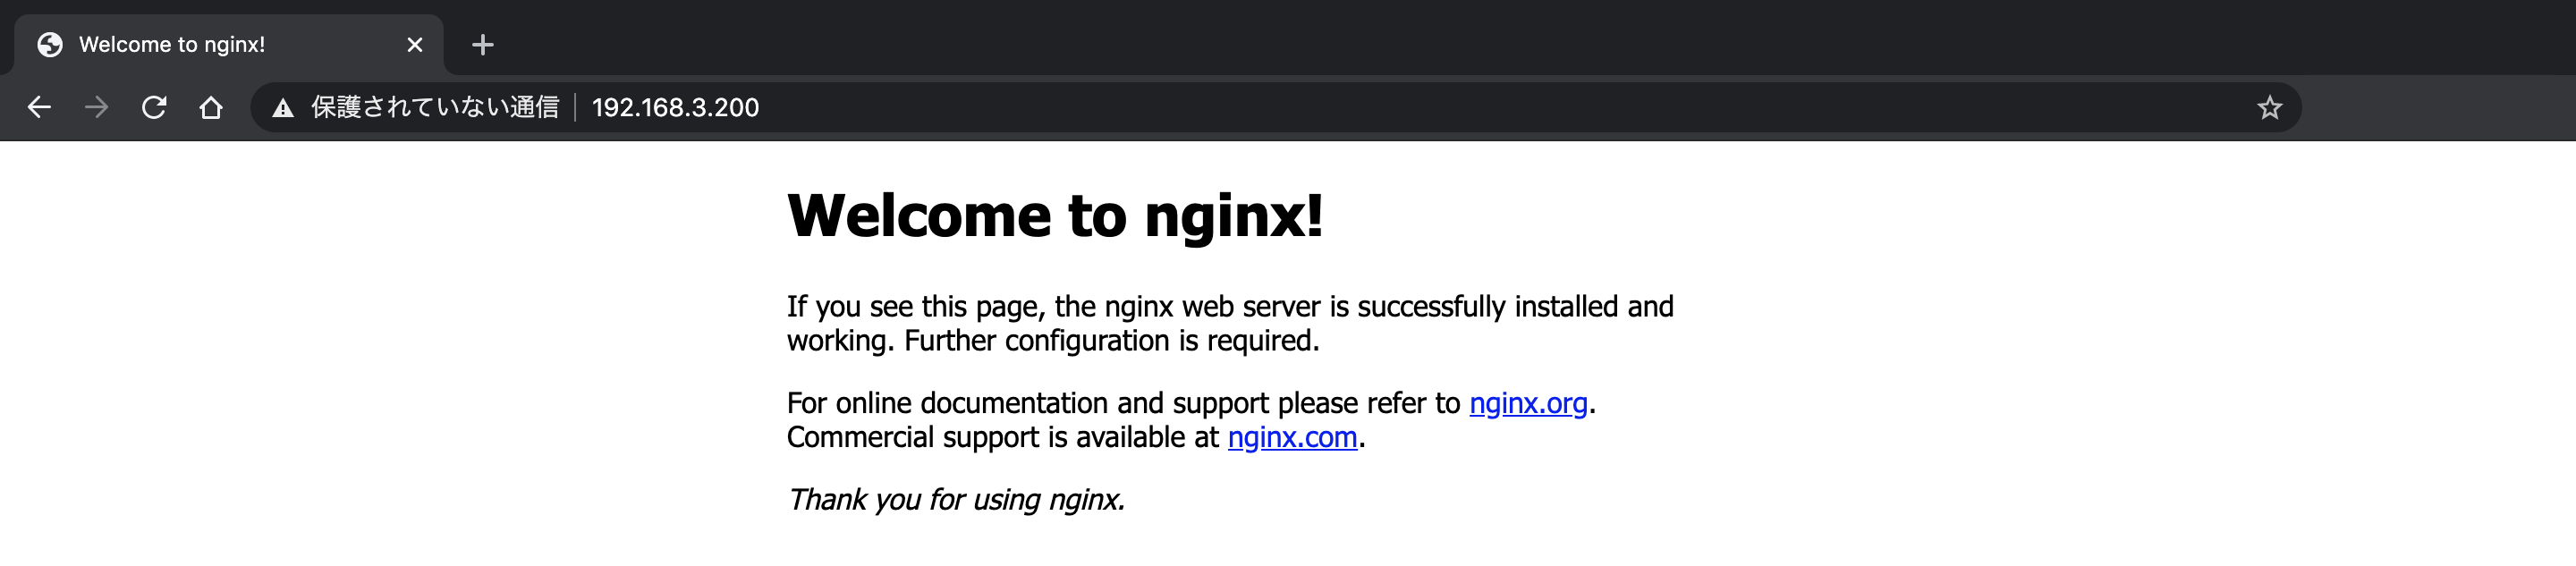
サーバー証明書を確認すると, 確かにこれが信頼されていることがわかる.
やったぜ.OpenSSLとnginxでHTTPSサーバーを建てることができた.
本当は他のHTTPSで提供されているサイトみたいにアドレスの左側に緑の鍵マークを表示させたいんだけど,Chromeはちょっと厳しくて発行時にCNだけじゃなくてSANsもちゃんと設定した証明書じゃないといけないらしい…
とりあえず今回はサーバー証明書の練習が目的だったのでここまでで終わりにする.
おわり
以上の手順でOpenSSLでサーバー証明書を作ってnginxにもたせてHTTPSサーバーを建てることができた.
時間とレンタルサーバーを借りるお金の余裕があれば,
無料で証明書を発行できるLet’s EncryptとかでちゃんとしたHTTPSサーバーを立ててみたい.
おまけ